
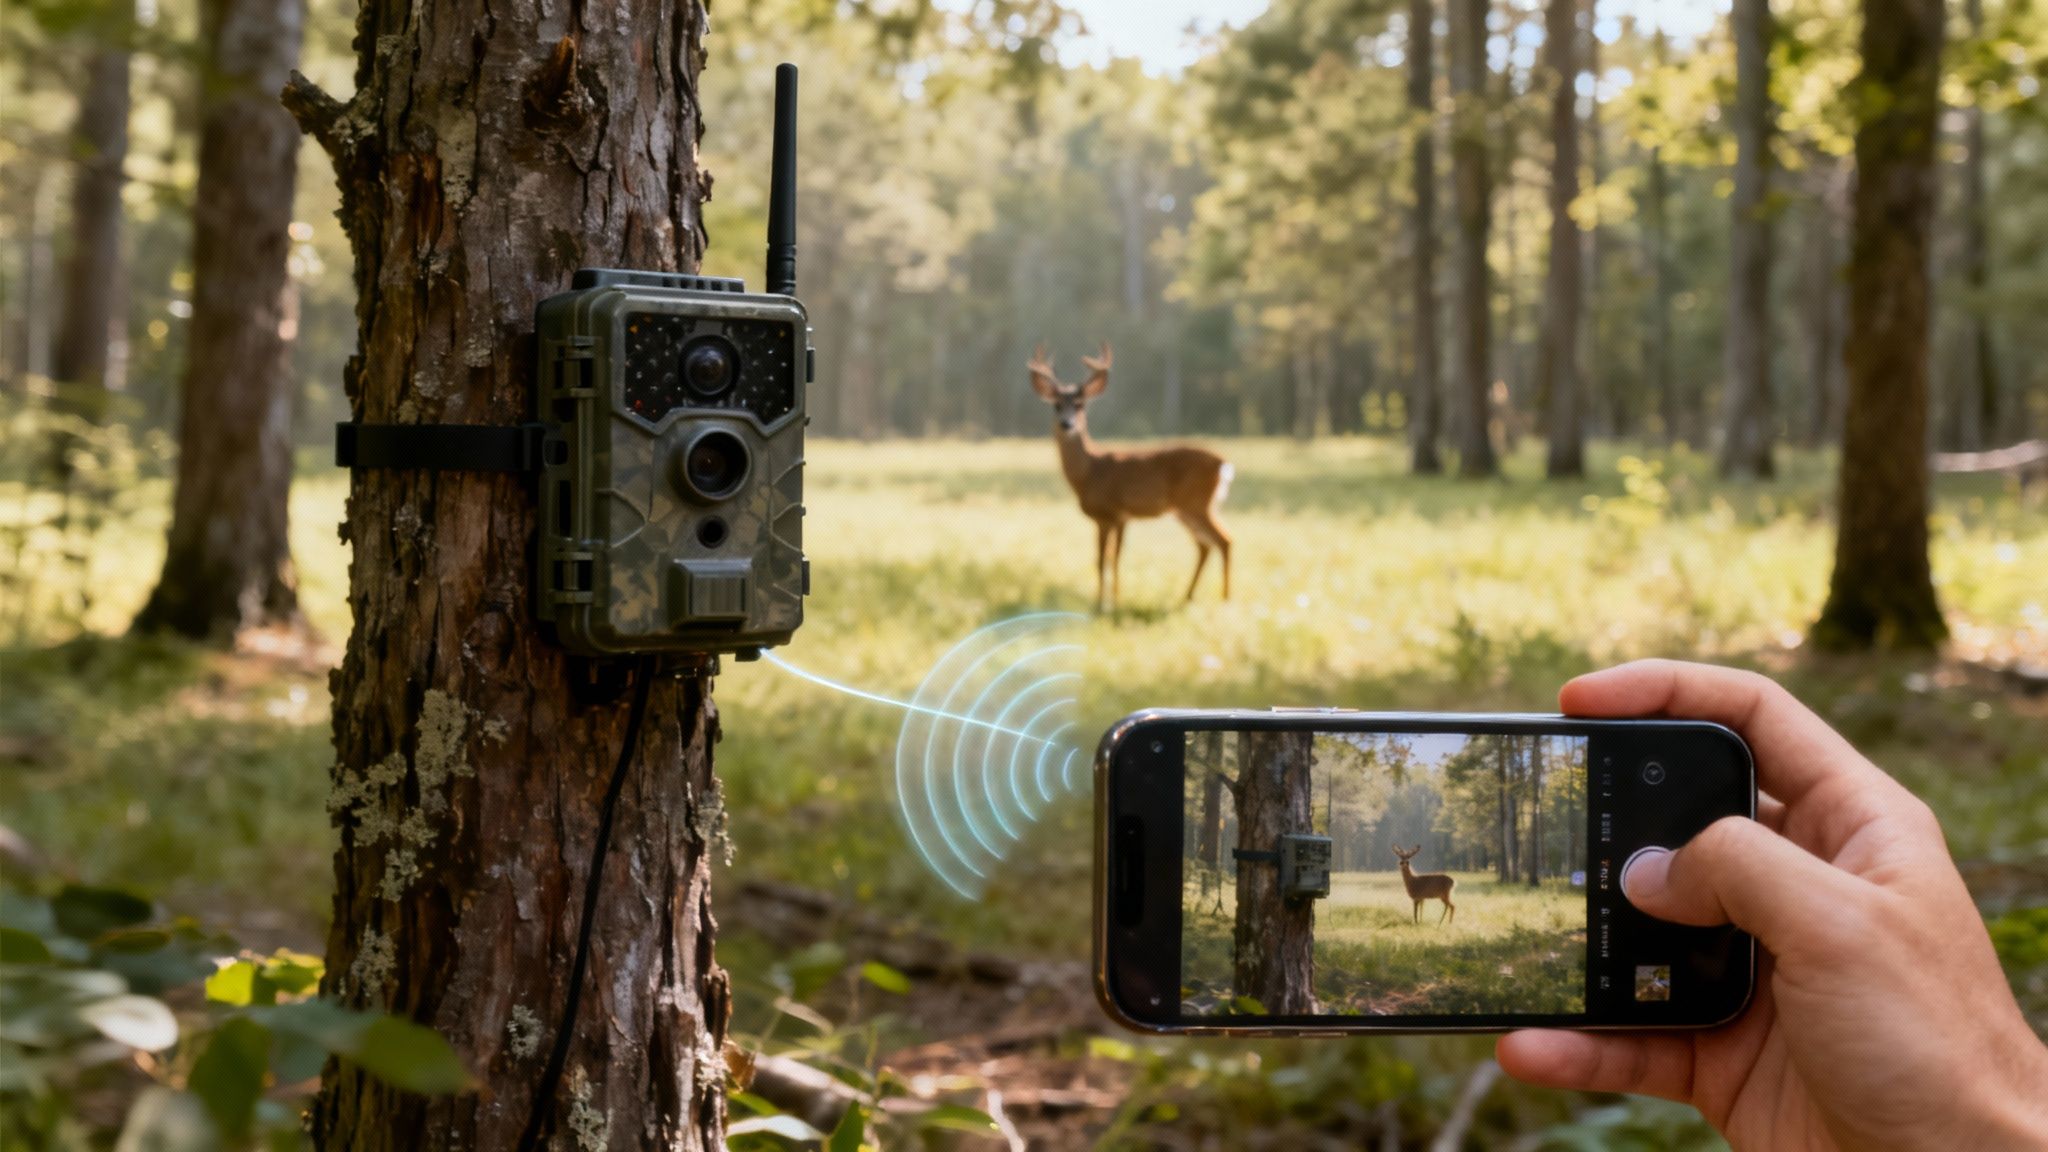
A trail camera with sim card is your secret weapon in the woods. Think of it as your own remote scout, instantly beaming photos and videos from deep in the field right to your smartphone. It’s like giving your camera a dedicated cell phone, letting it talk to you from miles away without you ever setting foot on the property.
How a Trail Camera With a SIM Card Works
At its heart, the technology is brilliantly simple. An animal walks past the camera, its motion sensor trips, and it snaps a picture or records a short video. Standard stuff, right?
But this is where the magic happens. Instead of just dumping that file onto an SD card for you to collect later, the camera uses its built-in cellular modem and SIM card to find the nearest cell tower—just like your phone does. It then shoots that data over the network (think Verizon or AT&T) to a secure server, which immediately pushes it to an app on your phone. All of this can happen in just a few seconds.
The Power of Instant Intel
The single biggest advantage of a trail camera with sim card is getting immediate information. The days of waiting weeks to pull an SD card, only to find you missed that monster buck, are over. This real-time feedback is an absolute game-changer for serious hunters and wildlife researchers alike.
This instant-intel capability is what’s fueling the massive growth in this space. The global trail camera market is on track to hit USD 192.53 million by 2032, and it’s almost entirely driven by the demand for wireless tech that delivers scouting data on the spot.
The core benefit is simple: you get vital information from your location without ever leaving a trace. This means less human scent to spook game and more natural, undisturbed wildlife observation for research.
Breaking Down the Process
To get a clearer picture of how it all works, let's look at the key components and their roles.
How a SIM Card Trail Camera Functions
This table quickly breaks down the key components and their roles, giving you an immediate understanding of how the technology operates in the field.
| Component | Its Role in Sending You Photos |
|---|---|
| PIR Sensor | Detects the body heat and movement of an animal, waking the camera up. |
| Lens & Imager | Captures the high-resolution photo or video clip. |
| SIM Card | Your camera's unique ID for the cellular network. |
| Cellular Modem | Connects to the cell tower, establishing a data link. |
| 4G/5G Antenna | Transmits the compressed image or video file over the air. |
| Cloud Server | Receives the file and routes it to your specific user account. |
| Smartphone App | Notifies you and displays the image, often within seconds. |
Understanding this sequence is the first step to truly mastering remote scouting. To dig deeper, check out our full guide on how cellular trail cameras work.
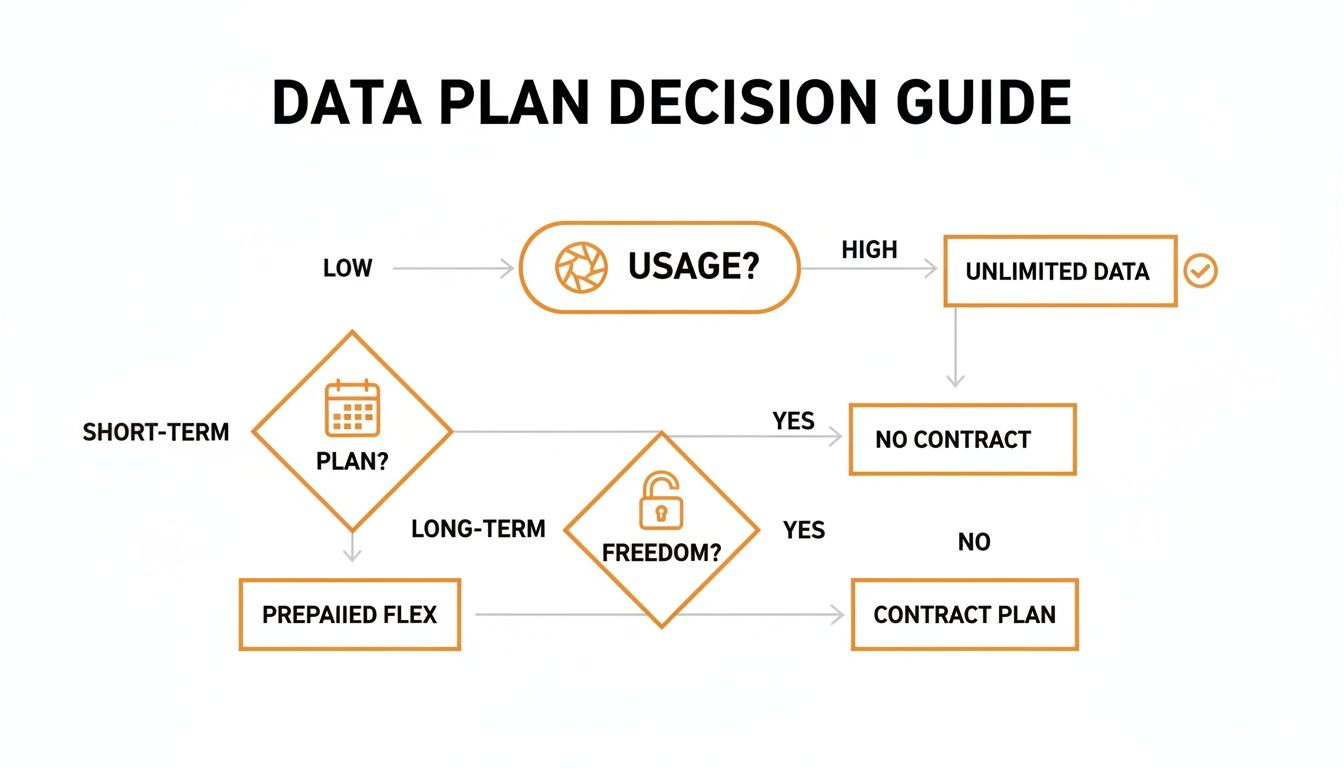
Navigating Cellular Trail Camera Data Plans
A cellular trail camera needs a data plan to send you pictures, just like your smartphone needs one to get on the internet. Think of it as the fuel that powers your camera's ability to communicate. Without a plan, your high-tech scout is effectively silent—it’ll still save images to an SD card, but it can't send them to you. Picking the right plan is a big deal for both performance and your wallet.
How much data your camera chews through depends entirely on how you use it. Sending low-resolution thumbnails uses a tiny sliver of data. On the other hand, transmitting full-size, high-resolution images or HD video clips will burn through it much, much faster. The frequency of alerts matters, too; a camera set to send photos instantly after every trigger will use way more data than one set to send a single daily report.
Understanding Plan Structures
When you start shopping around, you'll run into two main types of data plans. Each is built for different needs and usage patterns, so it’s important to know the difference.
- Pay-as-you-go: These plans are all about flexibility, often charging you based on the number of photos you receive or a specific amount of data used. They're perfect for spots with unpredictable animal activity or for seasonal use, like just during deer season.
- Monthly Subscriptions: This is the most common setup. You get a set number of photos or a data allowance for a fixed monthly fee. Plans usually come in tiers, so you can pick a package that lines up with how much action you expect at your camera site.
A common mistake is going all-in on a huge, unlimited plan right from the start. It’s almost always smarter to begin with a lower-tier plan—something that offers around 600-1,000 photos per month—and only upgrade if you find your camera is constantly maxing out. This simple strategy keeps you from overspending on data you just don't need.
Estimating Your Data Needs
So, how in the world do you know how much data you'll need? The trick is to make an educated guess about the activity level where you're placing your camera. A camera watching over a bait pile or a busy game trail is going to be sending a lot more photos than one monitoring a secluded scrape that only gets visited once a week.
Keep these factors in mind when choosing a plan:
- Photo Resolution: Are you okay with small thumbnails, or do you need full HD images sent to your phone? HD images can gobble up 10-20 times more data than their low-res cousins.
- Video Transmission: Sending even short video clips is the absolute fastest way to blow through your data allowance. If you plan on getting videos sent from the field, a larger plan is pretty much a necessity.
- Transmission Frequency: Do you need instant alerts the second a buck walks by, or is a once-a-day summary good enough? Setting the camera to batch-send photos once or twice daily can save a surprising amount of data.
For a much deeper dive into the specific options out there, check out our detailed comparison of the best cellular trail camera plans available today.
Locked vs. Unlocked Cameras
Finally, it’s critical to understand the difference between carrier-locked and unlocked cameras. A locked trail camera with sim card is built to work with only one specific carrier, like AT&T or Verizon. While that can make the initial setup feel simpler, it really limits your options if that carrier has spotty service in your hunting area.
Unlocked cameras, or the more modern all-in-one models, give you a ton more flexibility. They can connect to multiple networks and automatically pick the one with the strongest signal at that exact spot. This is a massive advantage in remote or hilly country where cell coverage can be all over the place, ensuring your camera stays connected and you keep getting your pictures.
Traditional SIM Cameras vs. Modern All-in-One Solutions
When you start shopping for a cellular trail camera, you’ll quickly find yourself at a fork in the road. There are two very different ways these cameras get connected.
The old-school path involves buying a camera that’s essentially a blank slate. It's on you to go out, purchase a separate SIM card from a provider like AT&T or Verizon, get it activated, and then try to make it all work together. It gives you some control, but it often comes with a whole lot of hidden headaches.
Then there's the modern, all-in-one approach. These cameras are built for pure simplicity, arriving with the cellular connection already baked in. Think of it like buying a new smartphone—it's designed to just work right out of the box, no need to wrangle with third-party cell companies or cross your fingers hoping your SIM card is compatible.
The Headaches of a Separate SIM
Going the separate SIM card route can feel a lot like a DIY project you didn't sign up for, complete with a steep learning curve. First, you have to play detective to figure out which SIM card is even compatible with your camera and the cellular network in your specific area. This can mean hours of online research, and even then, it's often a frustrating game of trial and error.
Once you finally have the card, the fun isn't over. You then have to activate it with the carrier and figure out how to link it to your camera. This part alone can be a technical nightmare, sending you down a rabbit hole of confusing online portals and long customer service calls just to get your gear online. And if the signal for that one carrier is weak where you set up? You're just out of luck.
The Simplicity of Integrated Connectivity
All-in-one solutions flip that script completely. Activation is usually a breeze, handled right inside the camera's mobile app in just a few minutes. Because the connectivity is already integrated, the manufacturer has done all the heavy lifting on the backend to make sure the system just works.
The biggest advantage of modern all-in-one cameras is their ability to eliminate network guesswork. Many of these devices are carrier-agnostic, meaning they can connect to multiple networks and automatically select the one with the strongest signal at your exact location. This is a crucial feature for reliability in remote areas.
This guide can help you visualize which approach makes the most sense for your needs.
As you can see, if you’re prioritizing maximum reliability and an easy, frustration-free setup, an integrated, all-in-one system is the clear winner.
See the key differences in user experience and performance between cameras that need a separate SIM and those with integrated, all-in-one connectivity.
Comparing Cellular Camera Technologies
| Feature | Traditional SIM Camera | All-in-One Camera (e.g., Magic Eagle) |
|---|---|---|
| Setup Process | Complex: Purchase SIM, activate with carrier, configure camera settings. | Simple: Activate within minutes through a dedicated app. |
| Network Carrier | Locked to one carrier (e.g., AT&T or Verizon). No flexibility. | Often multi-carrier; automatically finds and uses the strongest signal. |
| Reliability | Dependent on a single network's coverage at your location. | High reliability due to network switching; better for remote or fringe areas. |
| Data Plans | Managed through a third-party cell provider; can be confusing. | Managed directly with the camera manufacturer; plans are tailored for camera use. |
| Troubleshooting | Difficult: Is it the camera, the SIM card, or the cell carrier? | Easy: One point of contact for all support needs (camera and connectivity). |
| Best For | Users who need a specific carrier and don't mind technical setup. | Users who want a plug-and-play experience with maximum uptime. |
The takeaway is clear: while traditional SIM cameras offer a degree of manual control, all-in-one solutions deliver a far more reliable and user-friendly experience, which is what most of us are after in the field.
The Rise of Advanced Network Switching
This integrated technology has paved the way for powerful features like automatic network switching. These smarter systems are a big reason the cellular trail camera market is projected to hit USD 280 million by 2033. This growth is fueled by their sheer dependability, with some hunters reporting a 70% reduction in trips to their camera sites. This tech ensures the camera isn't stuck on a single, weak network, which dramatically improves the odds you'll get your photos without a hitch.
Advanced systems take this even further. For instance, you can learn more about how SignalSync technology works to keep cameras online by intelligently jumping between the strongest available signals. This is what turns your trail camera with sim card from a potential source of tech frustration into a truly dependable scouting tool.
Must-Have Features in a Cellular Trail Camera
Sure, the SIM card gives a cellular trail camera its voice, but a few other key features separate the truly great ones from the merely average. Think of these as your non-negotiables—the core specs that directly impact the quality of your scouting intelligence and the reliability of your entire setup.
Getting these right is the difference between capturing a perfect shot of that target buck and getting a blurry, useless image of its backside long after it's gone.
First up is always image and video quality. You'll want to look for cameras that offer high-resolution photos, ideally 30MP or higher, and capture at least 1080p video. These specs aren't just for showing off pretty pictures; high clarity lets you zoom in to identify specific animals, check antler growth, or spot other details you'd otherwise miss completely.
Performance in the Field
Just as critical is a camera's ability to see in the dark. The quality of its night vision, which is determined by the type and power of its infrared (IR) flash, dictates whether your nighttime images are crisp and well-lit or just dark, grainy messes. Check the camera's specified IR flash range—a range of 80 feet or more is a solid benchmark for covering open areas like food plots or fields.
The camera's sensor specs are equally important. A fast trigger speed—the time it takes from detecting motion to snapping the picture—is absolutely essential for capturing animals on the move. Look for speeds of 0.5 seconds or less to avoid a gallery full of animal tails leaving the frame. The detection range, which defines how far away the camera can sense motion, is the other half of this equation.
The real magic happens when a fast trigger and a long detection range work together. A camera that can detect an animal at 80 feet but only triggers once it's 20 feet away is missing crucial moments. Top-tier cameras align these two specs for peak performance.
Smart Technology and Longevity
Today's cameras are packed with smart features that go way beyond just taking a picture. Honestly, these tools are quickly becoming indispensable for efficient scouting.
- AI Species Recognition: This is a game-changer. It automatically filters your photos, sorting images of deer from those of raccoons or squirrels, saving you from countless false alerts.
- GPS for Theft Recovery: An integrated GPS lets you track your camera's location through the app, which is a lifesaver if it ever gets stolen.
- Live Streaming: The ability to tap into a live video feed on demand gives you immediate insight into what's happening at your spot, right now.
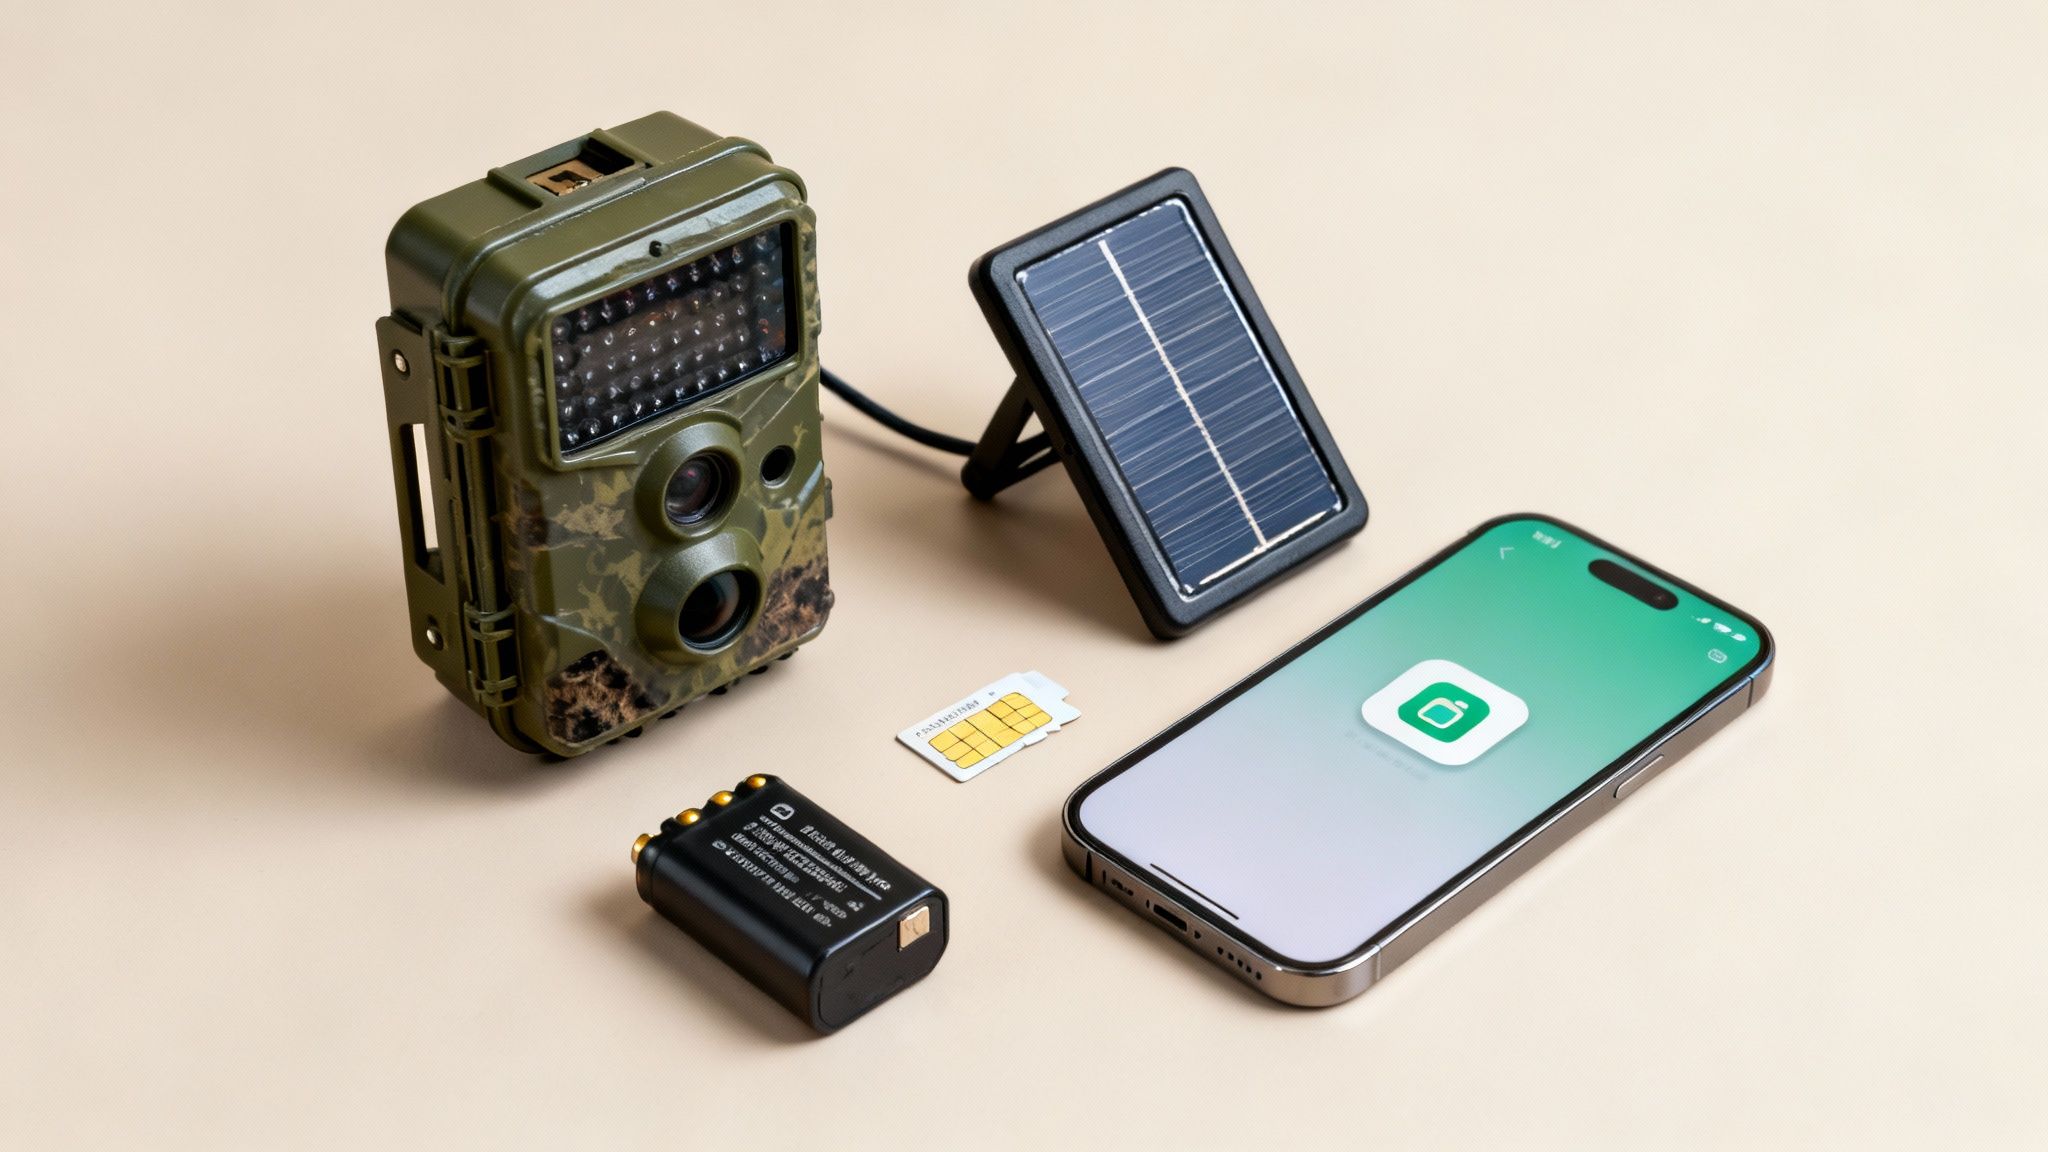
Finally, you have to think about power. A trail camera with sim card that dies in a week is useless. Look for models with long battery life, often supported by 16 AA batteries, and make sure it has a port for an external power source like a solar panel. This is absolutely key for any long-term, uninterrupted deployment.
The industry has come a long way since the early 2010s, with the market now valued in the billions. As detailed research on trail camera market growth shows, wireless models using SIMs really took off after 4G LTE became widespread, and features like high-megapixel sensors are now a major driver of sales.
Field Tips for Setup and Maintenance
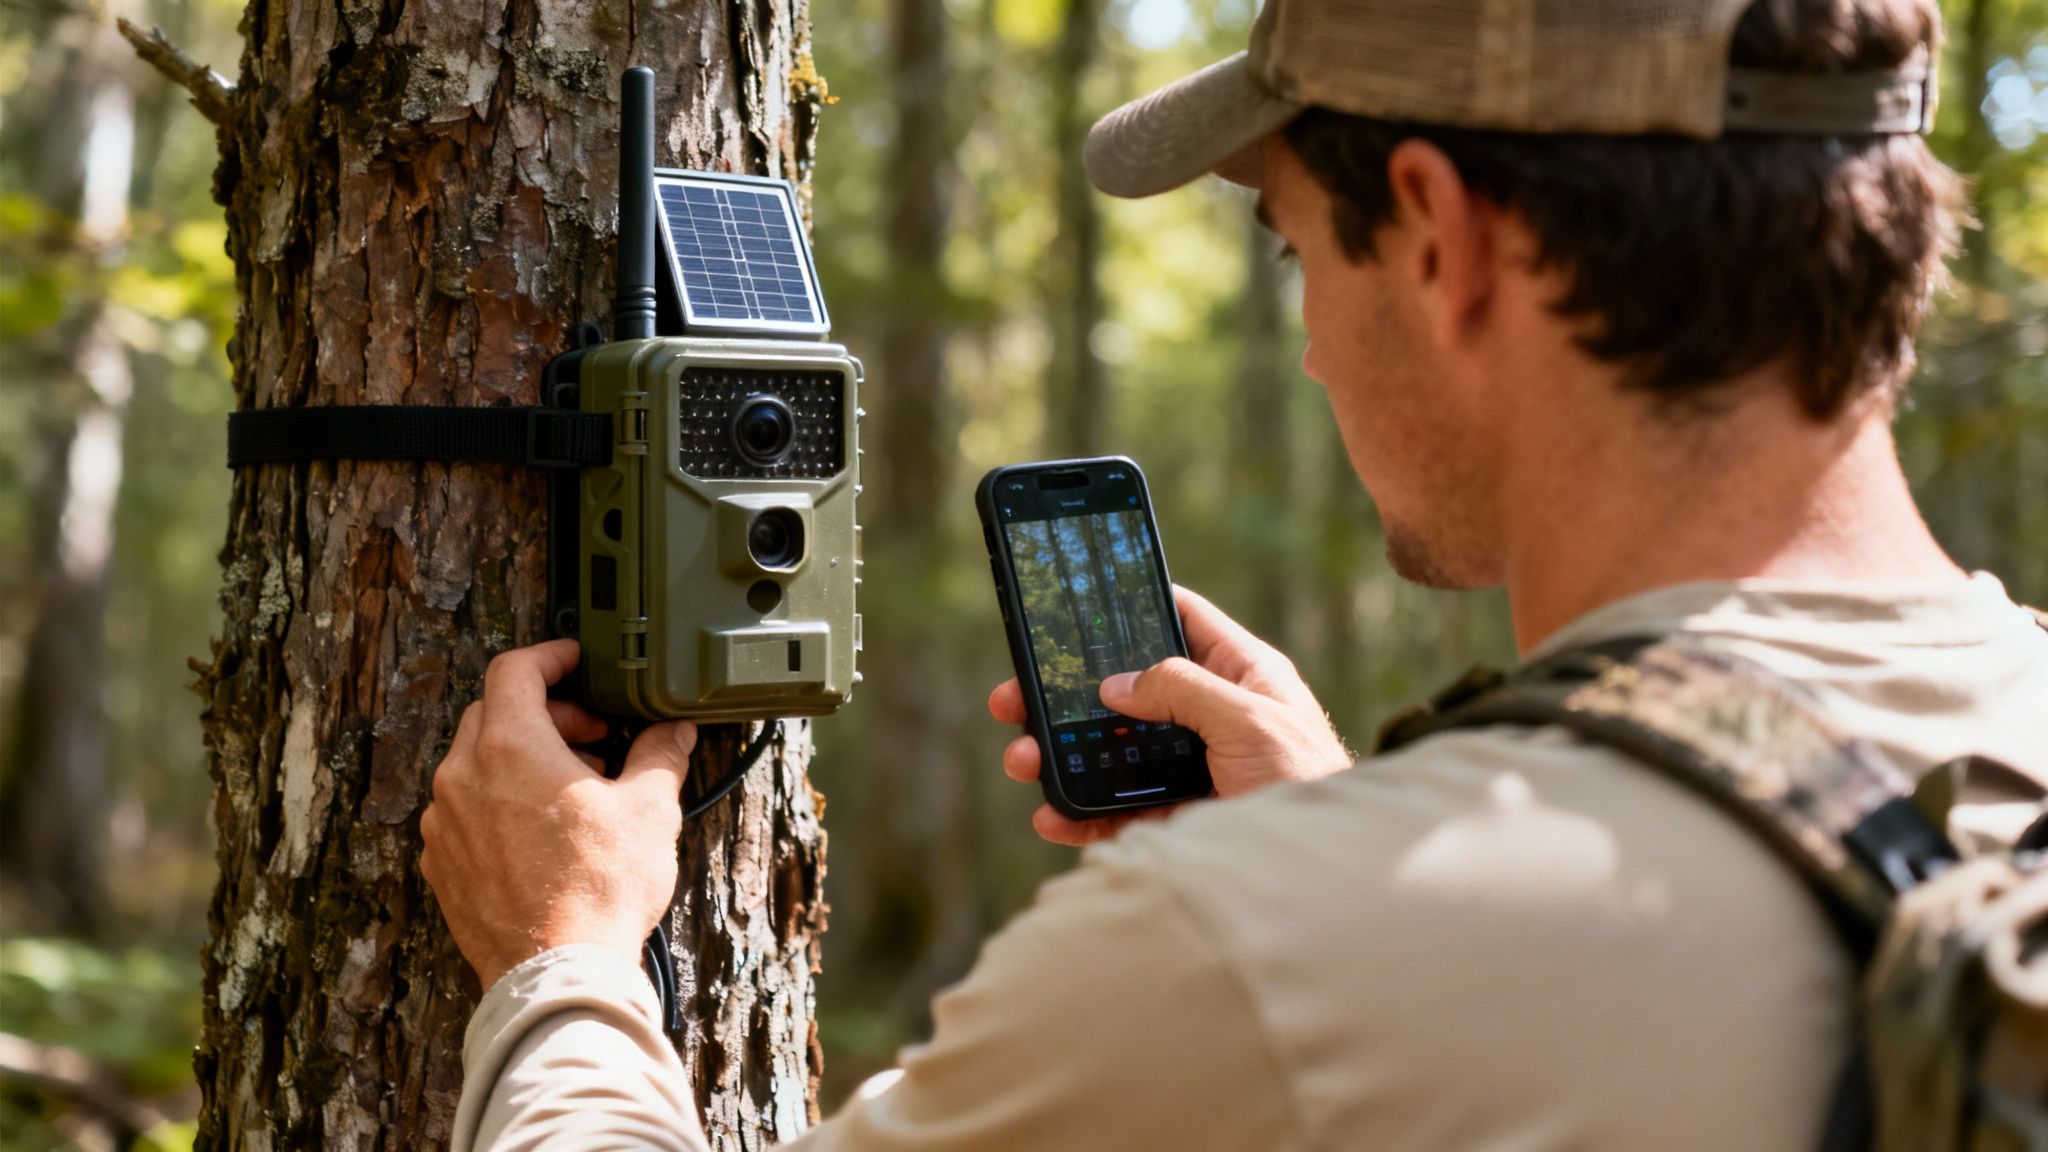
Owning a high-performance trail camera with sim card is only half the battle. A flawless field setup is what turns that potential into reliable intelligence day in and day out. Proper deployment and a little routine maintenance are the difference between getting clear shots and consistent pings, or just a bunch of blurry leaves and dead batteries.
The real work starts before you even step into the woods. Get your batteries fully charged and, this is important, format the SD card inside the camera itself, not on your computer. This makes sure the card is perfectly configured for your specific model. While you're still at home, activate the camera through its app, confirm the SIM is talking to the network, and snap a few test photos. Trust me, you want to iron out any kinks in your living room, not miles from civilization.
Achieving the Perfect Placement
Finding the right spot and angle is an art form. The goal is to capture clear, well-framed images of whatever you're tracking while making the camera virtually disappear into the environment.
- Height and Angle: A good rule of thumb is to position the camera about three to five feet off the ground. Aim it slightly downward—this helps capture the animal's entire body and cuts down on sky-related glare that can trigger false positives.
- Facing Direction: Whenever you can, face the camera north or south. This simple trick prevents the rising or setting sun from blowing out your images with lens flare.
- Clear the View: Trim any small branches, tall weeds, or leaves hanging right in front of the lens. Wind-blown foliage is the number one cause of false triggers, which absolutely demolishes your battery life and eats up your data plan.
Once you’ve found the perfect spot, pull out your phone and use the app to check the cellular signal strength before you walk away. A weak signal means you'll get delayed transmissions, or none at all. Sometimes, moving the camera just 10 or 15 feet to one side can make a huge difference, especially in hilly terrain.
Remember that the camera's antenna is its lifeline. Ensure it is screwed on securely and positioned vertically for the best possible reception. A loose or improperly angled antenna is a common and easily fixed reason for poor connectivity.
Maintaining Your Camera for Longevity
Long-term deployment means you'll need to do periodic check-ups to keep your camera running smoothly. These simple maintenance steps can head off common failures and seriously extend the life of your investment.
- Battery Management: For deployments lasting more than a few weeks, an external solar panel is a game-changer. It dramatically lengthens field time and is almost essential for high-traffic areas. Always start with a fresh set of high-quality lithium batteries, as they hold up way better in extreme hot and cold weather.
- Lens and Sensor Care: Before you leave the site, give the camera lens and PIR sensor a gentle wipe with a soft, clean microfiber cloth. It’s amazing how easily a little dirt, dust, or a few water spots can ruin an otherwise perfect shot.
- Firmware Updates: Every so often, check the manufacturer's app for firmware updates. These updates often include performance tweaks, bug fixes, and even new features that keep your trail camera with sim card operating at its peak.
Following these field-tested tips will help you sidestep the most common frustrations and ensure your camera is a reliable scout, season after season.
Answering Your Top Questions About SIM Card Trail Cameras
Even after you've got the basics down, a few practical questions always come up before pulling the trigger on a trail camera with a SIM card. Getting these sorted out will give you the confidence you need to pick the right camera for what you're trying to accomplish out in the field. Let's tackle the most common ones.
Can I Just Use My Own SIM Card in Any Trail Camera?
This is probably the biggest point of confusion, and the short answer is almost always no. Most older or entry-level cellular cameras are "carrier-locked," meaning they're hardwired to work with a single provider like AT&T or Verizon. Pop in a SIM from another network, and you'll get nothing.
While you might find a rare "unlocked" model, they can be a real headache to configure correctly. Honestly, the best and most user-friendly solution today is an all-in-one camera. These modern units come with the connectivity baked right in, often using multi-carrier technology that automatically sniffs out and locks onto the strongest local signal. It completely sidesteps the hassle of buying, activating, and troubleshooting a separate SIM card.
How Much Data Does a Cellular Trail Camera Actually Use?
Data consumption is all over the map—it really depends on your settings and how busy your camera's location is. Think of it like a faucet; you have total control over the flow.
- Low Usage: Sending just low-resolution thumbnails barely sips data.
- High Usage: Requesting full-resolution, high-megapixel photos or, especially, HD videos will burn through data much faster.
As a rough benchmark, a plan that allows for 1,000 photos will typically use about 1GB of data. Most camera providers structure their plans by photo count, which makes it pretty simple to choose. My advice? Always start with a lower-tier plan. You can easily upgrade if you find yourself constantly hitting the limit.
What Happens If My Trail Camera Loses Its Cellular Signal?
A temporary signal drop doesn't mean your camera is dead in the water. If the connection fails, the camera just reverts to behaving like a standard, non-cellular model. It will keep detecting motion and saving every photo and video it takes right onto its SD card.
Once the cellular connection comes back online—whether it’s a few minutes or a few hours later—the camera will get to work sending you the backlog of images it saved.
This is where those advanced multi-carrier cameras really shine. They are built to minimize these outages by automatically hopping between different networks to maintain the strongest possible connection. For anyone who depends on timely intel from a remote spot, this is a game-changing feature.
Are Cellular Trail Cameras Really Worth the Extra Money?
For most serious hunters, researchers, or anyone managing a remote property, the answer is a firm yes. You aren't just paying for a camera; you're paying for real-time information. That monthly subscription is an investment in convenience, time savings, and better outcomes.
Think about the gas and time you save by not having to drive out just to pull an SD card. Even more important for hunters, it drastically reduces the human scent and pressure you leave in a sensitive area, which means you get to see more natural animal behavior. Whether you're scouting for a target buck, keeping an eye on your cabin, or studying wildlife, the immediate intel from a cellular camera makes it a truly worthwhile investment.
Ready to get real-time intel from the field without the hassle? Magic Eagle offers all-in-one cellular trail cameras with built-in multi-carrier connectivity, AI species recognition, and GPS anti-theft protection.