
The secret to jaw-dropping trail camera footage often has less to do with the camera itself and more to do with a rock-solid, perfectly positioned stand. The right trail camera stands are what provide the stability, angle, and concealment you need to capture clear, consistent, and genuinely useful insights into wildlife behavior. It's all about matching the stand's design to your specific terrain and what you're trying to accomplish.
Decoding the Best Trail Camera Stands for Your Needs
Choosing the right trail camera stand is the first, most critical step for successful wildlife monitoring. Your choice directly impacts the quality of your images, the security of your expensive gear, and your ability to adapt on the fly. A dense hardwood forest full of trees is a totally different ballgame than a wide-open food plot with no natural mounting points. Each scenario demands a unique solution.
The goal here is to get past just strapping a camera to the nearest convenient tree. We need to think strategically to get optimal results. It's a balancing act between portability, stability, and versatility. A hunter tracking a specific buck through a thicket has different needs than a researcher monitoring a remote watering hole. Understanding the fundamental types of stands is the key to making a smart choice that saves you time, frustration, and money down the road.
Comparing the Core Types of Mounts
Let's break down the most common options you'll find out there. Each one has its own set of strengths and weaknesses depending on where you're setting up.
-
Strap/Bungee Mounts: These are the old standbys, often included right in the box with your camera. They're simple, light, and get the job done in areas with plenty of straight, perfectly sized trees. Their biggest drawback? You get almost zero angle adjustment. You’re completely at the mercy of how that tree is growing.
-
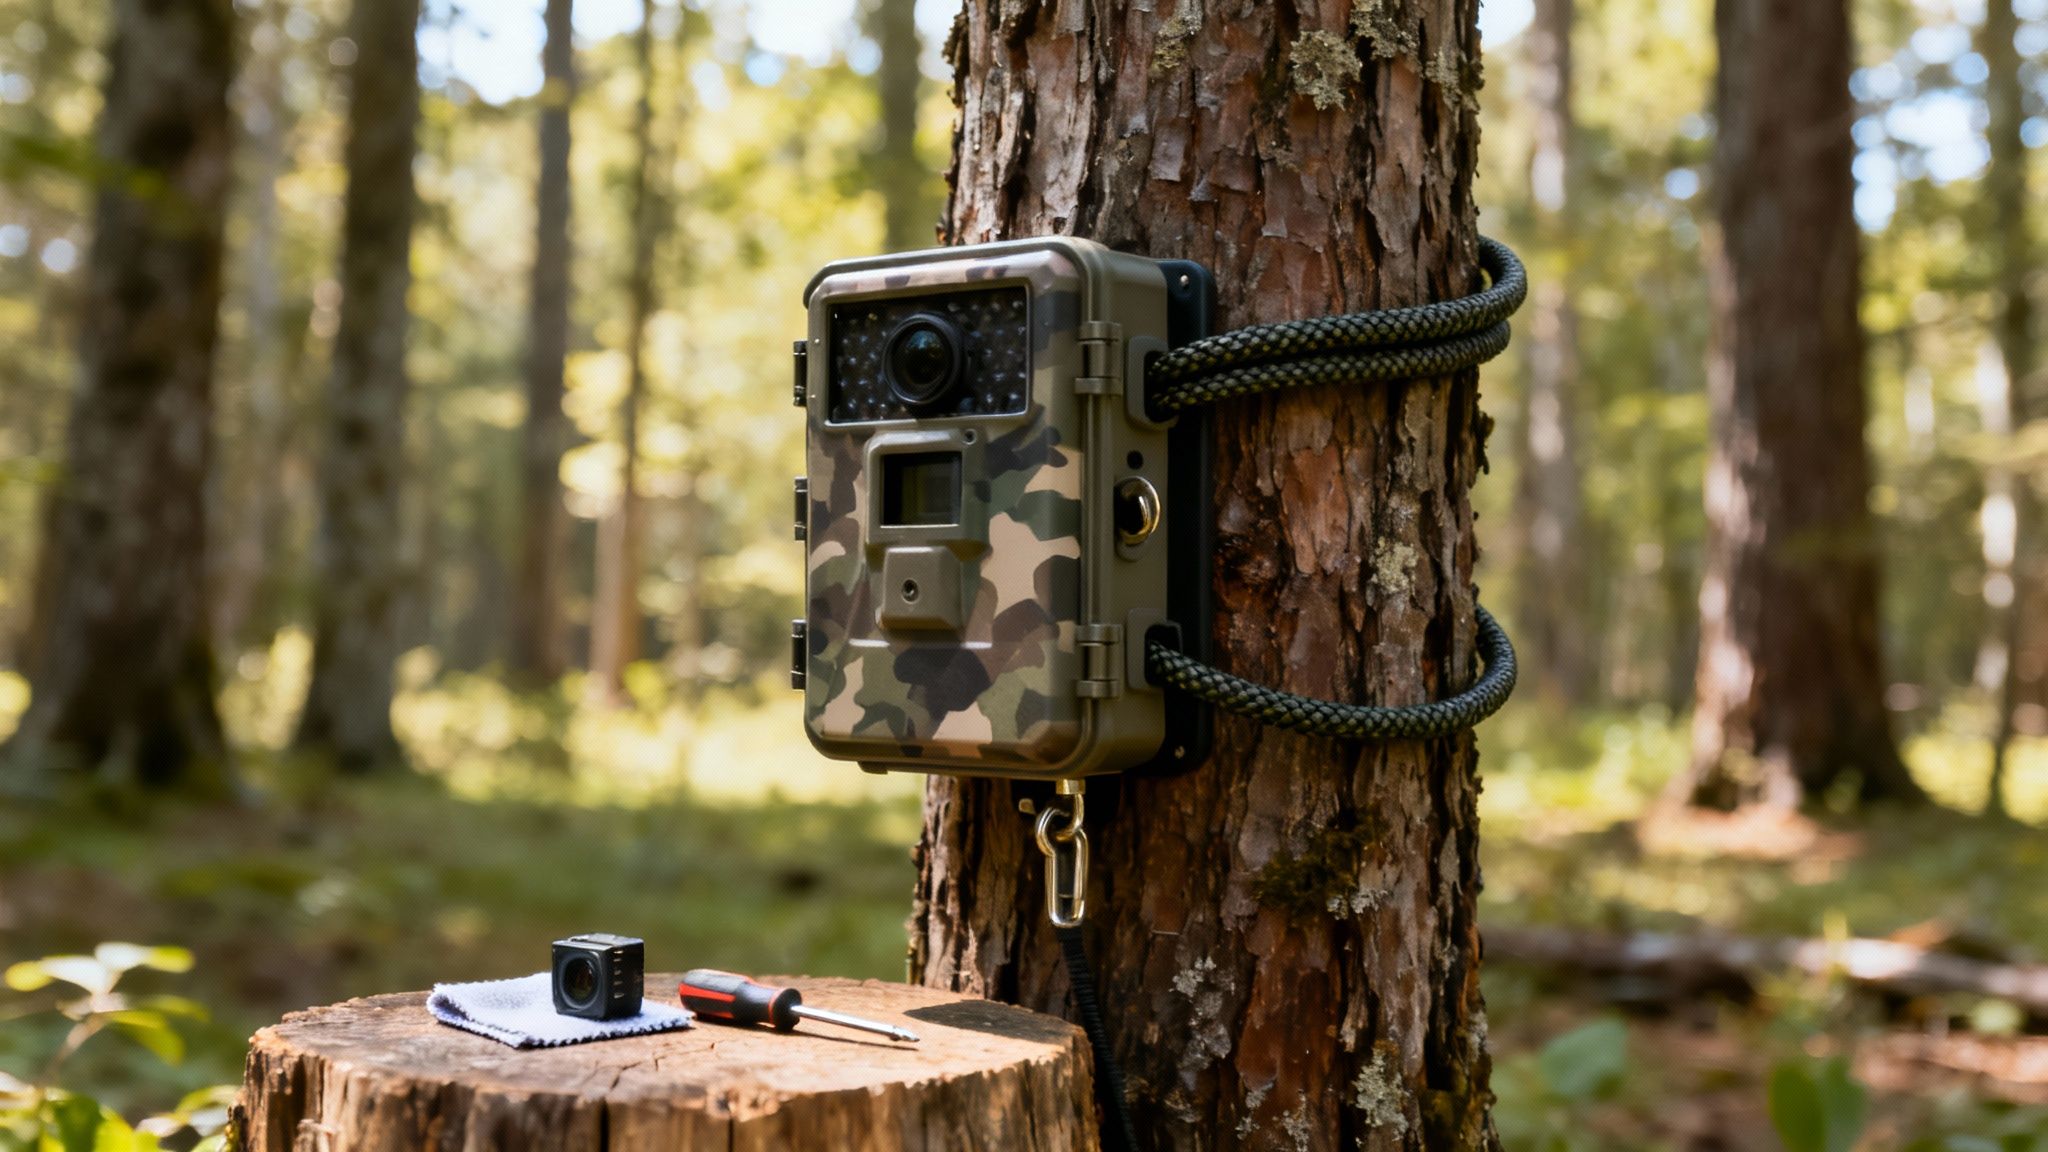
Screw-In Mounts: For a lot more flexibility, these mounts screw directly into a tree. This gives you a super sturdy base with fantastic angle articulation—you can pivot and tilt the camera exactly where you need it. The downside is that they do cause minor damage to trees and are often prohibited on public land.
-
T-Post Mounts: These are an absolute game-changer for open fields, fence lines, or food plots where trees are a luxury you don't have. The mount attaches to a standard T-post that you drive into the ground. They give you total freedom of placement, but you do have to lug that post in and hammer it down.
-
Tripods and Ground Stakes: As freestanding options, these offer the ultimate versatility. Tripods are brilliant for rocky, uneven terrain, while ground stakes give you a sneaky, low-profile setup for monitoring trails right at ground level. Their main weakness can be stability, especially when the wind kicks up or the soil is soft.
The explosive growth in wildlife monitoring has really pushed innovation in these accessories. The global trail camera market was valued at around USD 101.7 million in 2022 and is projected to soar past USD 1,420 million by 2032. This boom shows just how much demand there is for more effective scouting tools, including better stands.
Pro Tip: Don't paint yourself into a corner with just one type of stand. I always keep two or three different types in my pack. That way, I can adapt to any situation I run into out in the field.
Making the Right Choice for Your Environment
Your specific location is the single biggest factor in this decision. If you’re hunting a mature oak forest, a simple screw-in or strap mount will probably be all you need. But if your prime scouting area is a CRP field or open prairie, a T-post mount becomes non-negotiable. For those tricky spots along creek beds with soft banks, a tripod or a heavy-duty ground stake can provide stability where a tree is just not an option.
Don't forget to think about your target species, too. A low-to-the-ground stake might be the perfect ticket for capturing footage of turkeys or coyotes. On the other hand, placing your camera higher up on a T-post can give you a much better vantage point for patterning deer moving through a bean field.
To really get the most out of your setup, you have to pair a quality stand with a dependable camera. Our detailed review of the https://magiceagle.com/blogs/knowledge/best-trail-cameras-for-hunting can help you pick a device that's worthy of your new stand. A perfectly positioned mount deserves a high-performance camera, after all. And while you're at it, consider other essential hunting gear that can round out your setup in the field.
To make things a little easier, here's a quick table to help you compare your options at a glance.
Comparison of Trail Camera Stand Types
This table breaks down the most popular types of trail camera stands, showing you where they shine and what their limitations are. Use it to quickly pinpoint the best option for your next setup.
| Stand Type | Best For | Pros | Cons |
|---|---|---|---|
| Strap Mount | Areas with abundant, straight trees; quick setups. | Lightweight, non-damaging, easy to install. | Limited angle adjustment; dependent on tree availability. |
| Screw-In Mount | Precise camera angles; semi-permanent setups. | Very stable, highly adjustable, secure. | Damages trees; may be illegal on public lands. |
| T-Post Mount | Open fields, food plots, fence lines; treeless areas. | Place anywhere, very sturdy, consistent height. | Requires carrying and installing a heavy post. |
| Tripod/Stake | Uneven ground, low-angle shots, temporary placement. | Highly portable, versatile, precise positioning. | Can be less stable in wind or on soft ground. |
Ultimately, having the right stand in your pack makes all the difference. It turns a good spot into a great one and ensures you're not missing that crucial shot because your camera was pointed just a few degrees off.
How to Install and Position Your Camera Mount
You’ve picked out the right trail camera stand. Now comes the fun part—getting it set up in the field. This is where the magic happens, and proper installation is what separates grainy, useless photos from clear, actionable intel on game movement.
Getting this right isn't just about screwing a mount into a tree. It's about turning your camera into an invisible scout that captures full-body shots, avoids thousands of false triggers from windblown branches, and stays hidden from wary bucks and potential thieves.
This simple visual breaks down the core decision-making process for choosing a spot.

The big takeaway here? Your setup strategy should always start with the environment before you even think about the specific animal you're after.
Finding the Sweet Spot for Height and Angle
One of the most common mistakes I see is mounting a camera at human eye level. For deer and most other game, the ideal height is somewhere between 3 to 4 feet off the ground. This gives you a natural, broadside perspective that’s perfect for identifying individual animals and judging antler size.
- Too Low: Anything below 3 feet, and you risk getting your view blocked by tall grass, ferns, or a bit of snow. It also creates a weird, upward-facing angle on bigger animals.
- Too High: Mounting a camera way above 4 feet results in a steep downward angle. While that can be a good trick for security, it makes it nearly impossible to properly size up a buck.
The angle is just as critical. You almost always want the camera pointed slightly downward, never parallel to the ground. This simple adjustment helps capture more of the animal and, just as importantly, reduces the chances of sun glare washing out your images or creating false triggers.
A great rule of thumb is to aim your camera where you think a deer's chest would be as it walks past. This ensures both the motion sensor and the lens are focused right on the money.
Mastering Sun Direction and Concealment
The sun is your worst enemy out there. A camera pointed directly east or west is a recipe for disaster. The rising and setting sun will blast right into the lens, overexposing your pictures and triggering the motion sensor constantly with the rapid temperature changes.
Always try to aim your trail camera stands north or south. This simple habit keeps the sun out of the frame all day long, giving you consistent lighting and cutting down on those annoying false triggers.
Concealment is next on the list. A camera sticking out like a sore thumb will get noticed by mature bucks and other cautious critters.
- Use the trunk of a larger tree to break up the camera's silhouette.
- Try tucking your setup behind a cluster of saplings or some brush, just make sure your lens has a clear view.
- If you're using a T-post mount in an open field, let some tall grass grow up around the post to help it blend in.
For anyone just getting started, our complete guide on how to set up a trail camera is a fantastic place to build a solid foundation for these more advanced techniques.
The All-Important Walk Test
Never, ever leave a new camera setup without doing a "walk test." It’s a five-minute check that confirms your camera's detection zone is exactly where you need it to be. Most modern cameras have a test mode where a little light blinks when it senses motion.
Switch on the test mode and walk in front of the camera, right where you expect the deer to be. Weave back and forth across the trail, paying close attention to where that light starts flashing. This tells you the exact edges of your detection zone. If it’s triggering too soon or too late, just tweak the angle until you've got the trail perfectly covered. It’s a simple step that can save you from weeks of missed opportunities.
Building Your Own DIY Trail Camera Stand
While grabbing a commercial trail camera stand is convenient, there’s a special kind of satisfaction—and a ton of flexibility—that comes from building your own. A custom DIY stand lets you solve for your exact terrain, often for just a few bucks. Better yet, you can tailor it perfectly for height, stability, and portability.

Whether you’re a seasoned woodworker or just comfortable with a few basic tools, you can pull these projects off. We’ll walk through a few field-tested designs that are as effective as they are simple. These homemade solutions can crack placement puzzles that off-the-shelf products just can't touch.
Simple Rebar and PVC Ground Stake
For a cheap, fast, and surprisingly rugged option, the rebar and PVC ground stake is tough to beat. I love this one for setting up in soft soil along field edges or creek beds where I need a low-profile mount that blends in. This design is all about simplicity.
Materials You Will Need:
- One 3-foot section of 1/2-inch rebar to act as your anchor.
- One 4-foot section of 1.5-inch PVC pipe to form the main post.
- One 1/4"-20 hanger bolt, about 2 inches long. This matches the standard threaded insert on most cameras.
- Two 1/4"-20 nuts and washers to lock the camera in place.
- PVC primer and cement.
Putting it together couldn't be easier. First, hammer the rebar about 18 inches into the ground right where you want your camera. Next, drill a hole through your PVC pipe roughly 6 inches from the top. Push the hanger bolt through and secure it tightly with a nut on each side.
To finish, just slide the PVC pipe directly over the rebar. You’ll find it’s a snug, stable fit that’s ready for your camera in minutes.
The Versatile Wooden Post Mount
If you're looking for something a bit more robust and permanent, a wooden post mount is an excellent choice. This design gives you unmatched stability, making it perfect for long-term monitoring stations over food plots or mineral sites.
This build takes a little more effort, but the payoff is a rock-solid platform that won't budge. Start with a standard 4x4 pressure-treated post, cut to whatever height you need (usually 4-5 feet is plenty). For maximum stability, dig a hole and set the post with concrete. If you need it to be a bit more portable, you can create a sturdy base using crossed 2x4s.
A mount is only as good as its construction. If you're serious about crafting custom gear that lasts, a good guide to choosing the best screws for woodworking is worth its weight in gold. Getting the hardware right is key to a build that can handle the elements.
The Innovative Bucket Mount for Unstable Ground
What about setting up in a swamp, a marsh, or on that super-soft, sandy soil where nothing seems to hold? This is where the bucket mount really shines. It’s a clever workaround that creates a wide, stable base exactly where a simple stake would just tip over.
The concept is incredibly effective and easy to execute.
- Grab a 5-gallon bucket and a bag of quick-setting concrete mix.
- Stick your chosen post in the center of the bucket. A 4x4 wooden post or even a large-diameter PVC pipe works great for this.
- Mix and pour the concrete into the bucket. Use a level to make sure your post is perfectly vertical while the concrete sets up.
Once it's cured, you have a heavy, self-contained base that won't tip or sink in soft ground. For extra concealment, you can use surrounding mud, leaves, or vegetation to hide the bucket. This rig lets you put a camera in spots others can’t, giving you a serious advantage. A quick coat of outdoor paint will help it last for seasons to come.
Advanced Placement Strategies for Any Terrain
Getting the shot is all about thinking like the animal you're after. It's less about the camera and more about prediction—using the lay of the land to put yourself in the right place at the right time. You have to move past the obvious spots and learn to read the subtle clues that tell you how wildlife really moves through an area.
Successful scouting isn’t about just finding any trail; it’s about finding the right part of that trail. The tactics that work in a thick hardwood forest are totally different from what you'd do in an open field or a swampy river bottom. Each environment plays by its own rules, and the key to getting consistent, high-quality images is knowing how to adapt.
Targeting Whitetail Hotspots
For most of us, whitetail deer are the main event. The good news is their behavior is pretty predictable if you know what to look for, which makes smart camera placement incredibly rewarding. You need to get beyond the big, obvious trails and zero in on the spots where deer are likely to stop, linger, or intersect.
-
Mineral Licks and Scrapes: These are natural gathering spots for a reason. Setting up a camera overlooking a mineral site or a fresh scrape line during the pre-rut is a surefire way to get an inventory of the local bucks. If there isn't a good tree nearby, a T-post mount is perfect for getting the ideal angle.
-
Food Plot Edges: Don’t just point your camera blindly into the middle of a food plot. Instead, hang your trail camera stands on the main trails leading into and out of the plot. This is how you pattern specific bucks, learning when and where they prefer to show up for dinner.
-
Pinch Points and Funnels: These are the absolute gold mines of deer scouting. Look for anywhere the terrain naturally squeezes deer movement into a tight corridor. It could be a skinny strip of woods between two fields, a saddle connecting two ridges, or a corner where a fence line pushes them through. These spots dramatically boost your odds of capturing every deer passing through.
Scouting Elusive Predators and Other Game
When you're after coyotes, bobcats, or bears, the game changes. These animals are often more cautious and incredibly sensitive to anything that seems out of place. Your placement has to be much more subtle and deliberate.
Coyotes and bobcats, for instance, love using creek crossings and dry ditches as hidden travel corridors. A low-profile ground stake mount tucked away near a crossing can be ridiculously effective. For bears, your best bet is to focus on the thick cover leading to known food sources, like a good berry patch or an oak flat that's dropping acorns.
This isn't just hunter's intuition; the science backs it up. Camera arrays have become a vital tool in modern wildlife research, helping professionals track everything from population density to migration patterns. You're basically using the same proven techniques in your own backyard. You can learn more about the impact of cameras in wildlife studies and see how the pros do it.
Adapting to Different Terrains
The environment dictates everything. A one-size-fits-all approach just won't cut it, so you need a flexible game plan—and the right gear to pull it off.
Dense Forests
In thick woods, you can’t see very far. Your best bet is to focus on junctions where multiple trails come together. A screw-in mount is your best friend here, as it lets you make tiny adjustments to the camera's angle, aiming it perfectly down a narrow trail or shooting lane.
Open Prairies and Fields
Out here, T-post mounts and freestanding tripods are non-negotiable. With no trees to work with, these trail camera stands give you the freedom to set up anywhere you want. Position them overlooking watering holes or along the edges of cover where you expect animals to step out at dawn and dusk.
Wetlands and River Bottoms
Swampy, soft ground makes traditional mounting impossible. This is where a DIY bucket mount, filled with concrete, really shines. It creates a heavy, stable base that won’t sink or tip over, letting you get cameras into marshy areas that are otherwise off-limits. You'll get a unique look into a whole different ecosystem.
By tailoring your setup to both the animal and the landscape, you turn your trail camera from a simple gadget into a powerful intelligence-gathering machine.
How to Secure and Maintain Your Camera Gear
Your trail camera and stand are a serious investment in your scouting. Leaving them out in the elements—or worse, where thieves can spot them—is a risk you just can't take. A solid security and maintenance plan is the only way to protect that investment and make sure you're getting reliable intel season after season.
This isn't just pocket change, either. The entire hunting and trail camera market was valued at USD 224.08 million in 2024 and is on track to hit USD 375.16 million by 2034. That's a massive industry built on gear just like yours. With that much money flowing, protecting your assets is just common sense. You can dig into the numbers and trends of this growing market here.
Hardening Your Setup Against Theft
The best defense is a layered one, mixing physical toughness with smart concealment. Your first job is making the camera a pain to steal.
- Security Lockboxes: These aren't just flimsy containers. A good heavy-duty steel case is molded to fit your specific camera, creating a serious barrier against thieves and even curious bears who might get a little too rough.
- Python Cables: A lockbox isn’t much good if it’s held on by a zip tie. A python cable is its perfect partner—a cut-resistant steel cable that you can thread through the lockbox and cinch down tight around the tree. It’s a powerful visual and physical deterrent.
Beyond just locking it down, your best move is to make the camera disappear. Try placing it higher than eye level and angling it down at the trail. Most people just don’t look up. It's a simple trick, but it works. Use the natural environment, too—tuck it behind some branches or brush to break up its outline.
The goal is simple: make stealing your camera more trouble than it's worth. A thief looking for a quick score will almost always move on if they run into a setup with a solid lockbox and cable.
Common Security Mistakes to Avoid
Even with the best gear, a few rookie mistakes can leave your setup vulnerable. Avoiding these is just as important as buying the right locks.
- Placing Cameras on Obvious Trails: Setting up right on a public hiking trail or a well-used logging road is asking for trouble. The more foot traffic, the higher the odds someone will spot it.
- Using Cheap Padlocks: That little padlock from the hardware store aisle? It can be snipped in seconds with bolt cutters. Always spend a few extra bucks on a quality, weather-resistant lock made for the outdoors.
- Forgetting to Enable GPS: Many modern cellular cams have built-in GPS. While it won't stop the theft itself, it gives you a fighting chance to get your gear back.
For a deeper dive into security options, check out our guide on trail camera locking cables and other essential devices.
A Seasonal Maintenance Checklist
Security is one thing, but routine maintenance is what keeps your gear performing year after year. Weather, bugs, and general wear-and-tear will take their toll. A quick seasonal check-up will go a long way.
Early Season Prep (Late Summer)
- Lens Cleaning: Get a microfiber cloth and gently wipe the camera lens and the PIR sensor. Smudges and dust are your enemy.
- Battery Check: Pop in a fresh set of high-quality lithium batteries. They're way more reliable in cold weather than alkalines.
- Firmware Updates: Before you head out, check the manufacturer’s website for any firmware updates. They often include performance boosts or bug fixes.
Mid-Season Check-In (During the Rut)
- Insect Inspection: Spiders and wasps absolutely love making homes inside camera housings. Open up the case and clear out any webs, nests, or other debris.
- Desiccant Pack Refresh: If you're using a desiccant pack to fight moisture, now is a good time to swap it for a fresh one.
End-of-Season Storage (Winter/Spring)
- Bring Gear Inside: Don’t leave your cameras and stands out to get hammered by ice and snow all winter. Bring them in.
- Remove Batteries: This is critical. Always take the batteries out before storing your cameras long-term to prevent nasty corrosion that can ruin the electronics.
- Inspect Stands for Rust: Give any metal stands a once-over. If you see any rust, just hit it with a bit of sandpaper and a quick coat of spray paint to stop it from spreading.
Your Top Questions About Trail Camera Stands, Answered
Even the most seasoned hunters run into little questions out in the woods. When you're trying to get the perfect setup, a few small details can make all the difference. I get asked about these all the time, so let's clear up some of the most common issues people face with trail camera stands.
Think of this as your field guide for troubleshooting those nagging problems that can mess with your scouting intelligence.
What Is the Best Height to Mount a Trail Camera for Deer?
For deer, the sweet spot is usually between 3 to 4 feet off the ground. Mounting your camera at this height gives you a natural, broadside perspective of the animal. It's perfect for capturing the whole body and getting a clear look at antler size.
If you go too low, you risk summer brush or winter snow blocking your shot. Go too high, and you end up with a weird, steep angle that makes it tough to judge a buck's true size.
Pro Tip: Never skip the 'walk test.' After you strap the camera up, walk in front of it yourself at the distance you expect deer to be. This confirms your detection zone is perfectly lined up with the trail and you won't miss the action.
How Can I Stop My Trail Camera from Taking Blank Pictures?
Ah, the dreaded false trigger. Opening an SD card to find hundreds of photos of… nothing is one of the most frustrating parts of running trail cams. This problem almost always comes down to two culprits: moving vegetation or the sun.
First, take a moment to clear out the camera's field of view. Snip any small branches, leaves, or tall grass that could sway in the wind and trick the motion sensor. It doesn't take much.
Second, always try to aim your camera north or south. This simple trick keeps the rising or setting sun from shining directly into the lens. That direct sunlight can cause rapid temperature shifts that fool the PIR sensor into firing. Many newer cameras also let you adjust the PIR (Passive Infrared) sensitivity—turning it down a notch can work wonders.
Can I Use Any Stand with a Cellular Trail Camera?
Good news here: yes, you almost certainly can. The vast majority of cellular trail cameras are built with a standard 1/4"-20 threaded insert. This is the universal size for camera mounts, so they're compatible with just about every commercial and DIY trail camera stand out there.
But with a cellular model, the real challenge isn't the mount—it's the signal. When you're picking a spot, you have to think like a cell phone and avoid things that block the antenna's connection.
- Dense tree canopies are signal killers.
- Deep ravines or the bottoms of steep hills are often dead zones.
- Large metal objects like barn roofs or gates can block the signal.
Sometimes, all it takes is using a taller stand or moving the camera a few feet higher up a tree to dramatically boost your reception. That's the key to making sure your photos actually get sent to your phone.
Ready to stop guessing and start seeing? The Magic Eagle EagleCam 5 combines a rugged, all-weather build with smart AI detection and a rock-solid cellular connection. See what you've been missing and take your scouting to a whole new level. https://magiceagle.com