
Getting photos sent from your trail camera straight to your phone isn't a luxury anymore—it's become an essential tool for scouting and keeping an eye on your property. The magic happens when your camera connects to a wireless network, using either a cellular signal or a local Wi‑Fi connection to push images right to an app on your smartphone.
How Trail Cameras Send Pictures to Your Phone
Picture this: you get an instant alert the second that target buck you've been chasing steps into your food plot, even if you're miles away. This isn't just about convenience; it fundamentally changes how you gather intel and plan your hunts. The ability to link a trail camera to a phone is one of the biggest advancements the outdoor industry has seen in years.
The global market for trail cameras hit around USD 853 million in 2024, and a massive part of that growth is fueled by wireless features. In 2023, an estimated 62% of new trail cameras sold came with Wi-Fi or cellular capabilities, showing a clear shift away from the old days of manually pulling SD cards. For a deeper look at this trend, you can check out market insights from 360iResearch.
This technology works in two main ways:
- Cellular Cameras: These are your go-to for remote locations. They work just like a smartphone, using a built-in SIM card to connect to a mobile network like AT&T or Verizon. When the camera senses motion, it beams the image over that network to a cloud server, which then sends a notification and the photo to an app on your phone. To get into the nitty-gritty, you can explore our guide on how cellular trail cameras work.
- Wi-Fi Cameras: These cameras tap into an existing Wi-Fi network. They're perfect for monitoring areas within a few hundred feet of a solid internet source, like your house, barn, or cabin. Since the connection is direct and doesn't need a separate data plan, they're a great, cost-effective option for home security or watching backyard wildlife.
The bottom line is immediate information. Whether you're tracking game patterns or making sure your property is secure, having a trail camera send photos to your phone means you don't have to disturb a location, saving you time and keeping the area scent-free.
Cellular vs Wi-Fi Trail Cameras at a Glance
Choosing between cellular and Wi-Fi really comes down to where you'll be placing your camera and what you need it to do. Each has its strengths and weaknesses.
To make it simple, here’s a quick breakdown of how they stack up against each other.
| Feature | Cellular Trail Camera | Wi-Fi Trail Camera |
|---|---|---|
| Best For | Remote locations without Wi-Fi (food plots, deep woods) | Areas with existing Wi-Fi (backyards, barns, cabins) |
| Range | Virtually anywhere with a cell signal | Limited to Wi-Fi router range (typically 50-200 feet) |
| Cost | Higher initial cost + monthly data plan | Lower initial cost, no extra data fees |
| Setup | Requires activation and a data plan | Connects to your existing Wi-Fi network |
| Data Transmission | Sends images over a 4G/LTE network | Sends images over a local Wi-Fi network |
| Battery Life | Can be lower due to cellular transmission | Generally better as Wi-Fi is less power-hungry |
| Use Cases | Hunting, remote property surveillance, wildlife research | Home security, backyard wildlife watching, monitoring livestock near a building |
Ultimately, if your camera is going somewhere far from civilization, cellular is the only practical choice. For anything close to home, Wi-Fi will do the job perfectly without the recurring cost of a data plan.
Choosing Between Cellular and Wi-Fi Cameras
The first real decision you’ll make when getting a trail camera connected to your phone is whether to go with a cellular or a Wi-Fi model. This one choice impacts everything else, from where you can put the camera to what it costs to run each month. It all boils down to your mission and your location.
Think of it this way: a cellular camera is your go-to for that remote food plot miles from the nearest road—or reliable internet. It works on its own, using mobile networks to send you updates. On the other hand, a Wi-Fi camera is perfect for keeping an eye on your backyard, a nearby barn, or any spot that's just outside your home network's reach.
This decision tree helps you visualize which path makes the most sense based on where you need to put it.
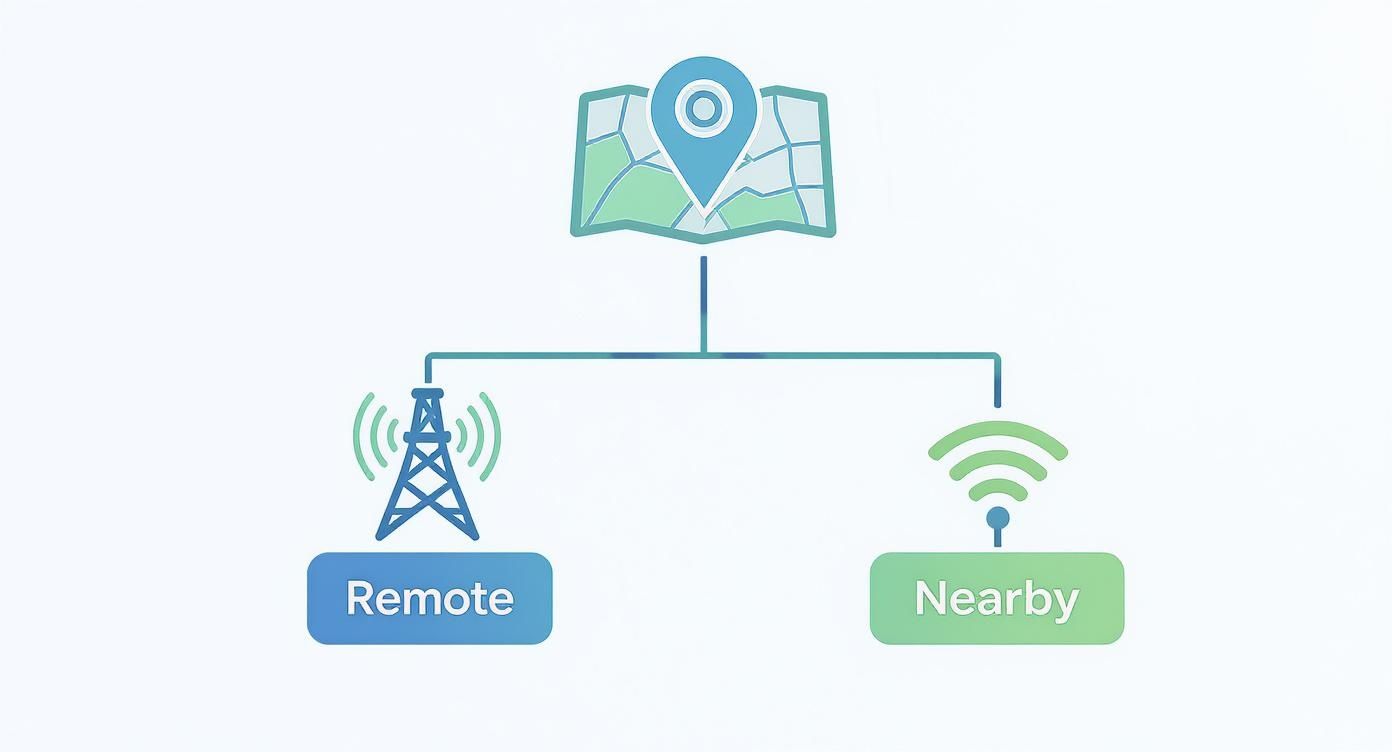
As you can see, if your camera needs to operate far from any existing internet, cellular is really the only way to go. For spots closer to home, Wi-Fi offers a simpler, more affordable solution.
Understanding Cellular Data Plans
When you pick a cellular camera, you're also signing up for a data plan. These plans are what let your trail camera "phone home" with pictures and videos. They usually come in two flavors:
- Monthly Subscriptions: These are perfect for high-traffic areas where you expect a lot of action. You pay a flat fee each month for a set number of photos or a certain amount of data.
- Pay-As-You-Go: This option is way more flexible. It’s a great fit for cameras on a quiet trail where you might only get a handful of pictures each week. You buy a block of data that lasts for a longer period, often several months.
Costs can run from just a few dollars a month for a couple hundred photos to over $20 for plans that include thousands of images and on-demand, high-resolution video. Before you buy anything, always check the carrier coverage maps for your specific area.
Pro Tip: Start with a lower-tier data plan. You can almost always upgrade through the app if you find yourself running out of photos before the month is over. This keeps you from overpaying for data you just don't use.
The Real-World Limits of Wi-Fi
Wi-Fi cameras are fantastic because they're simple and don't have those recurring fees, but their biggest weakness is range. A manufacturer might claim a range of several hundred feet, but that's in a perfect world with a clear line of sight.
Out in the real world, obstacles kill that signal strength. Trees, shed walls, and other buildings can easily cut the effective range in half or even more. A camera placed just 65 feet from your house might struggle to hold a stable connection if there's a dense line of trees in the way.
For these setups, success is all about having a strong, steady signal right at the camera's location. The best advice? Before you commit, walk out to the exact spot you plan to mount the camera and check the Wi-Fi signal on your phone. It's a simple test that can save you a lot of frustration.
Getting Your Camera and App Synced Up
This is where the fun really starts—connecting your new trail camera to your phone. We'll use the Magic Eagle EagleCam 5 as our example because it's a solid, representative model. Following these steps isn't just about ticking boxes; it's about sidestepping those little hiccups that can turn an exciting new gear day into a headache.
First things first, let's get the camera itself prepped. Before you even think about the app, pop in a fresh set of lithium AA batteries. Trust me, they last way longer, especially when the temperature drops. Next, slide in a quality SD card—look for Class 10 or higher to handle video and rapid-fire photos without a glitch. With the EagleCam 5, you get a break from the usual hassle of finding a SIM card; it comes with one already installed that automatically finds the best signal in the area.
Pairing the Camera and Firing Up Your Plan
With the camera ready to go, it's time to bring it to life with the app. This is the digital bridge that gets those images from the deep woods right into the palm of your hand.
Your first move is to grab the official MAGIC EAGLE app from your phone's app store. Once it's downloaded, you'll need to set up an account, which is usually just an email and password. This keeps your camera feed and photos secure.
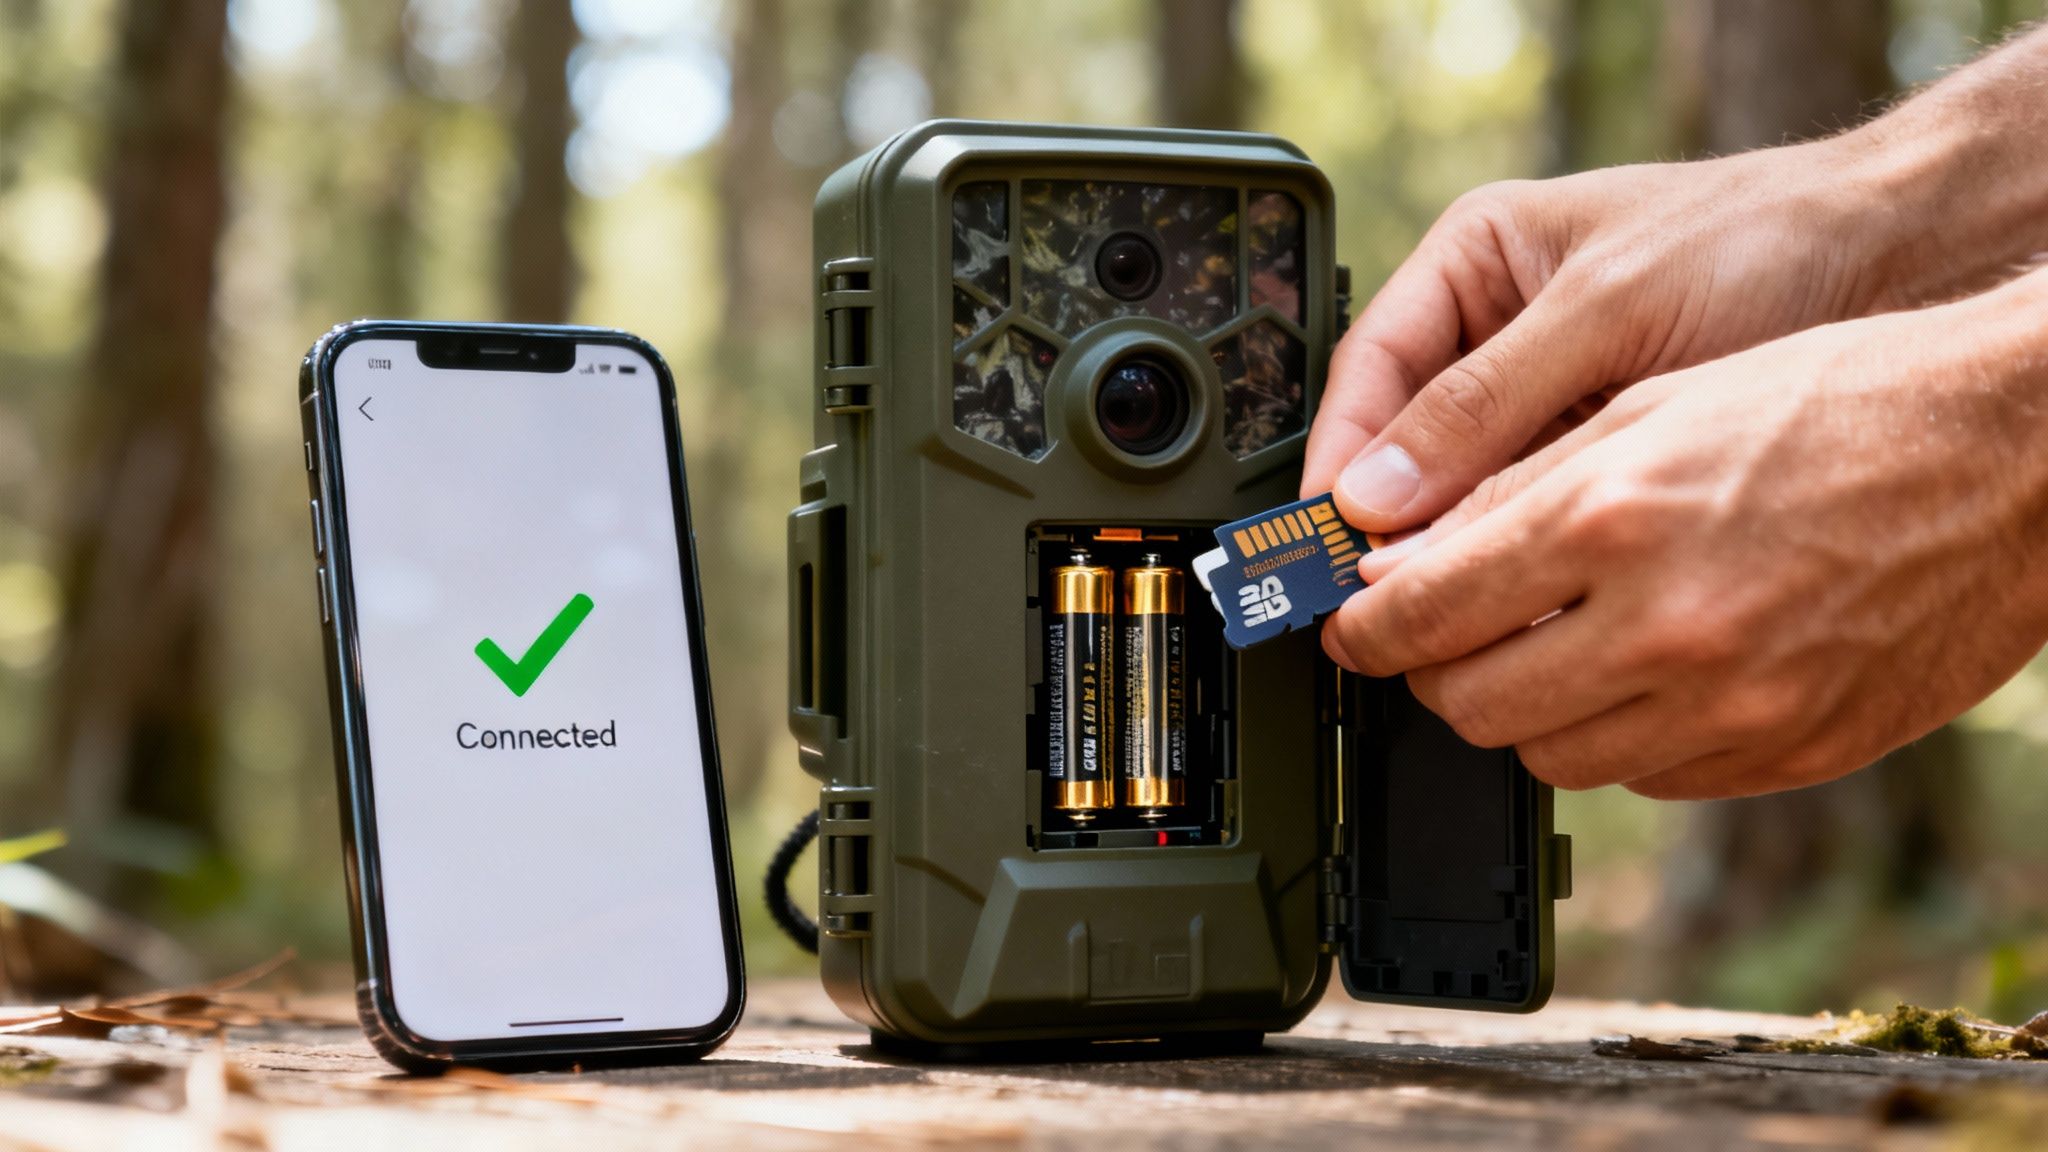
After you log in, the app will prompt you to add a camera. Most modern units, including the EagleCam 5, make this ridiculously easy with a QR code. Just open the app's scanner and point it at the QR code inside the camera. It’s an instant handshake that links the device to your account.
I see a lot of new users get stuck on activating the data plan. Here's the key: it’s almost always handled right inside the app. You don't need to call a carrier or visit a store. Just follow the prompts on your screen to pick a plan that makes sense for how you'll use it.
Finalizing the Connection
Once your plan is active, the app will give you the green light, confirming the camera is online. Now you're ready to tweak the settings. But before you hike out and mount it, take a moment to run a quick systems check right from your couch.
Here’s a simple checklist I run through every time:
- Take a Test Shot: Use the app's "take a photo now" command. This is your proof that the entire chain—camera, network, and app—is working perfectly.
- Check the Signal: Somewhere in the camera's status screen, you'll find a signal strength indicator. You're looking for at least two or three bars for dependable transmission. Anything less, and you might want to find a spot with a clearer view of the sky.
- Confirm GPS: If your camera has GPS, like the EagleCam 5, make sure its location pops up correctly on the app's map. This is a lifesaver if you're managing multiple cameras or need to recover a stolen one.
When that first test photo hits your phone, you're golden. That's the final confirmation. Now you can mount your camera in its final spot, confident you'll get the shot the second something walks by.
Fine-Tuning Your Setup: Real-Time Alerts and Photo Requests
Getting your trail camera talking to your phone is a huge first step. But the real magic happens when you move beyond just getting photos and start creating an active, real-time scouting tool. This is where you dial in the app settings to get exactly what you need, right when you need it—without your phone buzzing every time the wind blows.
The temptation is to turn every single notification on. Trust me, you'll regret it. This leads to "alert fatigue," where you get so many notifications that you start ignoring them all. A smarter approach is to customize your alerts to match your goal, turning your camera into an intelligent scout that works for you.
Setting Up Smart Notification Schedules
Most modern camera apps, like the one for the MAGIC EAGLE, let you set up "working hours" or custom schedules for when you receive alerts. This feature is an absolute game-changer for cutting out the noise and saving precious battery life.
Think about these real-world scenarios:
- Hunting: You probably only care about deer movement during those golden hours. Set your app to ping you with motion alerts only between 5 AM and 9 AM, and then again from 4 PM to 8 PM. The camera is still recording 24/7, but your phone only buzzes when it really matters.
- Security: If you're watching a barn or a gate, you can flip that logic. Set the camera to send alerts only during the overnight hours, say between 10 PM and 6 AM. This way, you get an instant heads-up on any unexpected late-night activity.
A classic rookie mistake is leaving notifications on 24/7 with the sensitivity cranked all the way up. By scheduling your alerts, every notification you get is more meaningful and actionable. If you want a broader look at how mobile alerts work, this guide on setting up alerts for important notifications has some useful tips.
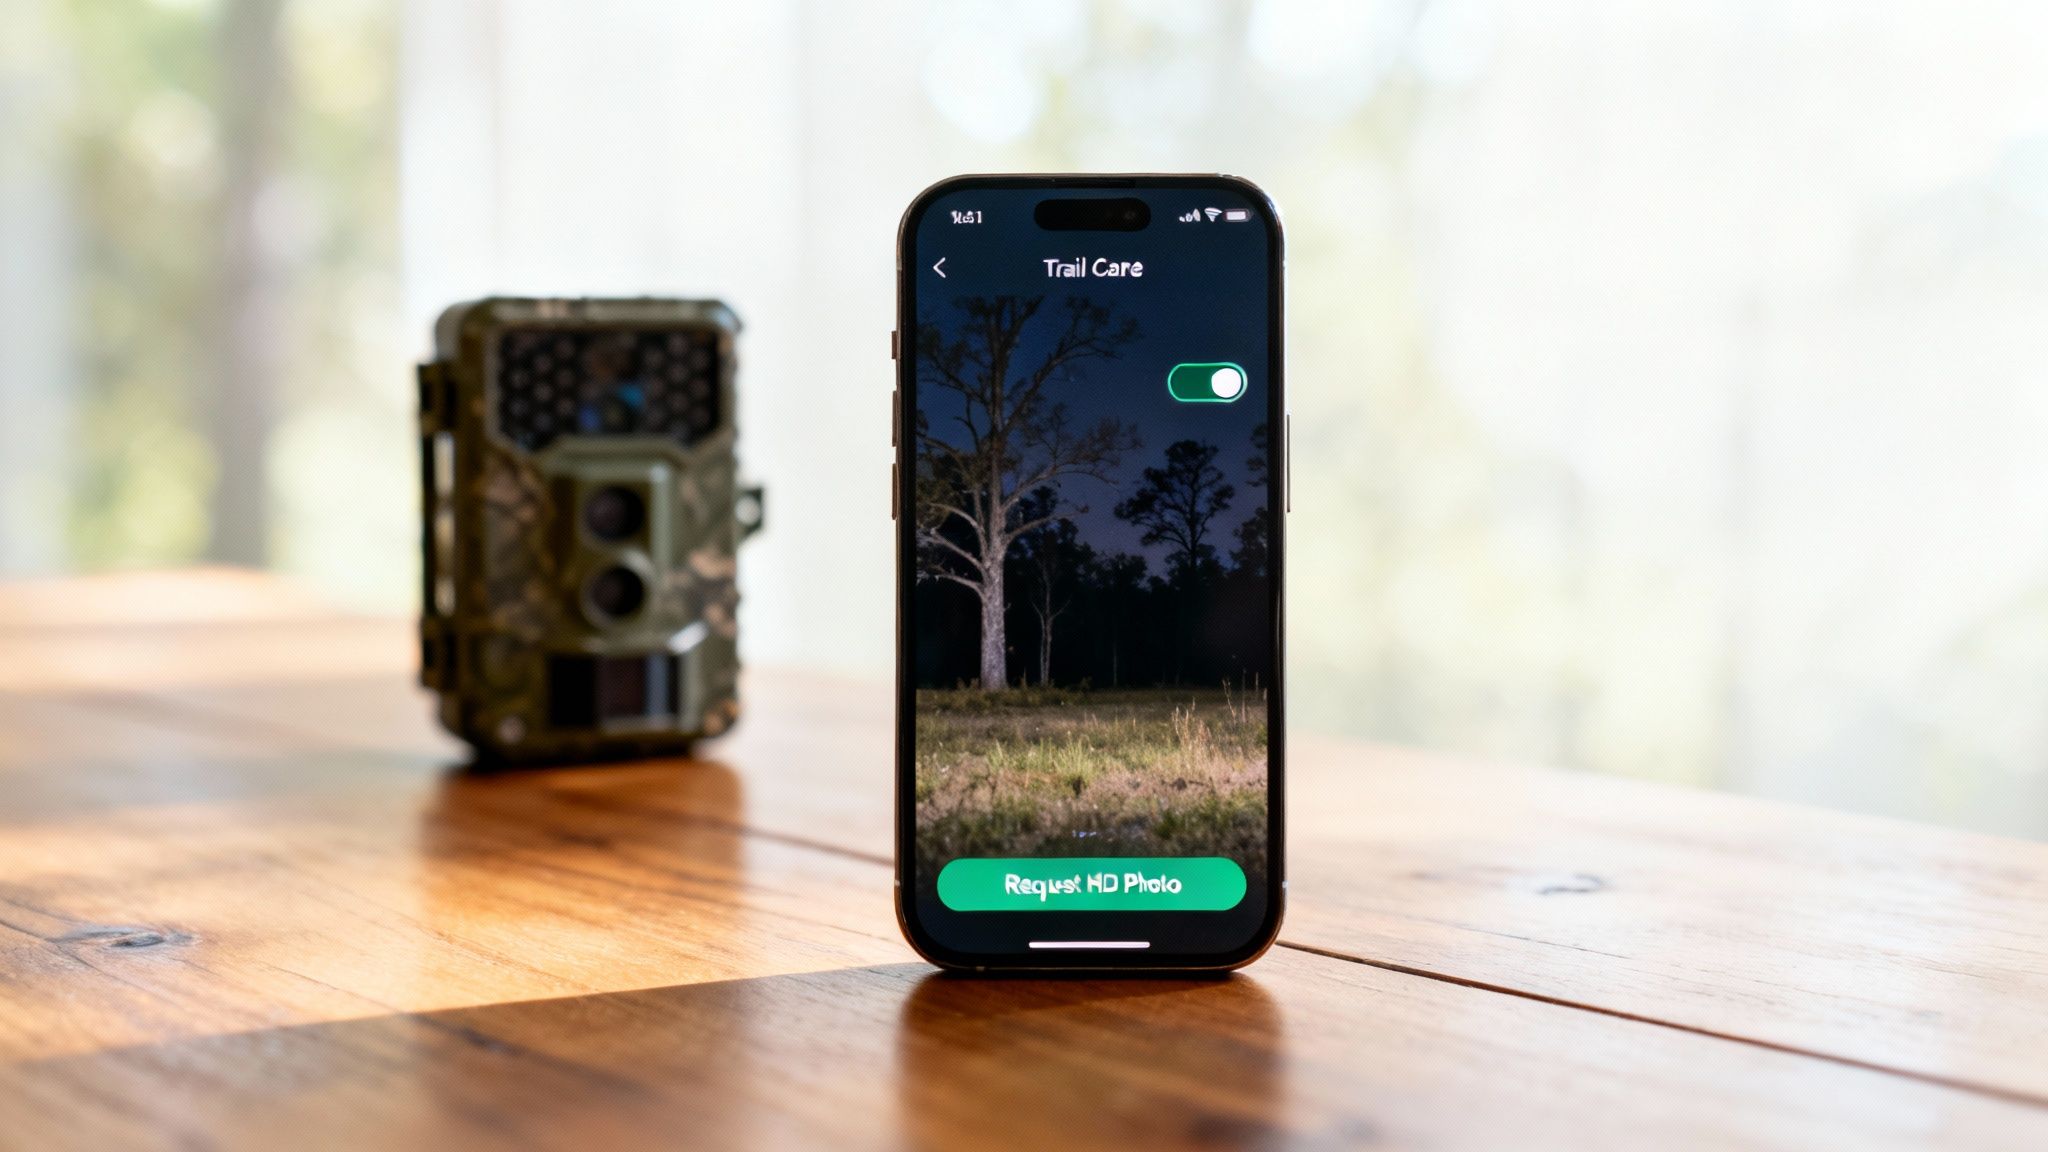
Requesting HD Media When You Need It
To save data, your camera will usually send you low-resolution thumbnails first. They’re great for a quick glance, but what happens when a thumbnail shows a buck that looks very promising and you need to see every detail?
This is where on-demand requests come in.
Right from the app, you can tell the camera to send over the full, high-resolution photo or even the entire video clip from that specific trigger. It's an incredible feature for confirming a target animal or checking out something suspicious.
Just be mindful that this action uses a lot more of your data plan than the standard thumbnails. Requesting just a couple of HD videos can chew through the same amount of data as hundreds of tiny preview images. Use it wisely—save it for the moments that truly demand a closer look—and you'll make your data plan last all month long.
Troubleshooting Common Connection Issues
It happens to everyone. You’ve had a perfect setup running for weeks, getting great shots, and then one day… silence. When your trail camera suddenly stops sending photos to your phone, it’s almost always one of a few common culprits.
The good news? Most of these problems are easy to diagnose and even easier to fix, often right from your app or with a quick trip out to the camera.
The number one reason a camera drops offline is a simple loss of signal. The remote spots that are perfect for wildlife are often the same places with notoriously spotty cell service. A camera that was working fine yesterday can easily lose its connection today because of a passing storm or minor network fluctuations.
Diagnosing a Silent Camera
When your trail camera to phone connection goes down, don't jump to the worst-case scenario. Before you assume the camera is broken, start with the basics. More often than not, the problem is related to power, signal, or your data plan.
Here’s a quick checklist to run through:
- Check the Batteries: This is the big one. Cellular transmission drains batteries fast. Pop open your app and check the battery status. If it's low—or if the camera is totally offline and you can't check—your first move should be swapping in a fresh set of batteries.
- Verify Your Data Plan: It’s surprisingly easy to forget a renewal date or burn through your photo allowance during a busy week. Log into your camera’s app and make sure your subscription is still active.
- Inspect the Antenna: Give the camera’s antenna a quick look. Is it screwed on tight? Is it damaged? A loose or busted antenna will absolutely kill its ability to connect to the network.
If you’ve gone through these steps and are still getting nothing, the problem is likely with the cellular network itself.
Tackling Network and Signal Problems
A weak signal is a constant battle when you’re running a cellular trail camera. For the camera to reliably send images, it needs a stable connection. Even with one or two bars of service, transmissions can fail, especially if it's trying to send larger files like videos.
A pro tip I learned the hard way: before you even mount a new camera, use your own smartphone to check the signal strength right at that spot. Walk around the tree and test different heights. Sometimes moving the camera just ten feet to the side or mounting it a little higher can make all the difference.
If you’re stuck with a consistently weak signal, you may just need to find a new location. But if moving it isn't an option, an external, high-gain antenna can sometimes help pull in a stronger signal from a distant tower. The principles are similar to how you might boost mobile phone signal at home, just adapted for the field.
Once in a while, the camera's network settings just need a good refresh. Buried deep in the app's settings, you can usually find an option to manually "sync" or "update" the network configuration. This forces the camera to re-establish its handshake with the carrier, which can fix minor glitches that knocked it offline.
Optimizing Camera Settings for Battery and Data
Getting your trail camera sending pictures to your phone is just the first step. The real art is fine-tuning the settings to turn it into a smart, efficient scouting tool. If you're not careful, a busy trail or feeder can chew through your batteries and data plan in less than a week.
Every little tweak you make is a trade-off. You're constantly balancing the quality of information you get against battery life and data consumption. The key is to define your mission. Are you watching a remote scrape for one specific buck, or are you just getting a general inventory of what's moving down a high-traffic corridor? The answer changes everything.
Balancing Data Usage and Image Quality
The two biggest drains on your data plan are your camera's resolution and transmission settings. It's tempting to get crystal-clear HD images beamed straight to your phone, but it's usually overkill and a serious data hog.
A much smarter strategy is to have the camera send you low-resolution thumbnails first. This gives you a quick look at what tripped the sensor without burning through data. If you spot something interesting—say, a buck with a rack worth a closer look—you can then use the app to request the full-resolution file. This selective approach means you only use up significant data when you truly need it.
For a high-traffic spot like a corn feeder, I'll set the camera to send only thumbnails and increase the delay between triggers to five minutes. This prevents hundreds of photos of the same squirrels from eating up my data plan.
Maximizing Battery Life in the Field
Nothing drains your camera's battery faster than cellular transmission. Every single time it sends a photo, the modem has to power up, connect to the network, and upload the file. You can seriously extend your camera’s time in the field by making a few smart adjustments to how and when it sends you pictures.
Here are a few pro tips I've learned for conserving power:
- Batch Uploads: Instead of sending each picture the second it's taken, set your camera to upload in batches. Transmitting a group of 10 photos once an hour uses way less juice than 10 separate transmissions spread out over that same hour.
- Status Reports: Go easy on the "check-in" or status report feature. A camera that pings the server every hour just to tell you its battery level will die much faster than one that only checks in once or twice a day.
- Video Settings: Only use video when you absolutely have to. Sending even a short 10-second video clip uses exponentially more power and data than a single still image.
Getting a handle on these trade-offs is crucial for long-term success. For a deeper dive, check out this complete guide on how long trail camera batteries last to better plan your deployments.
Finally, don’t forget about physical security. Your camera is a valuable piece of gear. I always use a quality lockbox and a heavy-duty cable lock to chain it to the tree. It’s a simple step that protects your investment from both two-legged and four-legged thieves, ensuring your perfectly optimized setup keeps working for you all season long.
Answering Your Top Questions
We get a ton of questions from hunters and researchers making the switch to modern trail cams. Here are the answers to the ones that come up most often.
Can I Just Pop Any SIM Card into My Cellular Camera?
Not usually, and trying to can cause a lot of headaches. While a few cameras out there are "unlocked," the vast majority are built to work with a specific network, like AT&T or Verizon.
To avoid setup problems, your best bet is to always use the SIM card and plan that the camera manufacturer provides. It's already configured to sync perfectly with their app and servers, which means you get a smooth, plug-and-play experience right out of the box.
How Much Data Does a Trail Camera Actually Burn Through?
This is the classic "it depends" answer. Your data usage is tied directly to your settings and how much action your camera sees.
If you're just getting a few dozen low-res thumbnails sent to your phone each day, you'll barely sip data. But if you're constantly requesting full-resolution images and videos from a busy food plot, you can easily burn through several gigabytes a month. Most plans are structured around the number of photos you get, not the raw gigabytes, which makes it easier to predict costs.
Do I Need a Wi-Fi Signal for a Cellular Camera?
Nope, and that’s precisely why they’re so powerful. A cellular trail camera doesn't need a Wi-Fi network at all. It connects straight to a 4G/LTE network using its own SIM card, just like your smartphone.
This is what lets you stick a camera in a remote backwoods location, miles from the nearest internet connection, and still get instant updates sent right to your phone. It's complete freedom.
Ready to stop guessing and start scouting smarter? The Magic Eagle EagleCam 5 delivers that instant wildlife intel right where you need it. Check it out on our website and see what you've been missing.