
A cellular trail camera data plan is the subscription that lets your camera send photos and videos straight to your phone over a network, just like your cell phone does. The amount of data you'll need boils down entirely to how you use it, but a hunter sending 15-20 images per day will typically land somewhere between 500MB and 2GB per month.
How Much Data Does a Trail Camera Actually Use?
Think of data as the fuel your trail camera needs to run. Every single thing it does—from sending a tiny thumbnail preview to uploading a full-HD video clip—burns a little bit of that fuel.
Getting a handle on your camera's "data appetite" is the first step. It's the only way to pick a plan that won’t hit you with surprise overage fees or, worse, stop transmitting right in the middle of the rut.
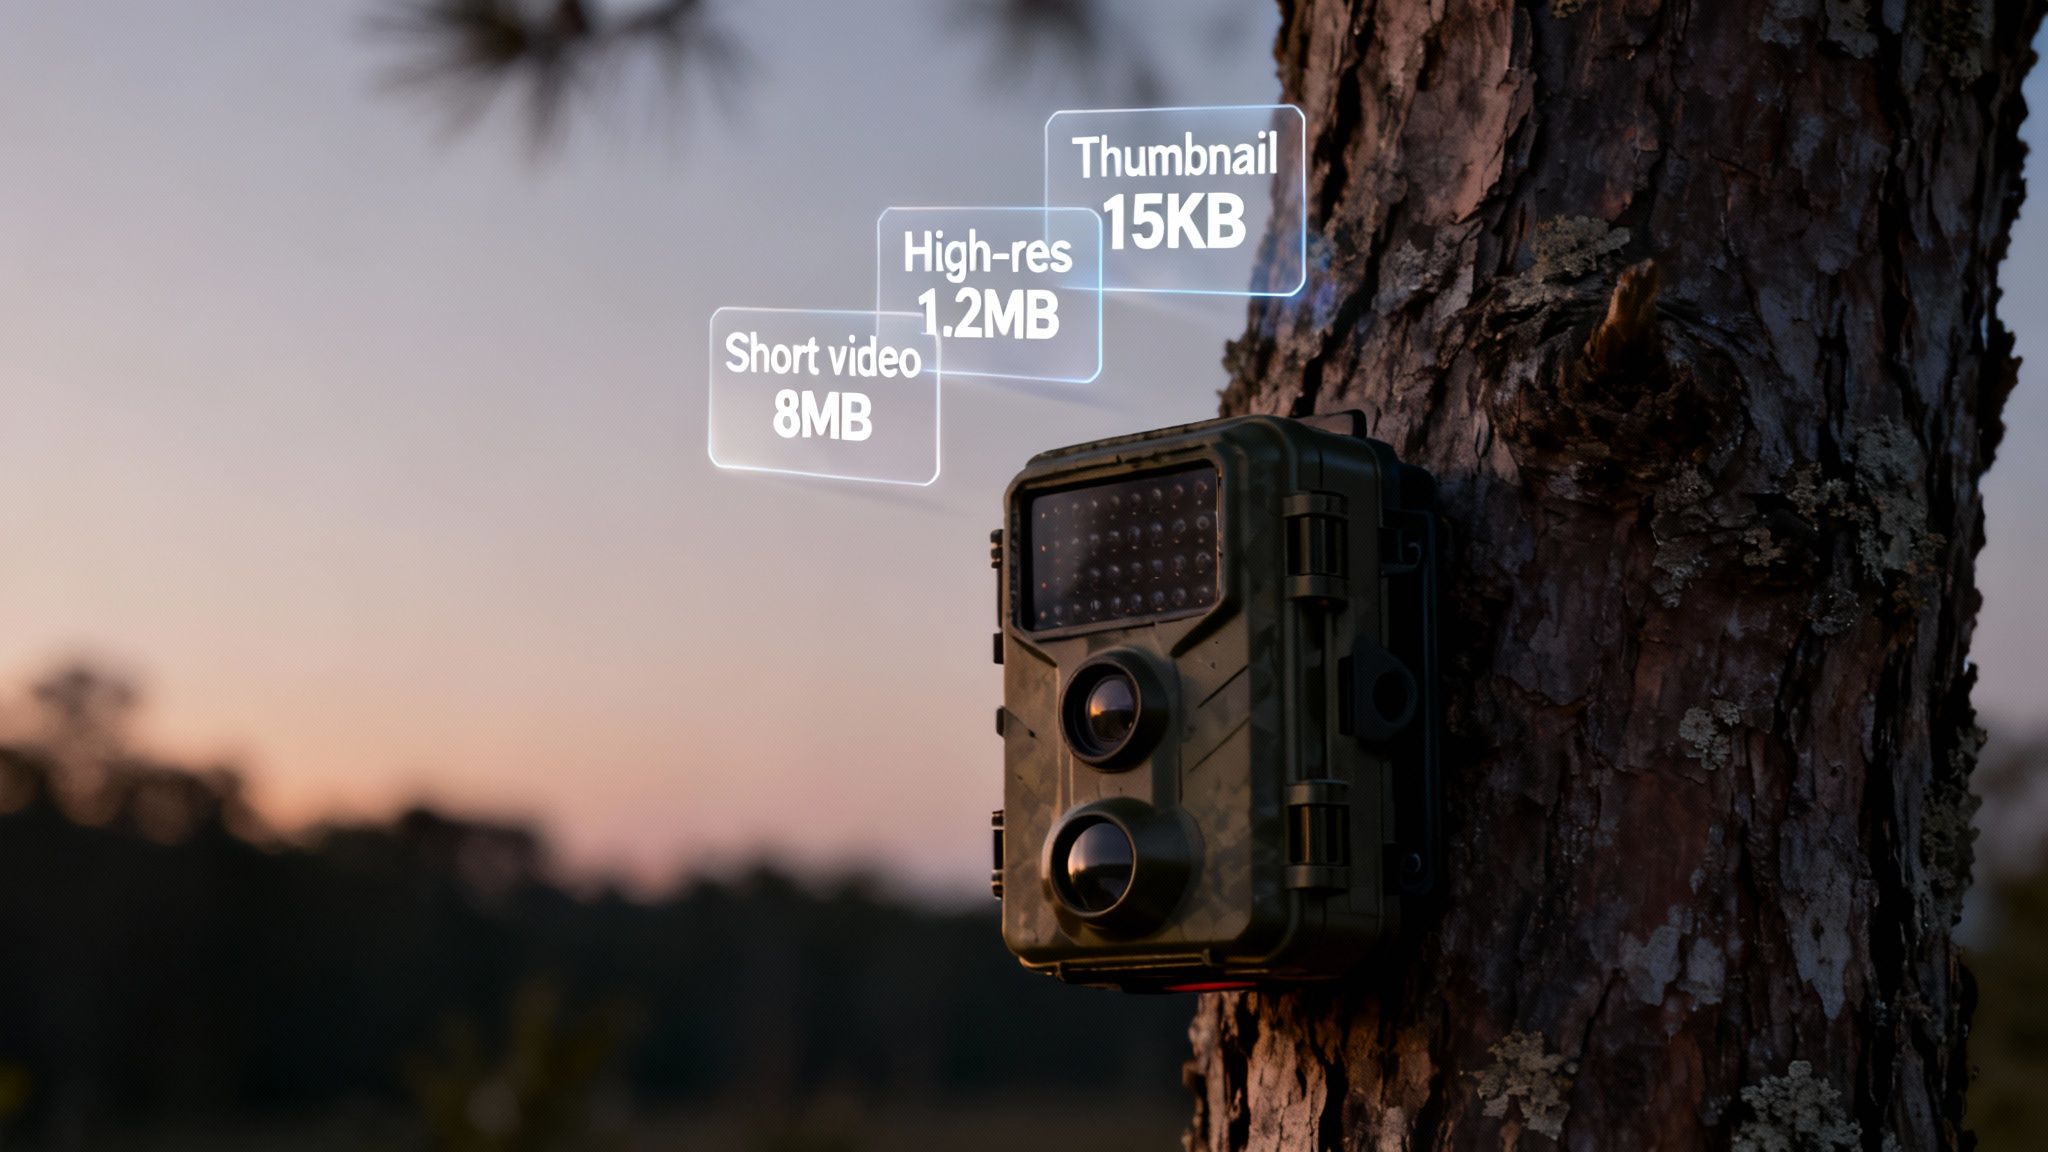
The amount of data your camera burns through changes dramatically based on what it's sending. A low-resolution thumbnail, for example, is like sending a quick text message; it uses next to nothing, often just 20-50 kilobytes (KB). This is perfect for quickly checking if a trigger was just a branch swaying in the wind.
Breaking Down Data by What You Send
On the other hand, asking your camera to send the high-resolution (HD) version of that same photo is more like emailing a large attachment. An HD image can eat up anywhere from 1 to 5 megabytes (MB), depending on the camera's megapixel sensor and how much detail is in the scene.
And video? Video clips are the real data hogs. A short 10-15 second clip can easily burn through 10-25 MB or even more.
Key Takeaway: The single biggest factor that determines your data usage is the mix of thumbnails, HD photos, and videos you request. A plan that feels like plenty for just thumbnails can get wiped out in a day if you start pulling down multiple videos.
To really see the difference, this chart shows how each action stacks up.
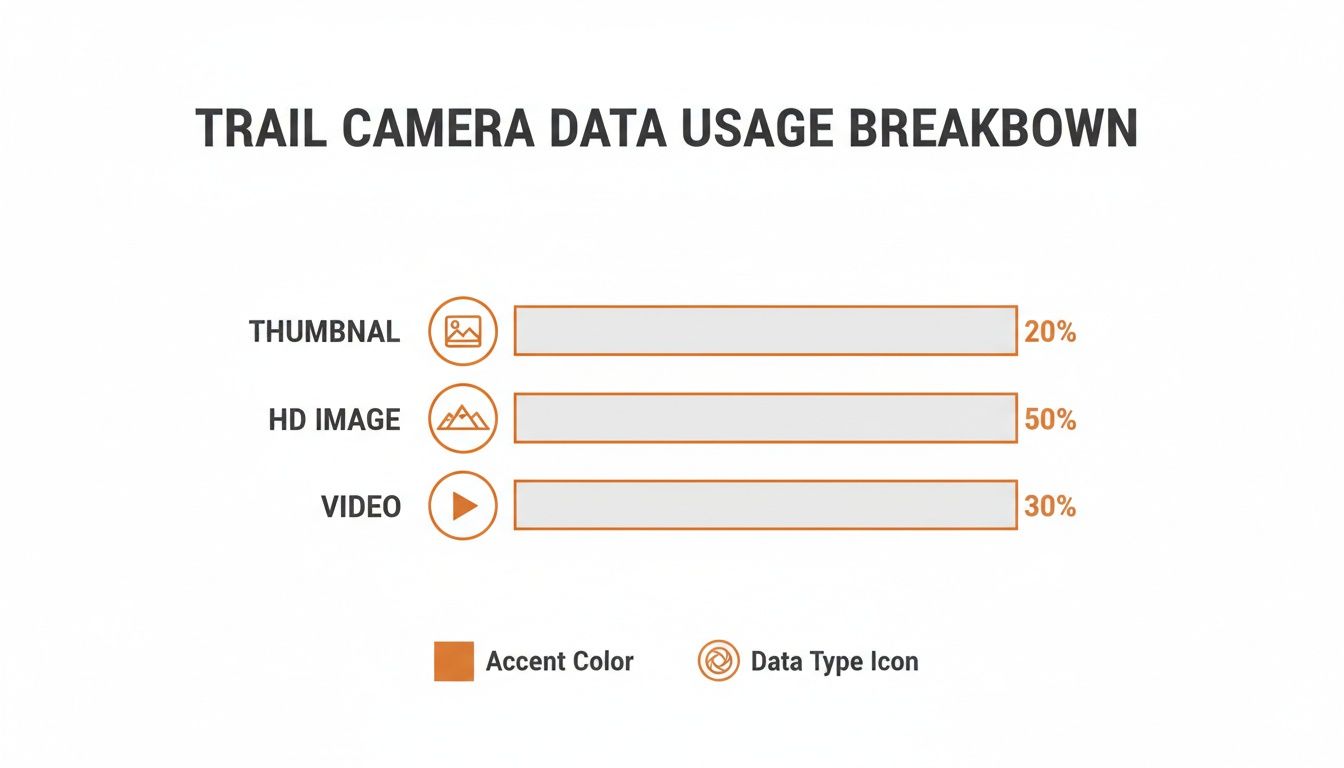
As you can see, sending video uses way more data than even HD images. This is why you absolutely have to consider your video habits when picking a plan.
Estimating Your Monthly Needs
To get a rough idea of your monthly data needs, start by thinking about your main goal. Are you just monitoring a food plot during deer season, or are you running year-round surveillance on your property?
This quick reference table breaks down the typical data cost for each action your camera takes.
Estimated Data Usage per Camera Action
| Camera Action | Typical Data Consumption | Estimated Monthly Usage (15 Events/Day) |
|---|---|---|
| Thumbnail Photo | 20 KB – 50 KB | 9 MB – 22 MB |
| HD Photo | 1 MB – 5 MB | 450 MB – 2.2 GB |
| 15-Second Video | 10 MB – 25 MB | 4.5 GB – 11.25 GB |
These numbers really put things into perspective. A few HD photo requests per day can add up fast, and consistent video uploads require a serious data bucket.
Here are a few common scenarios to help you match your needs to a plan:
- Seasonal Scouting: If you're just checking a few key images each day to pattern a buck, a plan with around 1GB of data is a solid starting point.
- High-Traffic Areas: For watching feeders, mineral sites, or busy game trails, you'll want a beefier plan. Look for something in the 2-5GB range to handle the constant triggers without worry.
- Security & Video: If you plan on requesting frequent HD photos or video clips for security, you should be looking at unlimited plans or those with at least 5-10GB of data to avoid getting shut down.
By matching how you plan to use the camera with these real-world estimates, you can pick a data plan that actually fits your budget and your goals—no guesswork involved.
Choosing the Right Type of Data Plan
Navigating the world of trail camera data plans can feel a lot like picking a cell phone contract, but it's much simpler once you understand the basic options. The real goal is to match your habits—whether you're a seasonal hunter, a year-round property manager, or just a curious wildlife watcher—to a plan that fits your wallet without locking you into something you don't need.
The structure of a plan is just as important as how much data it offers. Let's break down the four most common types you'll run into and figure out who each one is really for.
Pay-As-You-Go Plans
Think of it like buying a tank of gas only when you need to drive. That's the idea behind a Pay-As-You-Go plan. You buy a block of data—say, 1GB or 2GB—and it lasts until you use it all up, whether that takes one month or six.
This approach gives you maximum flexibility, making it perfect for folks with unpredictable or highly seasonal needs.
- Best For: Hunters who only fire up their cameras for a few months during the fall, or property owners monitoring a vacant lot for a short-term project.
- Pros: You only pay for what you actually use. No monthly bills, no contracts. It’s the easiest way to avoid paying for data during your off-season.
- Cons: The cost per gigabyte is often higher than subscription plans. It also means you have to keep an eye on your usage and "top up" before you run out, which can be a hassle.
Monthly Subscription Plans
Monthly subscriptions are the most familiar option, working just like your cell phone plan. You pay a set fee each month for a specific data allowance, like 2GB or 5GB. This model offers predictability and usually comes with better rates than Pay-As-You-Go.
These plans are a great fit for users who need consistent monitoring all year. They often come in different tiers, so you can pick one based on how many photos or how much data you expect to use.
A key thing to look out for is whether a plan is based on a photo count (e.g., 1,000 photos per month) or a gigabyte (GB) allowance. Photo counts seem simple, but they can be surprisingly restrictive. For a deeper look, you can learn more about why GB-based trail camera data plans often provide better value and flexibility.
Annual Subscription Plans
For the serious, year-round user, an annual plan is almost always the most cost-effective choice. With this setup, you pay for a full year of service upfront, but you get a steep discount compared to paying month-by-month.
This is the "set it and forget it" option for anyone who relies on their cameras for continuous security, wildlife management, or long-term scouting.
- Best For: Landowners, wildlife researchers, and dedicated hunters who keep their cameras running all 12 months of the year.
- Pros: Significant cost savings, often like getting one or two months for free. You also don’t have to think about monthly payments.
- Cons: The large upfront cost can be a hurdle. You’re also locked in for a full year, which isn't ideal if your needs change unexpectedly.
Bundled Camera and Plan Packages
More and more manufacturers, including Magic Eagle, are making things simple by offering all-in-one solutions. With these packages, the camera comes with an integrated SIM card and a dedicated data service straight from the provider.
This completely cuts out the headache of finding a compatible SIM and dealing with a separate cellular carrier. Everything—the camera, the app, and the data plan—is built to work together from a single company.
This integrated approach makes for a much smoother experience, from activation to daily use. Customer support is also streamlined, since there’s only one company to call if you have a problem with either the camera or the connection. These plans are usually offered as monthly or annual subscriptions and are built specifically for the device, ensuring you get the best performance.
Uncovering the True Cost of Staying Connected
The advertised monthly fee for a trail camera data plan is a lot like the sticker price on a car—it’s just the starting point. To really get a handle on what you'll spend, you have to look past that tempting number and figure out the total cost of ownership. The real expense often includes a handful of easily overlooked fees that can add up fast.
Factoring in these extras is critical because they can completely change the value of a seemingly cheap plan. Over a year or two, the cumulative cost of staying connected can sometimes rival what you paid for the camera itself. This makes choosing a data plan a significant financial decision, not just another minor monthly bill.
Breaking Down the Hidden Costs
So, where are these hidden costs lurking? They usually fall into a few common categories that aren't always highlighted in bold print. Knowing what to look for upfront will save you from some frustrating surprises down the line.
Here are the most common fees to watch for:
- Activation Fees: Some providers charge a one-time fee just to get your camera's SIM card and service running. This can range from $5 to $15 and shows up right on your first month's bill.
- Overage Charges: This is the most painful hidden cost, hands down. If you blow past your monthly photo or data limit, many plans will bill you for the extra usage at a punishingly high rate. A few unexpected videos or a busy week on a food plot can lead to a shocking bill.
- Cloud Storage Fees: While most plans include some cloud storage, premium features or keeping your files longer often come at a price. If you want to save high-resolution images or videos for more than 30 days, you might find yourself paying for a separate storage subscription.
Calculating Your Actual Yearly Expense
Let’s walk through a quick example to see how these fees can blow up your budget. Imagine you find a plan advertised for just $5 per month. At first glance, that sounds like a fantastic deal at only $60 per year.
But let's add in the typical hidden costs.
Example Scenario:
- Base Plan Cost: $5/month x 12 months = $60
- Activation Fee: A one-time charge of $10.
- Overage Charges: Let's say you go over your limit three times during the year, racking up an extra $10 charge each time ($30 total).
- HD Photo Downloads: The plan might only send thumbnail previews, charging $5 for a package of 20 HD photos. If you buy that twice, that's another $10.
Suddenly, your "cheap" plan isn't so cheap anymore. The true annual cost has jumped from $60 to $110—an increase of over 83%. This simple math shows exactly why you need to read the fine print.
Understanding the full financial picture is crucial. Usage patterns and plan costs vary widely; seasonal hunters often stick to low-cost, image-only plans, while those needing year-round security might opt for higher-capacity options. This variance puts the average monthly spend anywhere from $3 to $30. According to some analyses, the lifetime connectivity cost can easily exceed the camera's initial price. You can dive deeper into these market dynamics in this detailed industry analysis.
When you're comparing different options, it’s smart to map out these potential costs to find the most economical choice for your specific needs. To make this easier, check out our guide on the best cellular trail camera plans, where we break down the top providers and their fee structures.
Why a Cheap Data Plan Is Worthless Without Great Coverage
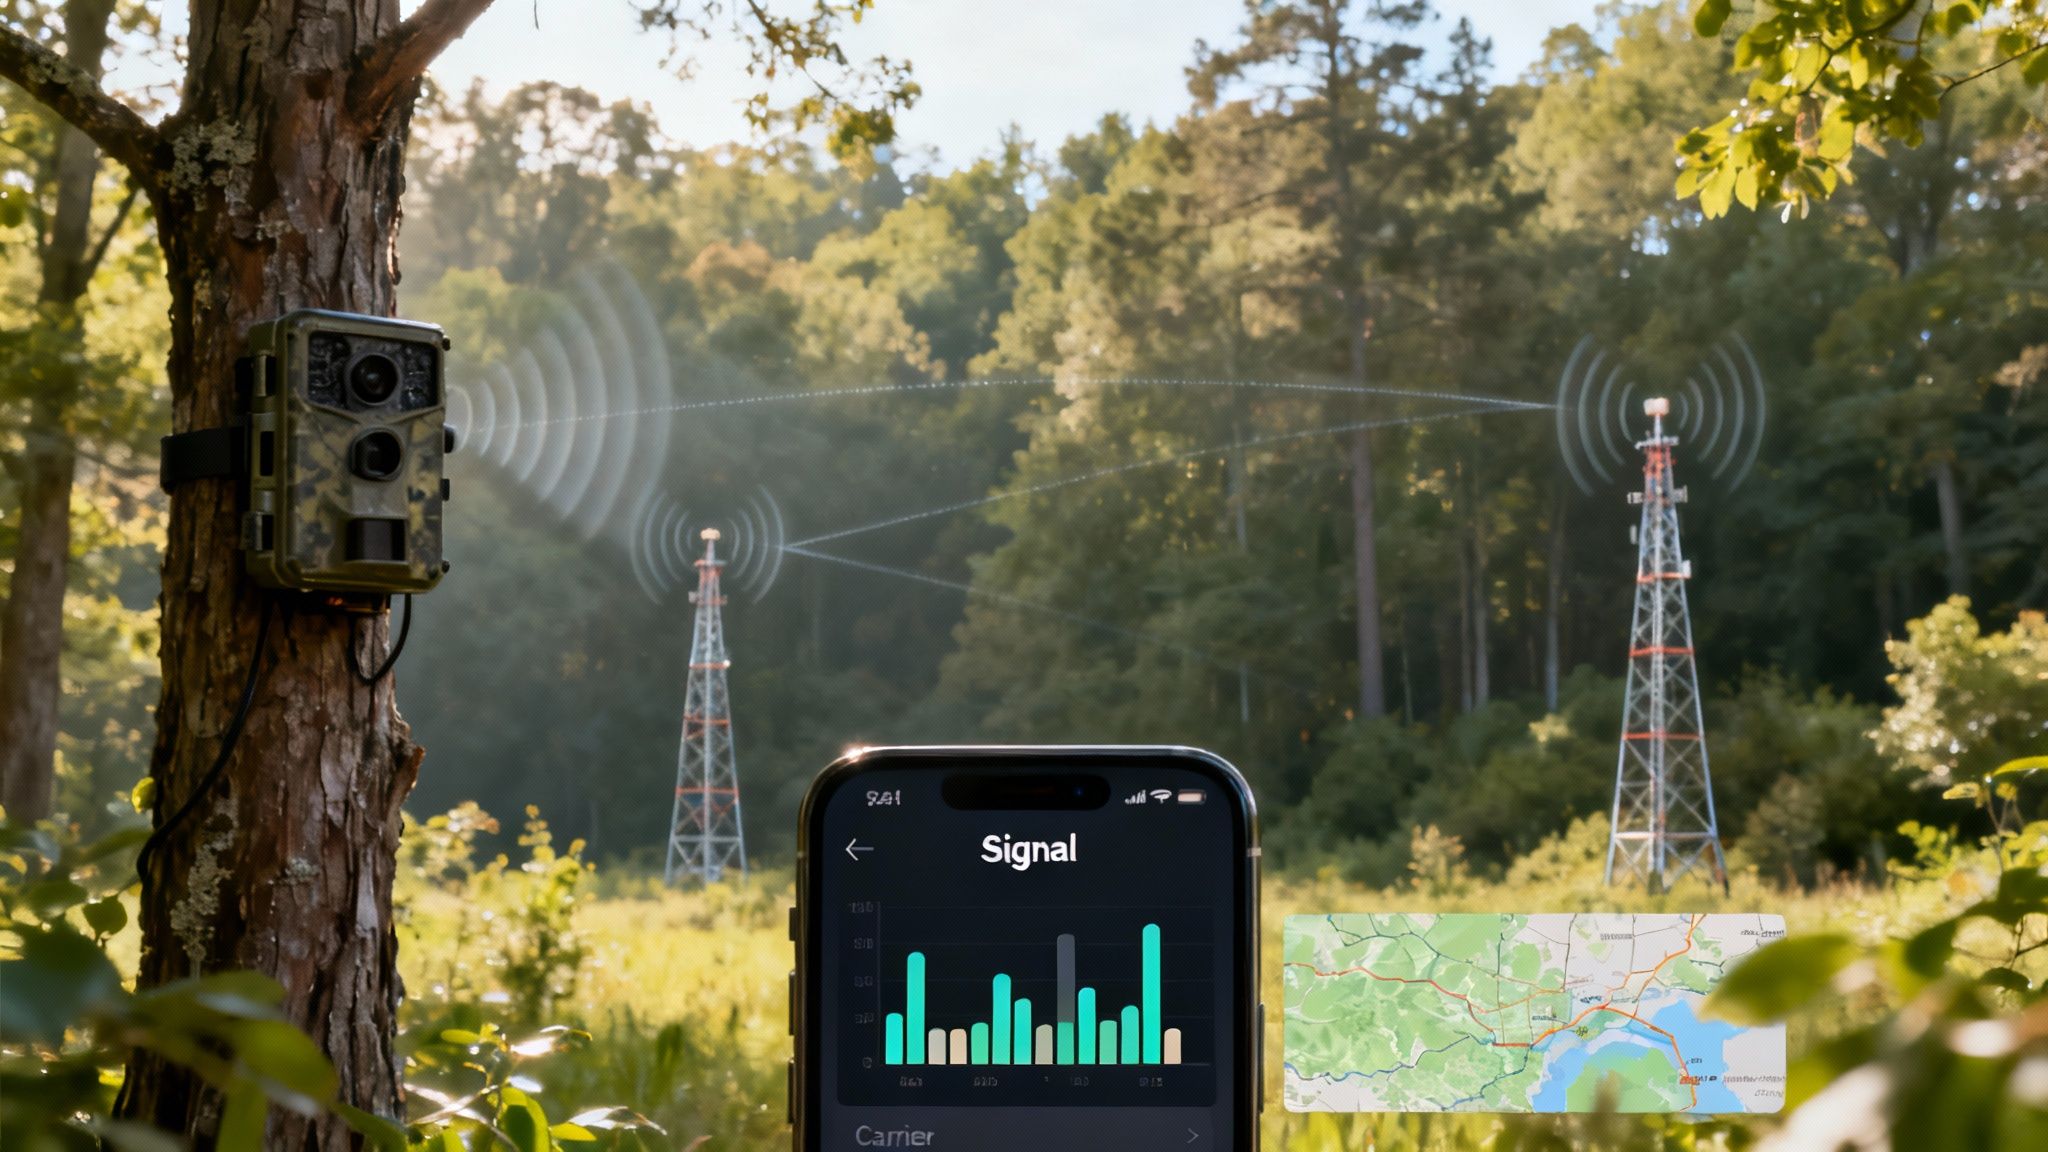
Let’s be honest. A cheap trail camera data plan might catch your eye, but it’s completely useless if your camera can’t get a signal in the woods. Picture this: you find the perfect scrape line deep in a valley, hang your camera, and then… nothing. Just silence. This is why reliable network coverage isn't just a nice-to-have feature—it's the absolute most critical part of your entire cellular camera setup.
Think of your camera like a radio. A top-of-the-line radio is just a box of wires if it’s out of range of the broadcast tower. In the same way, the best camera and data plan in the world will fail you if it can’t get a solid, consistent connection to a cell network. Before you lock into any plan, you have to be sure it will actually work where you need it to.
Making sure your investment pays off starts with understanding signal strength and knowing how to confirm it before you buy.
How to Actually Read Carrier Coverage Maps
Your first move should be checking the coverage maps from major carriers like Verizon and AT&T. But don't just glance at the pretty colors. You need to zoom in—way in—directly on your hunting property or monitoring area. You’re looking for solid, dark colors that indicate strong 4G LTE coverage. That’s what most modern cameras need to reliably send photos and videos.
Be skeptical of lighter shades or patches marked as "Fair" or "Roaming." These fringe zones are notoriously unreliable, especially under a thick tree canopy or during a storm. A signal that’s strong enough to make a quick phone call might not be nearly stable enough for your camera to push a 5 MB photo through the network.
To get a better handle on the technical side of things, it's worth understanding the importance of signal strength in wireless networks.
Single-Carrier vs. Multi-Carrier SIMs: A Game Changer
Once you’ve scouted the maps, you need to know how your camera connects. Trail cameras use two main types of SIM card technology, and the difference between them is massive out in the field.
- Single-Carrier SIMs: These cameras are locked into one specific network, like Verizon or AT&T. If that single carrier has a dead spot on your property—and they all do—your camera is just a very expensive paperweight.
- Multi-Carrier SIMs: This is the smarter technology, hands down. These cameras can automatically detect and connect to the strongest available signal from multiple carriers. If the AT&T signal starts to fade, it can seamlessly hop over to Verizon to keep transmitting.
Choosing a camera with multi-carrier capability, like the SignalSync technology in Magic Eagle cameras, is like buying a built-in insurance policy for your connection. It dramatically increases the odds that your camera will stay online, no matter where you decide to place it.
Don't Guess, Test: Verifying Signal Before You Commit
Coverage maps are a great starting point, but they aren't gospel. Nothing beats a real-world, boots-on-the-ground test.
The absolute best way to be certain is to take your personal cell phone (or even better, phones from different carriers) to the exact spot you plan to hang your camera. Stand right there and run a speed test. Check the signal bars. If your phone is struggling to load a simple webpage, your camera is going to struggle even more to send a high-resolution image. For a deeper look at a specific carrier's network, our guide on Verizon trail camera data plans offers more detailed insights.
Ultimately, a slightly more expensive plan on a network with a proven, tested signal is always a better investment than a bargain-bin plan that leaves you guessing whether your camera is even working.
Smart Ways to Reduce Your Data Usage
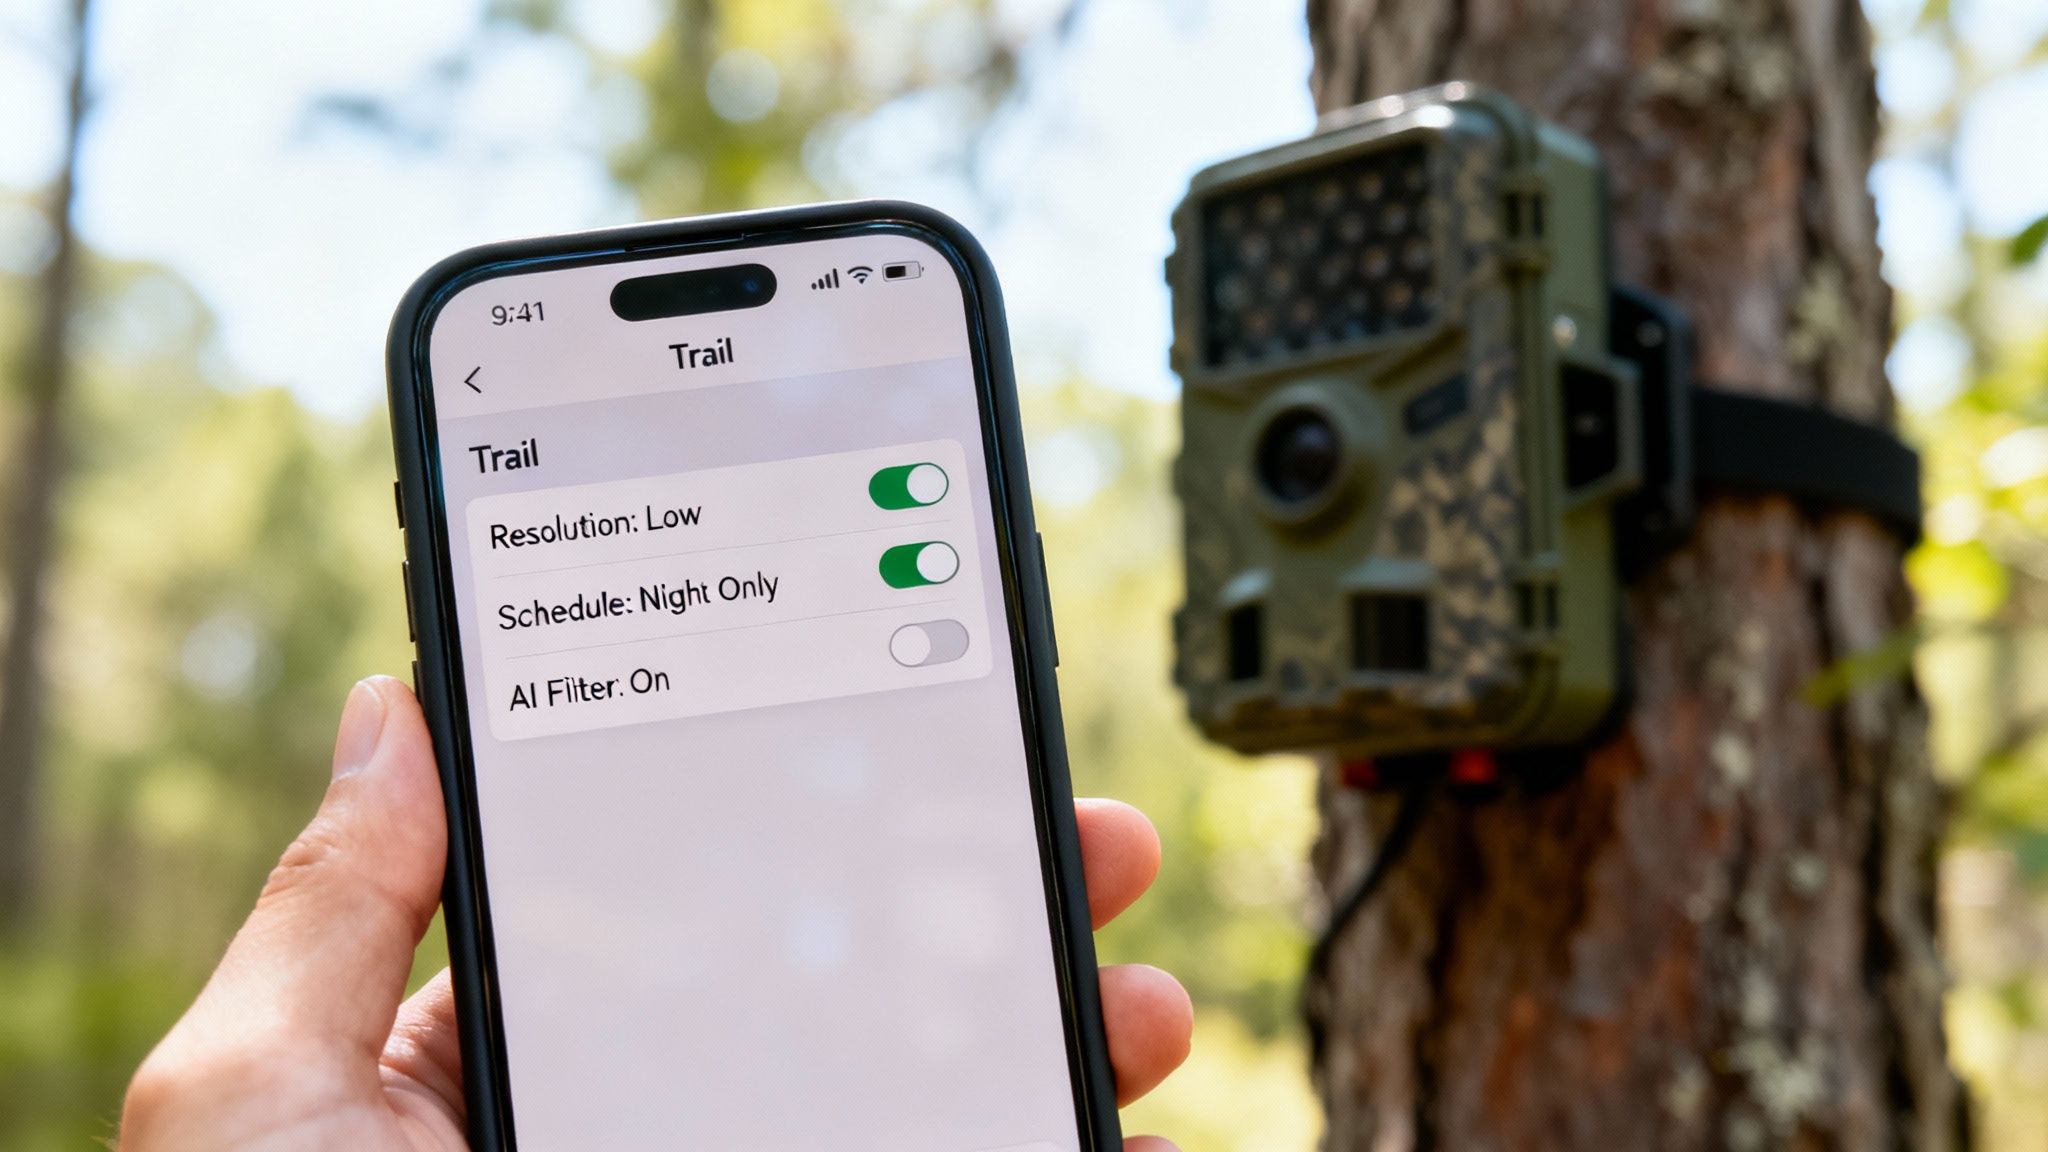
Taking control of your data plan doesn’t mean you have to miss out on the action. By making a few smart adjustments in your camera’s settings, you can stretch every megabyte and prevent those dreaded overage charges.
Think of it as fine-tuning your camera’s engine to run more efficiently. These strategies ensure you get the most important intel without burning through your monthly fuel. Best of all, most of these changes can be made remotely right from your smartphone app, giving you complete control over your camera’s data appetite from anywhere.
Optimize Your Image and Video Settings
The quickest way to slash data usage is to be selective about what your camera actually sends you. Let's be honest, not every picture of a swaying branch needs to be a crystal-clear, 5MB file. Making small tweaks to resolution settings has a huge impact on your monthly bill.
Start by adjusting your camera’s default transmission settings. You can configure it to send small, data-friendly thumbnails first. This allows you to quickly swipe through dozens of images using minimal data, then download only the high-resolution versions of the photos that truly matter—like that target buck finally showing up in daylight.
Here are a few key adjustments that make a real difference:
- Set Thumbnails as Default: Configure your camera to send low-resolution previews (thumbnails) for all triggered events. This is the single most effective way to conserve your trail camera data plans.
- Be Selective with HD Requests: Only request the full-resolution image or video when a thumbnail shows something genuinely interesting. Fight the temptation to download every single picture in HD.
- Limit Video Transmissions: Since video is the biggest data hog, reserve it for high-value situations. Consider setting your camera to only capture video during specific times of day or disabling automatic video uploads entirely.
Schedule Transmissions to Batch Your Photos
Instead of having your camera send a photo the instant it’s taken, you can schedule it to transmit pictures in batches. This setting tells your camera to collect all the images taken over a certain period—say, every four or six hours—and send them all at once.
This is an incredibly effective data-saving feature. Sending one large batch is far more efficient for the camera’s modem than sending dozens of individual files throughout the day. It also cuts down on the constant network "check-ins," which consume small but cumulative amounts of data over time.
Pro Tip: For scouting a low-traffic area like a scrape on a field edge, setting a transmission schedule of two or three times per day is often plenty. This keeps you updated without wasting data on constant, real-time alerts.
By batching transmissions, you can dramatically reduce the number of connections your camera makes to the cellular network, saving both data and battery life.
Leverage Smarter Camera Technology
Modern trail cameras are packed with intelligent features designed specifically to help you manage data. These tools go beyond simple settings, actively working to filter out unimportant events before they ever get sent.
One of the most powerful advancements is on-device AI filtering. Cameras with this feature can distinguish between significant motion (like a deer) and nuisance triggers (like windblown leaves or a pesky squirrel). By filtering out these "junk" photos at the source, the camera avoids transmitting them altogether.
This saves you both data and the time you'd otherwise spend deleting useless images. It’s a smarter, more efficient way to monitor your property.
To help you get started, here's a quick reference table of common settings and their impact on your data plan.
Key Data-Saving Features and Settings
| Feature or Setting | How It Conserves Data | Ideal for Users Who... |
|---|---|---|
| Thumbnail-First Transmissions | Sends small, low-res previews instead of full HD images by default, drastically cutting the data used per trigger. | Want to review every event without burning through their data allowance. |
| Scheduled Sync/Batch Uploads | Groups all photos from a set period (e.g., 6 hours) into a single transmission, reducing network connection frequency. | Monitor low-traffic areas and don't need instant notifications for every picture. |
| On-Device AI Filtering | Uses artificial intelligence to identify and discard "junk" photos (e.g., leaves, branches) before they are sent. | Have cameras in windy locations or areas with lots of non-target animal movement. |
| Lower Video Resolution | Transmits videos in standard definition (SD) instead of high definition (HD), which can cut video file size by 50-75%. | Still want video clips but are focused on confirming animal presence, not cinematic quality. |
| Reduced Burst Mode | Captures fewer photos per trigger event (e.g., 2 instead of 5), lowering the total amount of data transmitted. | Are trying to identify animals passing through, not capture a perfect pose. |
These settings give you the power to customize your camera’s behavior to match your specific scouting needs and budget, ensuring you never pay for data you don't use.
The Rise of All-in-One Camera and Data Solutions
The cellular trail camera world is getting a lot simpler, and it’s about time. Gone are the days of buying a camera, hunting down a compatible SIM card, and then trying to activate a separate data plan. Manufacturers are now bundling everything—the camera, the data plan, and the cloud app—into a single, ready-to-go package.
This all-in-one approach is catching on for one simple reason: it eliminates the biggest headaches of running cellular cams. No more guesswork matching cameras to carriers or getting the runaround between different companies when something goes wrong. When the hardware, software, and data all come from one place, the experience just works.
A Unified System for Better Performance
When one company controls both the camera and the network service, they can tune them to work perfectly together. The result is a more reliable connection, faster photo transmissions, and a much more stable app on your phone.
It also means you have a single point of contact if you need help. If your camera suddenly stops sending pictures, you don't have to play detective, wondering if it’s a hardware glitch, a SIM card failure, or a network outage. One call or email gets you to the right person, saving you a ton of time and frustration.
The core idea is simple: connectivity is no longer an optional add-on but a fundamental part of the modern trail camera experience. By integrating the data plan directly, manufacturers ensure their advanced features actually work as intended in the field.
This shift is a direct response to what hunters and property managers have been demanding. As more people moved away from old-school SD-card-only models, they expected better image quality, longer battery life, and powerful tools like cloud storage and AI. All of those features depend on a constant, reliable data connection. You can explore detailed market analysis on cellular camera growth to see just how quickly this technology has taken over.
Deeper Integration Unlocks Advanced Features
The real magic of an all-in-one solution is how it unlocks advanced features that would be clunky or impossible otherwise. Because the manufacturer controls the entire pipeline—from the camera lens to the cloud—they can build seriously sophisticated tools to make your scouting more effective.
These integrated features often include:
- Cloud-Based AI: Instead of relying on the camera's limited processor, the system can use powerful cloud servers to analyze your photos. This allows it to automatically identify species, separate bucks from does, and filter out false triggers without draining your camera's battery.
- Live Streaming: On-demand video streaming requires a perfectly synced connection between the camera's hardware and the network—something best achieved in a closed, optimized system.
- Firmware Updates: Manufacturers can push critical software updates "over the air" directly to your camera, fixing bugs, improving performance, and even adding new features while it's still strapped to a tree.
This evolution makes one thing clear: the best trail camera data plans are the ones built specifically for the device they power. By choosing an all-in-one solution, you're not just buying a camera; you're investing in a complete scouting ecosystem designed to work flawlessly right out of the box.
Your Top Questions About Data Plans Answered
Even with all the options laid out, you probably still have a few practical questions about how these data plans work out in the field. Let's dig into the most common ones I hear from other hunters and property managers. Getting these answers straight will help you lock in your decision with confidence.
Can I Just Use My Phone’s Data Plan for a Trail Camera?
This is easily the most common question, but the answer is a hard no. Your personal cell phone plan is built for smartphones—devices that are always on and use data in a completely different way. Trail cameras, on the other hand, are specialized IoT (Internet of Things) or M2M (Machine-to-Machine) devices that wake up, send small bits of data, and go back to sleep.
Popping a SIM card from your phone into a camera will almost certainly violate your carrier's terms of service. Even if it didn't, it probably wouldn't work correctly anyway. The camera's hardware isn't designed for it, and you'd likely face constant connection failures. Your best bet is to always stick with a plan offered by the camera maker or a dedicated IoT provider to ensure your camera actually works when you need it to.
What Happens if I Go Over My Monthly Data Limit?
This is a big one, because how providers handle data overages can really hit your wallet. The consequences depend entirely on the kind of plan you signed up for.
- Prepaid or Pay-As-You-Go Plans: This is straightforward. Your service just stops cold. Your camera won't send you another photo or video until you top up your account and buy more data.
- Monthly Subscription Plans: Here's where you need to be careful. Some carriers will hammer you with expensive overage fees for every extra megabyte you use. Others will "throttle" your connection, slowing it down to a crawl that's basically useless until your next billing cycle starts.
A few of the better providers offer the flexibility to upgrade your plan mid-month. That's a fantastic feature to look for if you think your usage might spike, like during the peak of the rut.
Field Insight: Running out of data a week before opening day is a nightmare scenario. I always recommend choosing a plan with a clear, fair overage policy or an easy upgrade path. It's crucial for keeping your eyes on the woods during the most important times of the year.
Can I Pause My Data Plan in the Off-Season?
Absolutely, and you should. Many companies that serve seasonal users like us build this flexibility right into their trail camera data plans. The ability to suspend your service during the months you aren't scouting can save you a serious amount of cash over the year.
This feature lets you stop the billing for a few months without having to completely cancel your service and go through the hassle of setting everything up again next season. But be warned, not all plans offer this. If you have a clear "on" and "off" season, make sure you pick a provider that explicitly advertises this feature before you sign up.
Do All Trail Cameras Work With All Carriers?
Nope, and this is a critical detail to get right. Cameras are built with specific cellular modules that are only compatible with certain networks, like AT&T or Verizon. Some cameras are "carrier-locked," meaning they will only work if that specific carrier's signal is available where you place it.
A better option is to look for cameras sold as "nationwide" or "multi-carrier." These are far more flexible because they can automatically detect and connect to the strongest network in a given area, whether it's AT&T, Verizon, or another partner. Before you buy any camera, you have to confirm which carriers it supports and then double-check that you have a decent signal from at least one of them at your spot.
Ready to stop worrying about carriers, plans, and compatibility? The Magic Eagle EagleCam 5 was designed to solve this problem with an all-in-one connection. Its SignalSync technology automatically finds and connects to the strongest network, so you get reliable service without ever having to think about it. https://magiceagle.com