
The best elk hunting backpack isn't just one specific model. It's a complete system meticulously engineered to haul extreme weight without breaking you down. The top dogs in this space all share a few non-negotiable traits: a rock-solid internal frame, a highly adjustable suspension system, and at least 5,000+ cubic inches of capacity to swallow up both your gear and all the meat from a successful hunt.
What Makes a Great Elk Hunting Backpack

Picking the right pack is one of the most critical gear decisions you'll make. It has a direct, make-or-break impact on your effectiveness and how long you can last out there. Don't think of it as just a bag. It's your mobile basecamp, your lifeline, and arguably your most reliable hunting partner.
Your pack carries your shelter, your food, your expensive optics, and—if all goes well—the incredible reward of a hard-earned bull. The difference between a good pack and a great one becomes painfully, brutally obvious on a heavy pack-out when you're still miles from the truck.
Core Components of a Superior Pack
The absolute foundation of any top-tier elk pack is its frame and suspension. These two parts have to work in perfect harmony to transfer the immense weight of deboned meat—which can easily top 100 pounds—off your shoulders and onto your hips where your powerful leg muscles can do the work. This is what allows you to carry those back-breaking loads efficiently and with a much lower risk of injury.
The market for this kind of specialized gear has exploded, with more hunters realizing it pays to invest in quality. In fact, the global hunting backpack market was valued at $1.5 billion in 2023 and is on track to nearly double. You can read the full market research about this expanding industry if you're curious.
A truly great pack feels like an extension of your own body. When it's fitted right, it moves with you through thick timber and up steep inclines, never fighting your natural motion or throwing you off balance.
Beyond the frame, a few key features separate the best from the rest:
- Load-Hauling Capability: A dedicated meat shelf or an expandable load-carry system is non-negotiable. This is the whole point.
- Stealth and Durability: The materials must be tough enough to handle backcountry abuse yet quiet enough that you don't sound like a walking potato chip bag when you're trying to sneak in on a bull.
- Intelligent Organization: Pockets and access points need to be designed for intuitive use. When you need your rangefinder or a call, you need it now, not after fumbling with five different zippers.
Matching Pack Capacity to Your Hunt
Choosing the right pack size can feel like you're trying to decipher a secret code of numbers and liters, but it’s a lot simpler than it looks. The capacity of an elk hunting pack is measured in cubic inches (ci), which is just a fancy way of saying how much gear it can hold. Think of it as the difference between a grocery basket and a shopping cart—you don't need a cart for a gallon of milk, and you can't stuff a week's worth of groceries into a basket.
Your hunting style is the single biggest factor here. Are you a day hunter who hikes back to the truck or a basecamp each night? Or are you a backcountry warrior who vanishes into the mountains for five days at a time, carrying everything you need to survive on your back?
Day Hunts vs. Multi-Day Expeditions
For most day hunts, a smaller pack in the 2,500 to 3,500 cubic inch range is perfect. It gives you plenty of room for your lunch, water, a kill kit, and some extra layers without feeling like you're hauling a small car on your back. The big limitation, though, becomes obvious the moment you notch your tag—it almost certainly won't have the space or the frame to haul out a serious amount of meat in one trip.
This is where the big expedition packs really earn their keep. High-capacity packs built specifically for elk hunting have become the standard for serious backcountry hunters, with models from 5,400 to 7,000 cubic inches being the sweet spot for multi-day trips. Modern materials have made a huge difference here; you can find packs offering 5,400 cubic inches of space that weigh just over five pounds.
To help visualize this, here’s a quick breakdown of what those numbers mean in the real world.
Elk Hunting Pack Capacity Guide
This table breaks down common pack sizes and what they're best suited for, so you can match the right volume to your specific hunting plans.
| Capacity (ci) | Ideal Hunt Type | Typical Load (lbs) | Example Model Type |
|---|---|---|---|
| 2,500-3,500 | Day Hunt / Scouting | 15-30 lbs | Lightweight Daypack |
| 4,000-5,500 | Overnight / 2-3 Day Hunt | 30-50 lbs | Mid-size Backcountry |
| 5,500-7,000+ | 3-7+ Day Expedition | 50-80+ lbs | Expedition Frame Pack |
As you can see, a few extra days in the field demands a significant jump in both capacity and load-bearing capability. Don't try to cram a multi-day hunt's worth of gear into a daypack.
Calculating Your True Volume Needs
Here's the thing you absolutely have to remember: a successful hunt completely changes your capacity needs. An average bull elk can yield 200 pounds or more of deboned meat. That meat alone will take up roughly 4,500 to 5,000 cubic inches of space.
Your pack must handle your gear plus the meat. A 5,000 ci pack can get maxed out in a hurry, which is why packs with expandable load shelves between the frame and the main bag are such a game-changer for hauling meat.
Getting a handle on your pack's capacity is critical, and a big part of that is being ruthless about weight management. The lessons learned in managing pack weight for backpackers, where every single ounce counts, are incredibly valuable for elk hunters. This kind of planning makes sure you have room for essentials, like extra food and your scouting tools. Speaking of scouting, knowing your area is key, and you might find our guide on what elk sign looks like helpful: https://magiceagle.com/blogs/knowledge/what-does-elk-scat-look-like.
Dialing In the Perfect Fit and Suspension
You can have the most expensive, tricked-out pack on the market, but if it doesn’t fit right, it’s worse than useless—it’s a liability. A poorly fitted pack will grind on your hips, dig into your shoulders, and turn a dream hunt into a miserable, painful slog. The whole point is to make the backpack feel like an extension of your own body, not some dead weight fighting you with every single step.
Think of it like tuning a guitar; every strap is a string that needs just the right amount of tension for the whole system to work together. A good suspension system is designed to transfer up to 80% of the load straight onto your hip bones, letting your powerful leg muscles do the real work. But that magic only happens when the pack is sized and adjusted perfectly for your body.
This chart gives you a quick visual on how pack size usually lines up with the type of hunt you're planning.
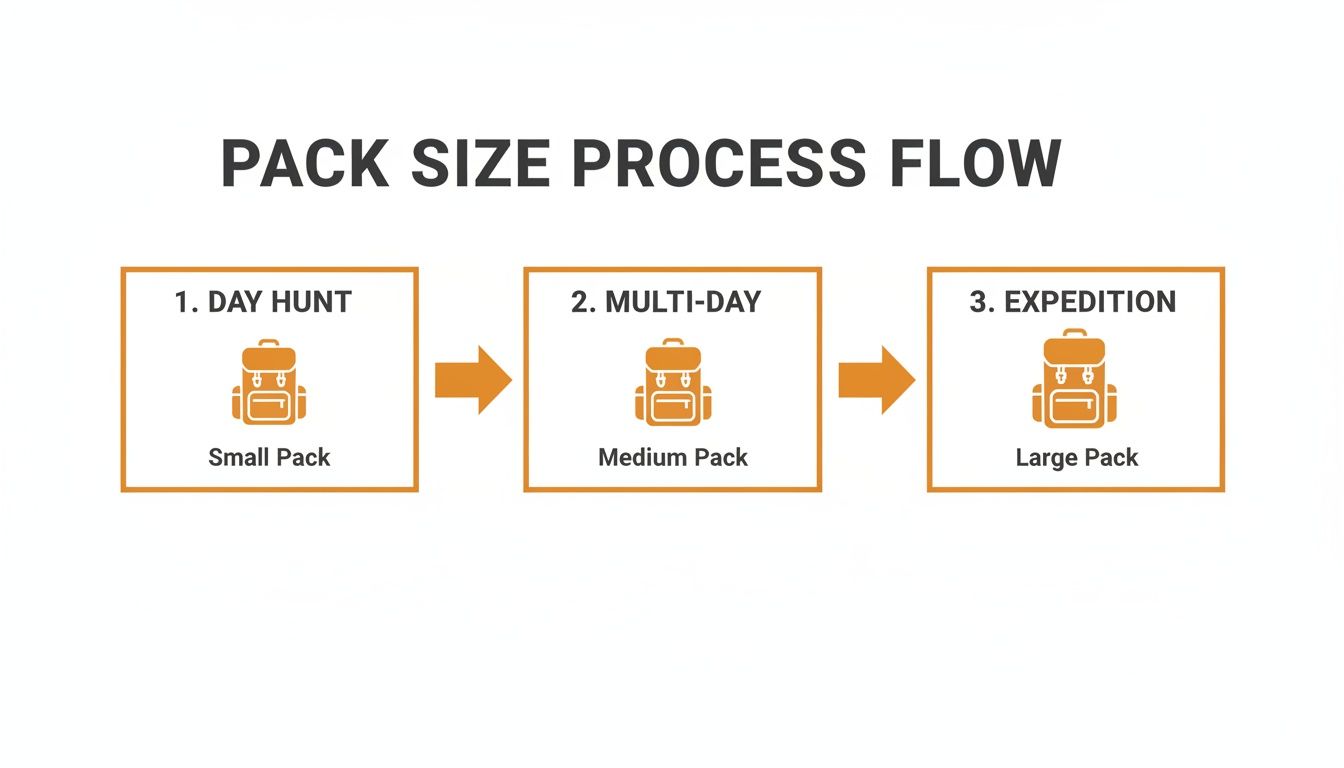
Just remember, while this shows the volume you'll need, the suspension system has to be tough enough to handle the weight that comes with it.
Key Adjustments for a Perfect Fit
Before you even think about loading up your pack, you need to know your torso length. This is the distance from your C7 vertebra (that bony bump at the base of your neck) down to your iliac crest (the very top of your hip bones). This single measurement is what determines your frame size. Once you've got the right size, throw about 30-40 pounds in the pack and follow these steps to get it dialed in.
- Hip Belt First: Loosen every single strap. Now, position the hip belt so the padding sits right on top of your hip bones and cinch it down good and snug. This is your foundation.
- Shoulder Straps: Pull down on the shoulder straps until they wrap smoothly over your shoulders. You shouldn't see any gaps between the strap and your body.
- Load Lifters: These are the unsung heroes of a good pack. They’re the small straps connecting the top of your shoulder straps to the pack frame. You want to adjust them to roughly a 45-degree angle. This pulls the weight in and up, keeping it from sagging away from your back.
- Sternum Strap: Last but not least, buckle the sternum strap across your chest. Tighten it just enough to pull the shoulder straps inward so they don't slip off while you're scrambling up a ridge.
A correctly adjusted pack has zero sway or bounce. The weight should feel completely stable and centered, moving with you, not against you. That stability is just as crucial for guys running non-traditional setups, which we break down in our guide on choosing a saddle hunting backpack.
Choosing Materials for Stealth and Durability
Those last few moments of a stalk are everything. The slightest unnatural sound—a zipper pull clinking against a buckle, or a branch scraping across a noisy fabric—can blow your cover and end the hunt right there. That’s why the best elk hunting backpacks are made from materials that pull off a tough balancing act: they have to be whisper-quiet yet tough as nails.
Your pack will get dragged through brush, scraped against rocks, and soaked in the rain. It needs to handle all that abuse while keeping you completely undetected.
Finding the Quiet Strength
Think of it as a trade-off between silence and strength. Fabrics like high-denier Cordura are legendary for their ability to resist tearing and abrasion, making them a go-to for high-wear zones like the bottom of a pack. The only catch? Some of those ultra-tough materials can be pretty noisy when they get scraped.
To solve this, the top pack manufacturers have gotten smart. Many premium packs now feature a brushed or fleece-like fabric on the exterior. This soft texture is a game-changer for dampening sound, killing that awful "zzzzip" noise you get when pushing through a thicket of alders. The trade-off is that these quieter materials can sometimes be magnets for burrs or hold a bit more moisture.
This is exactly why a Durable Water Repellent (DWR) finish is a non-negotiable feature. This coating makes water bead up and roll right off the fabric, keeping your gear from getting soaked in a light rain or snow. It also prevents the material from getting waterlogged and heavy.
A pack's material isn't just about the fabric—it's the whole system. You need to see reinforced stitching at high-stress points, like where the shoulder straps and hip belt connect. Quiet, easy-to-use hardware, like specially designed buckles and zipper pulls, also makes a world of difference when you’re trying to stay silent.
Weapon Carry Systems and Durability
A pack’s durability also comes down to how well it carries your weapon. A poorly designed rifle or bow carry system is a liability. It lets your weapon shift around, snag on every branch, and make a racket. Look for systems that have adjustable compression straps and a solid boot or pocket to cradle the stock or cam. The goal is a rock-solid attachment that keeps your weapon accessible but locked down and quiet.
The demand for this kind of specialized gear is huge. The global backpack market is projected to swell to $22.87 billion by 2026, which shows just how much people are willing to invest in high-performance equipment. You can discover more insights about the backpack market on thebusinessresearchcompany.com. For hunters, that investment drives real innovation, pushing companies to develop better, quieter, and tougher packs every year.
Smart Organization For The Backcountry Hunter
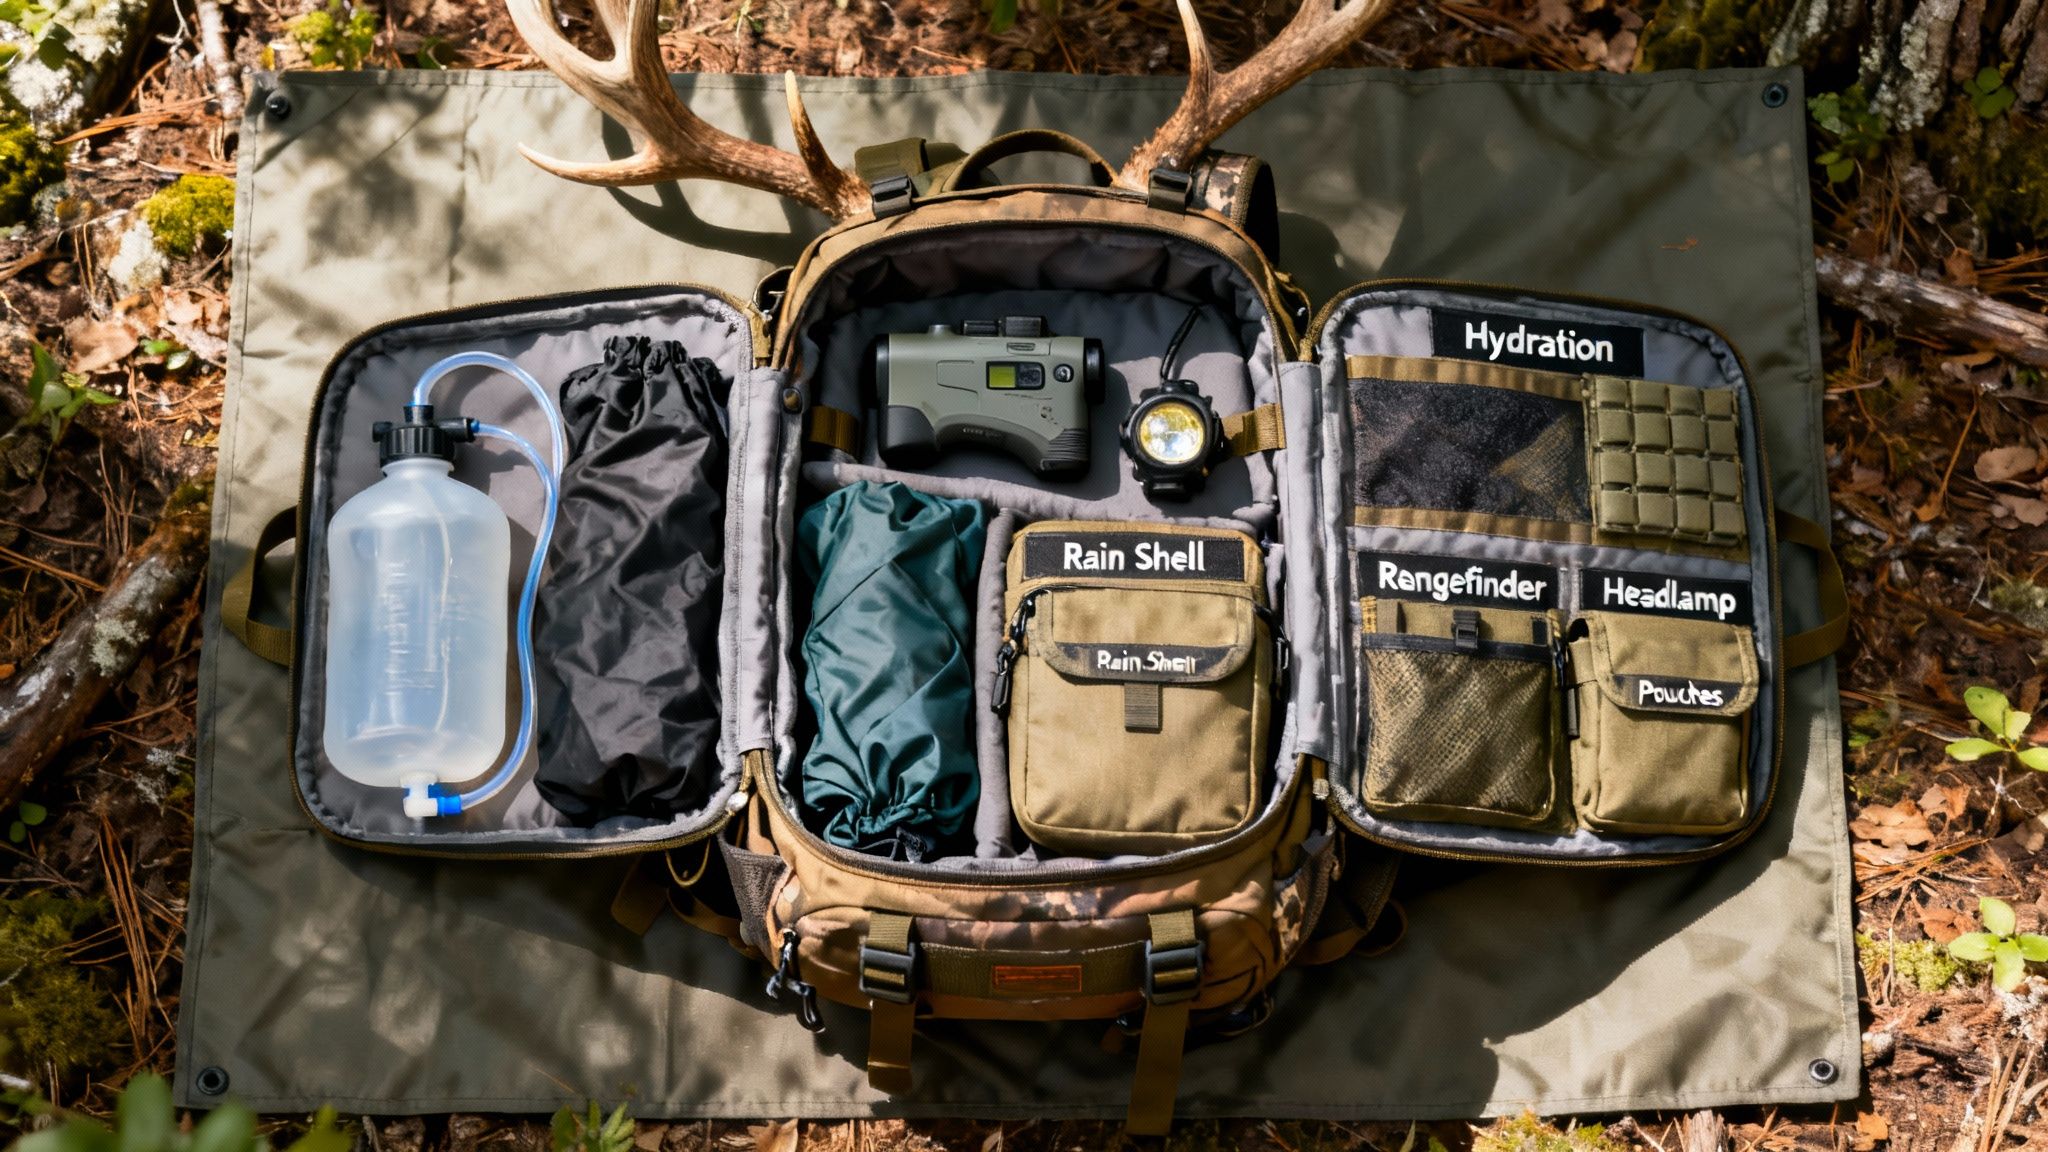
A well-organized pack is about so much more than just being tidy. It’s about speed, efficiency, and ultimately, your safety in the field. When you have a split-second opportunity for a shot, the last thing you want is your rangefinder buried under a puffy jacket and rain gear. The best elk packs are built to support a system where every piece of gear has its own spot, and you know exactly how to get to it.
Think of your pack like a mobile toolbox. You’d never just dump all your wrenches, sockets, and screwdrivers into one giant bucket and hope for the best. You organize them so you can grab what you need without a second thought. Your hunting pack demands that same level of methodical thinking.
This means using external pockets for items you’ll be grabbing all day long—your GPS, calls, and wind checker. These are your go-to tools. They need to be accessible without dropping your pack and digging through the main compartment.
Creating Your Packing System
A smart packing system is all about consistency. You should be able to find your headlamp or first-aid kit with your eyes closed, in the pitch dark. This is where modular pouches, often called "ditty bags," become an absolute game-changer.
- Kill Kit: This bag is dedicated to the moment of truth. It holds your knives, game bags, and latex gloves.
- Emergency & Survival: A separate, brightly colored pouch should contain your fire starter, water filter, and emergency shelter.
- Electronics: Keep your battery banks, charging cables, and GPS together in another pouch to keep them organized and protected.
By grouping related items into dedicated bags, you're essentially creating a mental map of your pack. This system builds confidence and cuts down on critical wasted time when every second counts.
As you plan out your gear, don't forget to fuel the engine—your body. Having effective high-protein hiking snacks ready to go provides the sustained energy you'll need for those brutal mountain climbs. A well-rounded system accounts for both your gear and your nutrition. For a more exhaustive breakdown, this list of hunter essentials is a great resource for building out your organized kits.
Essential Maintenance to Keep Your Pack Field Ready
Think of your pack as a critical piece of gear, right up there with your rifle or bow. It's a serious investment, and just like any high-performance tool, it needs regular care to keep it from failing you when it matters most. Ignoring it is asking for a busted buckle or torn seam miles from the truck.
A little preventative maintenance after a hunt is your best insurance policy for the next one. Sure, the grit, sweat, and blood are badges of honor from a tough hunt, but they’re also hell on the high-tech fabrics and hardware that make up a good pack. Let’s walk through how to keep it in fighting shape.
Post-Hunt Cleaning and Inspection
Once you've unpacked the last of your gear, the real work begins. Don't just toss your pack in the garage until next season—that's a recipe for disaster.
- Empty and Shake Out: First things first, empty every single pocket and compartment. Even those little hip belt pouches. Then turn it upside down and give it a good, hard shake to knock out all the dirt, pine needles, and forgotten granola bar crumbs.
- Spot Clean Blood and Grime: Whatever you do, don't throw it in the washing machine or use harsh detergents. That will strip the DWR (Durable Water Repellent) coating right off. Instead, grab a soft brush and some mild, non-detergent soap (a tech wash is perfect) and gently scrub away any blood or caked-on mud.
- Rinse and Air Dry: Give it a thorough rinse with a hose or in a big utility sink. Then, hang it upside down somewhere with good airflow, but out of direct sun. Never, ever put your pack in a dryer. Storing it even slightly damp is a one-way ticket to mildew, which will ruin the fabric for good.
Use cleaning time to give your pack a solid once-over. This is your chance to spot small problems before they become catastrophic failures deep in the backcountry.
Proactive Repairs and Proper Storage
With the pack clean and bone-dry, it's time for a detailed inspection. Focus on the high-stress areas where things are most likely to go wrong.
Your inspection checklist should include:
- Buckles and Straps: Check every single buckle for hairline cracks or signs of stress, paying close attention to the main hip belt and load lifter buckles. Look over all the webbing for any fraying.
- Zippers: Run every zipper back and forth to make sure they glide smoothly. If they feel gritty, use a small brush to clean out the teeth.
- Frame and Suspension: Eyeball the frame connections to make sure all the bolts and rivets are tight. Check the stitching where the shoulder straps and hip belt join the pack body—this is a major load-bearing area.
When it comes to storage, find a cool, dry spot away from direct sunlight. Loosen all the compression straps to take the tension off the seams and buckles. It’s a simple step, but doing this ensures your pack is always ready to grab and go for the next adventure.
Questions from the Field: Your Elk Pack FAQs Answered
Diving into high-performance packs always brings up a few questions. I get them all the time. Let's tackle some of the most common ones that hunters ask when they're trying to nail down the right pack for their hunt.
What’s the Best “Do-It-All” Pack Size for Elk Hunting?
For the hunter who splits their time between day hunts from a base camp and shorter 2-3 day bivvy trips, a pack in the 4,000 to 5,500 cubic inch range is your jack-of-all-trades. It's big enough to haul meat or carry overnight gear, but it also compresses down tight for a nimble day hunt. It truly is the sweet spot for versatility out in elk country.
How Much Weight Should My Pack Really Be Able to Handle?
Don't even consider a pack with a load rating under 100-120 pounds. Seriously. Your day-to-day gear might only be 30-40 pounds, but once an elk is down, you're adding 80+ pounds of deboned meat to that. A rock-solid frame and suspension system built to haul that kind of weight isn't a luxury—it's non-negotiable for getting an elk off the mountain safely.
Internal vs. External Frame: Which One Is for Me?
For the vast majority of elk hunters, a modern internal frame pack is the way to go. They hug your body, which gives you far better stability and agility when you're busting through thick timber or navigating a steep sidehill. They're also much quieter.
External frames are absolute workhorses for hauling ridiculously heavy, awkward loads and they do offer fantastic ventilation. But, they tend to be bulkier and noisier, making them less than ideal when you’re trying to stalk in close.
How Can I Test a Pack’s Fit Before I Buy It?
The only real way to know is to load it up. Throw 30-40 pounds of weight in there—dumbbells, sandbags, or water jugs work great—and wear it for at least 15 minutes. Walk around your house, go up and down some stairs, and feel for any hotspots or pressure points. The hip belt is key; it should sit snugly on your hip bones and carry about 80% of the weight without slipping an inch.
Ready to gain an edge on your next hunt? Magic Eagle cellular trail cameras give you the real-time scouting intelligence you need. See what's happening in the field, right from your phone.