
A game camera stand is basically a tripod built tough for your trail camera. Forget just strapping your camera to the nearest tree—a stand gives you way more control over where you point it and keeps it rock-steady. It's the secret to getting crisp, clear shots, especially in places where a good tree is nowhere to be found.
Why a Game Camera Stand Is Your Most Underrated Tool

We've all been there. You get a new trail cam and immediately strap it to the first decent-looking tree you find. It works, sure, but it's also why so many of us end up with crooked photos, views blocked by a stray branch, and a nagging feeling we're missing the action. The ol' "strap-it-and-forget-it" method really holds your camera back.
A good stand changes the game entirely. It takes your camera from a passive observer and turns it into a serious scouting tool.
Think about it this way: a professional photographer would never show up to a shoot without a tripod. Why? Because stability is everything for a perfect shot. A stand does the same for your trail cam, keeping it absolutely still for sharp images and smooth video. This is huge on windy days when a camera strapped to a thin tree can sway, giving you nothing but blurry pictures and false alerts. A solid mount means your camera stays exactly where you aimed it, period.
Unlocking Perfect Placement and Angles
The single biggest win with a game camera stand? Freedom. You're no longer handcuffed to the location of straight, perfectly-spaced trees. This alone can revolutionize how you scout, letting you monitor key spots that were impossible to cover before.
Suddenly, you can set up your camera:
- In the middle of a food plot to watch travel corridors far from any tree line.
- Right on a creek bed where the only good vantage point is a rocky bank.
- On that tricky hillside where every single tree grows at a weird angle.
- At the exact height and angle to get the whole animal in the frame, not just its legs or back.
A stand gives you total control over height, angle, and location. That control means you get a clear, unobstructed view of your target zone, every single time. This consistency is what allows you to really pattern wildlife and helps advanced features like AI species recognition work their best.
A Small Investment for Major Returns
At the end of the day, a game camera stand isn't just another piece of gear—it's a small investment that delivers a massive payoff. The cost is tiny compared to the value of the intel it helps you gather. Better placement means more consistent sightings, clearer images, and a much more accurate picture of what the animals on your property are doing.
That improved data translates directly into more successful hunts. By graduating from the basic tree strap, you elevate your entire scouting strategy and put your camera to work 24/7, no matter the weather or the terrain.
Breaking Down the Different Types of Game Camera Stands
Choosing the right game camera stand is a lot like picking the right tool for the job. You wouldn’t use a hammer to turn a screw, and the stand that’s perfect for a dense forest might be completely useless in an open field. Figuring out the main types is the key to placing your camera with total precision, no matter where you are.
The massive growth in trail camera popularity has led to a flood of new mounting solutions. The global trail camera market hit USD 852.97 million in 2024 and is expected to soar to USD 1,420.95 million by 2032. That's a clear sign of just how many people rely on this tech, and it means we have more options for stands than ever before. You can read more about this market expansion from 360iResearch.
So, let's break down the most common stands you'll find out in the field.
Game Camera Stand Comparison
Before we dive deep, here’s a quick-glance table to help you match the right stand to your situation.
| Stand Type | Best For | Pros | Cons |
|---|---|---|---|
| Tree Screw Mounts | Wooded areas, fence lines, dense forests | Extremely stable, installs fast, allows for precise aiming. | Requires a tree, leaves a small hole, may be restricted on public land. |
| T-Post Mounts | Open fields, farm fence lines, food plots | Rock-solid stability, great for treeless areas, elevated vantage point. | Only works with T-posts, less versatile in other environments. |
| Ground Stakes/Augers | Prairies, cut cornfields, marsh edges | Creates an anchor point anywhere, ideal for low-profile setups. | Can be tough to install in rocky or frozen ground. |
| Tripod Stands | Any terrain, especially rocky or uneven ground | Maximum versatility, highly portable, works on any surface. | Bulkier than other options, can be less discreet if not hidden well. |
This table gives you the basics, but the real expertise comes from knowing exactly when and why to use each one.
Tree Screw Mounts
Tree screw mounts are the undisputed workhorses in the trail cam world, especially for anyone scouting in wooded country. They’re simple, tough, and incredibly effective.
Think of it as a heavy-duty screw with a camera mount on the end. You just twist the sharp, auger-like tip into a tree, pop your camera on, and use the ball joint to get the perfect angle. This design is unbelievably sturdy and lets you position your camera away from the main trunk, helping you aim around branches or down a trail from a sneaky spot. They are my go-to for a fast, secure setup.
- Best For: Dense forests, wooded fence lines, and anywhere a solid tree is your main anchor.
- Pros: Super stable, installs in seconds, and offers precise aiming with a gimbal head.
- Cons: You need a tree, and it leaves a small hole, which can be an issue on public land or with certain trees.
T-Post Mounts
When you’re scouting an open field lined with metal T-posts, these mounts are your best friend. T-posts are everywhere on farms and ranches, making these stands the perfect solution for monitoring agricultural fields or food plots.
A T-post mount just clamps right onto the post, giving you a rock-solid platform for your camera. It's a total game-changer for watching fence lines or gates in areas where the nearest tree is hundreds of yards away. They’re usually built from powder-coated steel to handle years of rain, sun, and snow.
Pro Tip: T-post mounts give you a great high-angle view in open country. You can clamp your camera higher up the post to get a wider field of view, making it easy to watch an entire food plot or field entrance from one spot.
Ground Stakes and Augers
So what do you do when there are no trees and no fence posts? You bring your own anchor point. That’s where ground stakes—often called auger mounts—come in. They're long metal stakes you drive or screw right into the dirt. A standard threaded mount at the top holds your camera securely.
It’s like creating your own mini fence post exactly where you need it. This gives you the freedom to stick a camera in the middle of a cut cornfield, along a marsh, or on a prairie hillside. They are fantastic for low-profile setups where you want to hide the camera down in the tall grass or brush.
Tripod Stands
For pure, unmatched versatility, nothing beats a tripod stand. And I'm not talking about your flimsy indoor photography tripod—these are rugged, often camouflaged, and built for the abuse of the outdoors. Their biggest advantage is that you can set them up on literally any surface, from soft mud to hard, rocky ground where a stake just won’t go in.
A quality game camera stand in tripod form lets you adjust each leg on its own, which means you can get a perfectly level and stable shot on seriously uneven terrain. This makes them the ultimate problem-solvers for tricky spots like creek beds or steep ridges where other mounts just won't work. They're also perfect for short-term scouting missions where you plan on moving your camera around a lot.
How to Select the Right Stand for Your Environment
Knowing the different types of game camera stands is a good start, but the real skill is matching the right one to your specific terrain and target animal. Think of it like a puzzle. The terrain, the available anchor points, and your scouting goals are all pieces that have to fit together perfectly.
Getting this right from the start saves a ton of frustration and ensures you're gathering reliable intel. A stand that works flawlessly in a thick pine forest is completely useless in an open cornfield. This kind of strategic thinking is what separates a good scouting setup from a great one.
This decision tree gives you a quick visual for the most common choice you'll face: woods or open field.
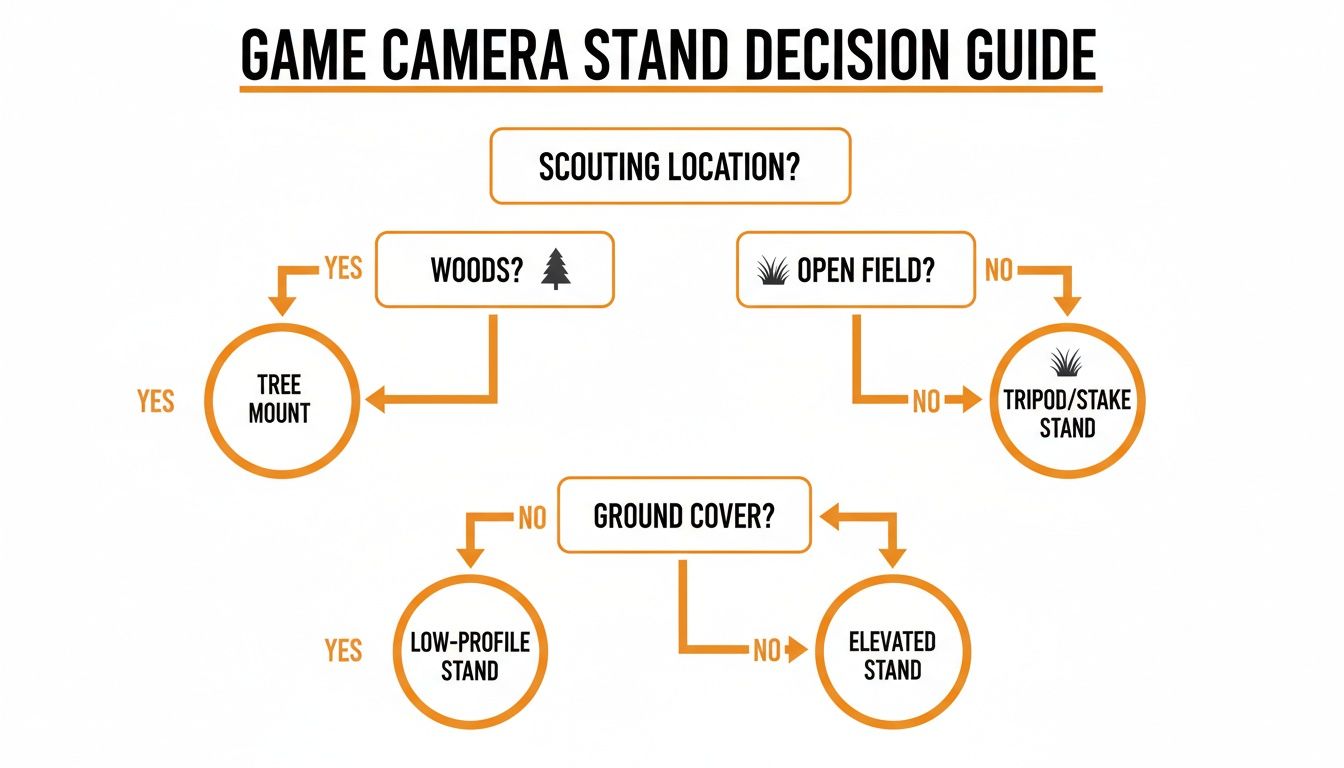
It really boils down to that first big decision. If you've got trees, use them. If not, you'll need a ground-based solution.
For Dense Forests and Wooded Areas
When you're deep in the timber or setting up along a wooded creek bottom, trees are your best friends. This is the natural habitat for tree screw mounts. Their biggest advantage is speed and stability; you can get one installed in under a minute and trust it to hold your camera steady through wind and rain.
The best part is the adjustability. You can screw the mount into the tree and then pivot the ball head to aim it exactly where you want—down a trail or at a scrape—even if the tree itself is crooked. This is how you get those perfect angles that catch deer movement without the camera sticking out like a sore thumb.
When scouting thick woods, a screw-in mount gives you the power to use just about any tree as a solid base. That kind of flexibility is crucial for setting up on tight travel corridors where your options are slim.
For Open Food Plots and Fields
Out in the open, a dedicated game camera stand really earns its keep. With no trees to work with, your strategy has to change. If you're setting up along a farm fence line, the t-post mount is an unbeatable choice. It clamps right onto an existing metal t-post, giving you a rock-solid, elevated view over a food plot. It's perfect for season-long monitoring.
But what if there are no fence posts? That's when a tripod stand or a ground stake becomes your go-to tool.
- Tripod Stands: These are the ultimate problem-solvers for open country. You can set them up literally anywhere, giving you a stable base on soft dirt, frozen ground, or even rocky soil.
- Ground Stakes: An auger-style stake is a fantastic, low-profile option. It’s perfect for the middle of a cut cornfield or a tall grass prairie where you need the camera hidden from both deer and other people.
For Tricky Terrains Like Creek Beds and Hillsides
Uneven ground is where a lot of hunters get tripped up. Creek beds, rocky ridges, and steep hillsides almost never offer a straight tree or a level patch of ground. This is the perfect scenario for a tripod game camera stand.
Because you can adjust each leg on its own, you can level your camera on a serious slope without any trouble. Imagine setting up on a rocky creek bank to watch a crossing—a tripod is often the only way to get a stable, level platform. This adaptability means you never have to compromise on camera placement just because the terrain is tough.
Matching Your Stand to Your Target Species
Finally, don't forget to think about the animal you're after. Your camera's height and stability needs change depending on what you're scouting.
- Whitetail Deer: A height of 3 to 4 feet is the sweet spot. This gives you a natural broadside view and is high enough to keep it out of a wary buck's direct line of sight. A t-post mount or a tripod works great for this.
- Elk or Bear: For bigger animals, you'll want a higher vantage point of 4 to 5 feet to get a better perspective. A taller tripod or a higher placement on a t-post is the way to go.
- Turkeys: When scouting turkeys, you need to get low. An angle from about 2 feet off the ground is perfect for capturing strutting toms without just getting photos of their backs. A short tripod or a ground stake is ideal here.
Mastering Placement for Flawless Scouting Footage

Alright, you've picked out the perfect game camera stand for your hunting grounds. Now it's time to put it to work. Proper placement is the final, critical piece of the puzzle that turns a good setup into a great one. This is where the small details can make a huge difference in your scouting footage, giving you clear, actionable intel instead of a memory card full of blurry leaves and sun glares.
Think of your camera as your silent, 24/7 scout. Your job is to give it the best possible vantage point to capture natural animal behavior without tipping them off. A few simple adjustments can prevent those common frustrations like false triggers and washed-out images, dramatically improving your results.
Dialing In the Perfect Height and Angle
The height of your camera is one of the most important variables in your setup. If you set it too low, you risk getting triggered by every squirrel and rabbit that scampers by or capturing nothing but legs. Too high, and you might only get pictures of the backs of your target animals. A dedicated stand gives you complete control over this crucial factor.
As a general rule, aim for the animal's chest height. It gives you a natural, broadside view.
- For Whitetail Deer: A height of 3 to 4 feet is the industry sweet spot. This is high enough to avoid spooking most deer but low enough to capture their entire body in the frame.
- For Larger Game (Elk, Bear): You'll want to aim a bit higher, around 4 to 5 feet, to get a comprehensive view of these bigger animals.
- For Turkeys and Predators: A lower placement of about 2 feet is ideal. This puts you at eye level with the animals, perfect for capturing strutting toms or wary coyotes.
Once you’ve got the height locked in, angle the camera slightly downward. This simple tilt helps fill the detection zone and ensures the camera triggers on your target, not on distant movement in the background.
Avoiding Sun Glare and False Triggers
Nothing ruins a great trail cam picture faster than direct sunlight blasting into the lens. That "lens flare" can completely wash out an image, making it impossible to identify anything. Even worse, the changing light and moving shadows from the sun can cause an endless stream of false triggers, draining your battery and filling your SD card with useless shots.
To prevent sun-related issues, always try to face your camera either north or south. This keeps the rising and setting sun from shining directly into the lens, giving you consistent lighting throughout the day.
This small step is one of the most effective ways to improve image quality and conserve battery life. While it's not always possible, making it a habit will pay off big time. Hunters are clearly investing more in quality setups like this; the global market for hunting and trail cameras hit USD 224.08 million in 2024 and is projected to reach USD 375.16 million by 2034. You can see more detailed market growth reports and discover how the industry is expanding.
Prepping the Site for Clear Shots
Before you walk away, take a minute to clear the immediate area in front of your camera. Even a single branch or a few tall weeds waving in the wind can trigger your camera's motion sensor over and over. It's one of the most common and frustrating sources of false alerts.
Take a few minutes to trim any grass, leaves, or small branches within the camera's detection zone—typically about 30-50 feet out. Your goal is a clean, unobstructed field of view. This ensures that when your camera does trigger, it’s because an animal is there, not just the breeze.
Pro Tip: Modern cameras like the Magic Eagle EagleCam 5 often have a live-view feature accessible through a mobile app. Use this to your advantage. After setting up your stand, connect to your camera and check the live feed on your phone to confirm your field of view is perfect before leaving the area.
This final check guarantees your camera is aimed exactly where you want it and that there are no hidden obstructions you might have missed. For a complete walkthrough of these fundamental steps, check out our guide on how to set up a trail camera for beginners. It's a great resource for getting the basics right every single time.
Securing Your Gear from Theft and the Elements
Leaving an expensive camera and a game camera stand out in the wild for weeks at a time is a recipe for worry. Let’s be honest, a visible setup can be an easy target for thieves or get knocked around by a curious bear. Protecting your investment isn't about just one thing; it's a smart strategy that mixes physical toughness with some modern digital tricks.
Your first line of defense is simply making your gear a pain to steal. Start with heavy-duty steel lockboxes. They act like a protective cage around your camera, stopping casual tampering and grab-and-go theft cold.
But a lockbox alone isn't enough. Pair it with a beefy cable lock. Python cables are famous for their cut-resistant braided steel, and you can thread one right through the lockbox and cinch it tight around a solid tree. That one-two punch makes it incredibly time-consuming for someone to just walk off with your camera. For a deeper dive on picking the right one, check out our guide on trail camera locking cables.
Hiding in Plain Sight with Smart Concealment
Even the best lock can't beat old-fashioned stealth. The real goal is to make your camera and stand blend in so well that they become invisible to both people and wildlife.
And effective concealment is more than just a camo pattern.
- Use Natural Cover: Don't just strap your camera to a bare trunk. Tuck your setup behind a cluster of saplings, inside a thicket, or at the base of a big fallen log. Use the branches and leaves around you to break up the clean, unnatural silhouette of the stand.
- Pick Unconventional Spots: Everyone looks for that perfect, straight tree right on the main trail. Avoid it. Instead, find a less obvious tree set back from the path, or use a ground-based stand hidden in tall grass where no one would think to look.
- Watch the Angle: A glint of sunlight off the lens is like a beacon. Try to position your camera so it doesn't catch the morning or evening sun. A north-facing setup is often your best bet to avoid that tell-tale flash.
If you're anchoring your stand into hard ground or rock for the long haul, getting good with tools is key. Mastering diamond drill bit techniques for robust anchoring can give you an extra layer of security that makes physical removal nearly impossible.
Your Digital Safety Net
Physical security is crucial, but modern cellular cameras give you a powerful digital safety net that's on duty 24/7. These features can be the difference between losing your gear for good and getting it back fast.
Cellular cameras with built-in GPS are a game-changer for security. If your camera gets moved, you can track its location in real-time on your phone, massively boosting your odds of recovery.
Brands like Magic Eagle build serious anti-theft tech right into their cameras. The EagleCam 5, for example, has GPS tracking that keeps reporting its location even if it’s turned off. It also sends photos to your phone instantly. So, if a thief is caught on camera, you have their picture before they even manage to pry the device loose. This digital defense adds a vital layer of protection and gives you the peace of mind that your scouting gear is always accounted for.
Powering and Connecting Your Remote Camera Setup
Okay, your game camera stand is rock-solid, the angle is perfect, and your gear is locked down. Now for the final piece of the puzzle: making sure your setup can run on its own for weeks, or even months, at a time. This is where a smart power strategy separates the amateurs from the pros, creating a truly hands-off system that won't have you spooking game every other weekend.
The number one enemy of any long-term deployment is a dead battery. Constant triggers from swaying branches, bitter cold snaps, and sending photos over a cell network all drain power fast. Trekking out to swap batteries isn't just a hassle; every trip you make leaves your scent behind, potentially changing the very animal behavior you’re trying to pattern.
Adopting a Sustainable Power Source
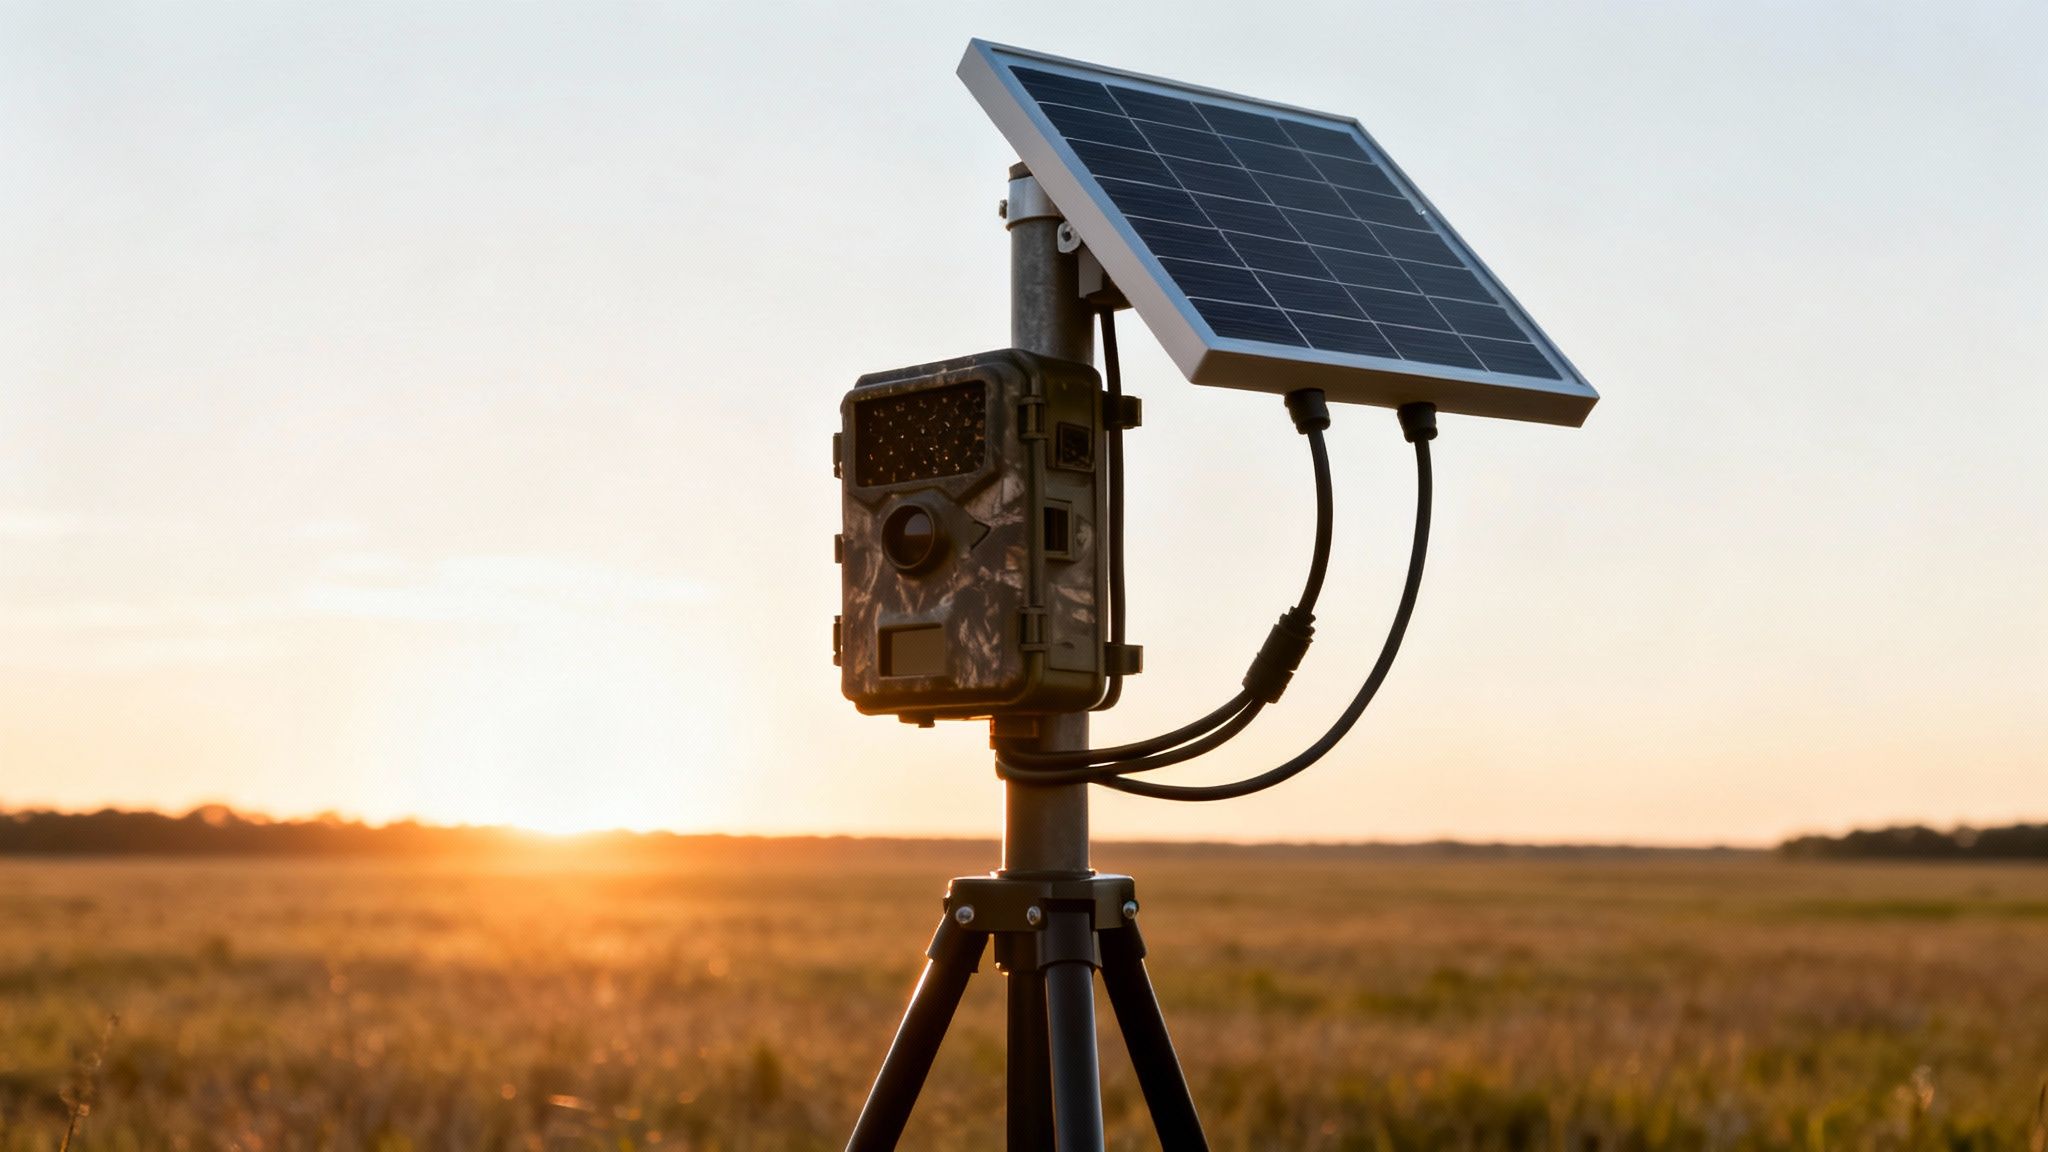
The best way to solve the battery problem for good is to pair your camera with an external power source. For off-grid reliability, nothing beats a solar panel. A small, well-placed panel will continuously trickle-charge an external battery pack or the camera’s internal one, giving it all the juice it needs to run 24/7. Many modern stands even come with dedicated mounting points just for this purpose.
- Mounting the Panel: Get that panel up high, either on the stand itself or a nearby branch. Make sure it has a clear, south-facing view of the sky to catch maximum sunlight.
- Cable Management: Run the power cable down the stand’s leg or frame and use zip ties or electrical tape to keep it tight. You don't want it flapping in the wind or giving a curious raccoon something to chew on.
- Weatherproofing Connections: Take a minute to wrap the connection point between the cable and the camera with electrical tape. This creates a simple, water-resistant seal that can prevent a lot of headaches down the road.
A setup like this transforms your camera into a powerful, autonomous scouting machine. To really dial in your system, check out our detailed guide on using solar panels for game cameras.
Ensuring Universal Compatibility
Here's some good news. The modern trail cam market has done a great job of standardizing its hardware. The vast majority of cameras and stands—including the Magic Eagle EagleCam 5—use the universal 1/4"-20 threaded mount. This is the exact same screw mount that photographers have been using for decades, which means your camera will connect seamlessly to just about any stand out there.
This universal standard takes all the guesswork out of pairing your gear. It means that as you upgrade your cameras or try out different stands over the years, your equipment will still work together. It's a simple feature that really protects your investment.
This kind of compatibility is a sign of a healthy, growing market. In fact, North America now accounts for over 40% of global trail camera revenue. To get the most out of your camera’s power, it’s worth looking into best practices for remote video monitoring systems to unlock some serious advantages.
Got Questions About Game Camera Stands? We've Got Answers.
Even when you've got all your gear laid out, a few questions always seem to pop up right before you head into the field. This is where we tackle the most common head-scratchers about using a game camera stand, giving you straight answers so you can set up your rig with total confidence.
Think of this as your final checklist—the last bit of know-how you need before a successful deployment.
How High Should I Mount My Game Camera on a Stand?
The perfect height all comes down to what you're trying to capture. Getting this right is the difference between a great shot of a buck and a blurry photo of its legs.
For whitetail deer, 3 to 4 feet off the ground is the sweet spot. This puts the camera right around chest level on a deer, giving you a killer broadside view without being so low that they get spooked.
If you’re chasing bigger animals like elk or bear, you’ll want to go a bit higher. Aim for somewhere between 4 and 5 feet to get a better perspective on their larger bodies. On the flip side, for smaller game like turkeys, dropping the camera down to about 2 feet will get you right at their eye level.
Pro Tip: No matter the height, always angle your camera down just a little. It’s a simple tweak, but it helps the camera focus its detection zone on your target area and dramatically cuts down on false triggers from things moving way off in the background.
Can I Use a Game Camera Stand Where There Are No Trees?
Absolutely. In fact, that's one of the main reasons these things exist. Those wide-open food plots, sprawling prairies, or freshly cut cornfields where trees are nowhere to be found? That's where stands like tripods and t-post mounts really prove their worth.
- T-post mounts are rock-solid for long-term setups, especially along fence lines in agricultural areas.
- Tripod stands give you total freedom. You can set up a stable camera on just about any surface, whether it’s soft marshland or hard, rocky ground.
These tools let you put your camera in the perfect spot, not just the most convenient one.
Are All Game Cameras and Stands Universally Compatible?
For the most part, yes. The industry settled on the standard 1/4"-20 threaded insert years ago—it's the same size you'll find on photography tripods. This means that pretty much any modern trail camera will screw right onto any aftermarket stand or mount without a problem.
That said, it never hurts to double-check the specs on both your camera and the stand before you buy. This is especially true if you're running an older camera model or looking at a weird, specialized mounting system that might be proprietary.
How Do I Protect My Camera Stand from Rusting?
Good stands are usually made from powder-coated or painted steel to fight off the elements. But let's be real—out in the woods, even the toughest coating is going to get scratched up, exposing the metal to moisture. Over time, that leads to rust.
To make your stand last, give it a quick inspection at the end of every season. Look for any chips or deep scratches. If you find some, just lightly sand the spot to knock off any surface rust, then hit it with a fresh coat of rust-resistant spray paint. A matte brown or green will blend in perfectly. And, of course, storing your stands in a dry shed or garage during the off-season will do wonders for preventing corrosion.
Ready to take your scouting to the next level with a setup that’s as smart as it is tough? Magic Eagle provides the advanced cellular cameras and rugged accessories you need to get the clearest intel from the field.