
A t post camera mount is a purpose-built bracket that lets you securely fasten a trail camera to a standard metal T-post. This simple tool is a game-changer, giving you a stable, go-anywhere monitoring solution, especially in spots where good trees are nowhere to be found.
Think open fields, food plots, and long fence lines—places where strapping a camera to a tree just isn't an option.
Why A T Post Mount Unlocks Better Trail Cam Footage
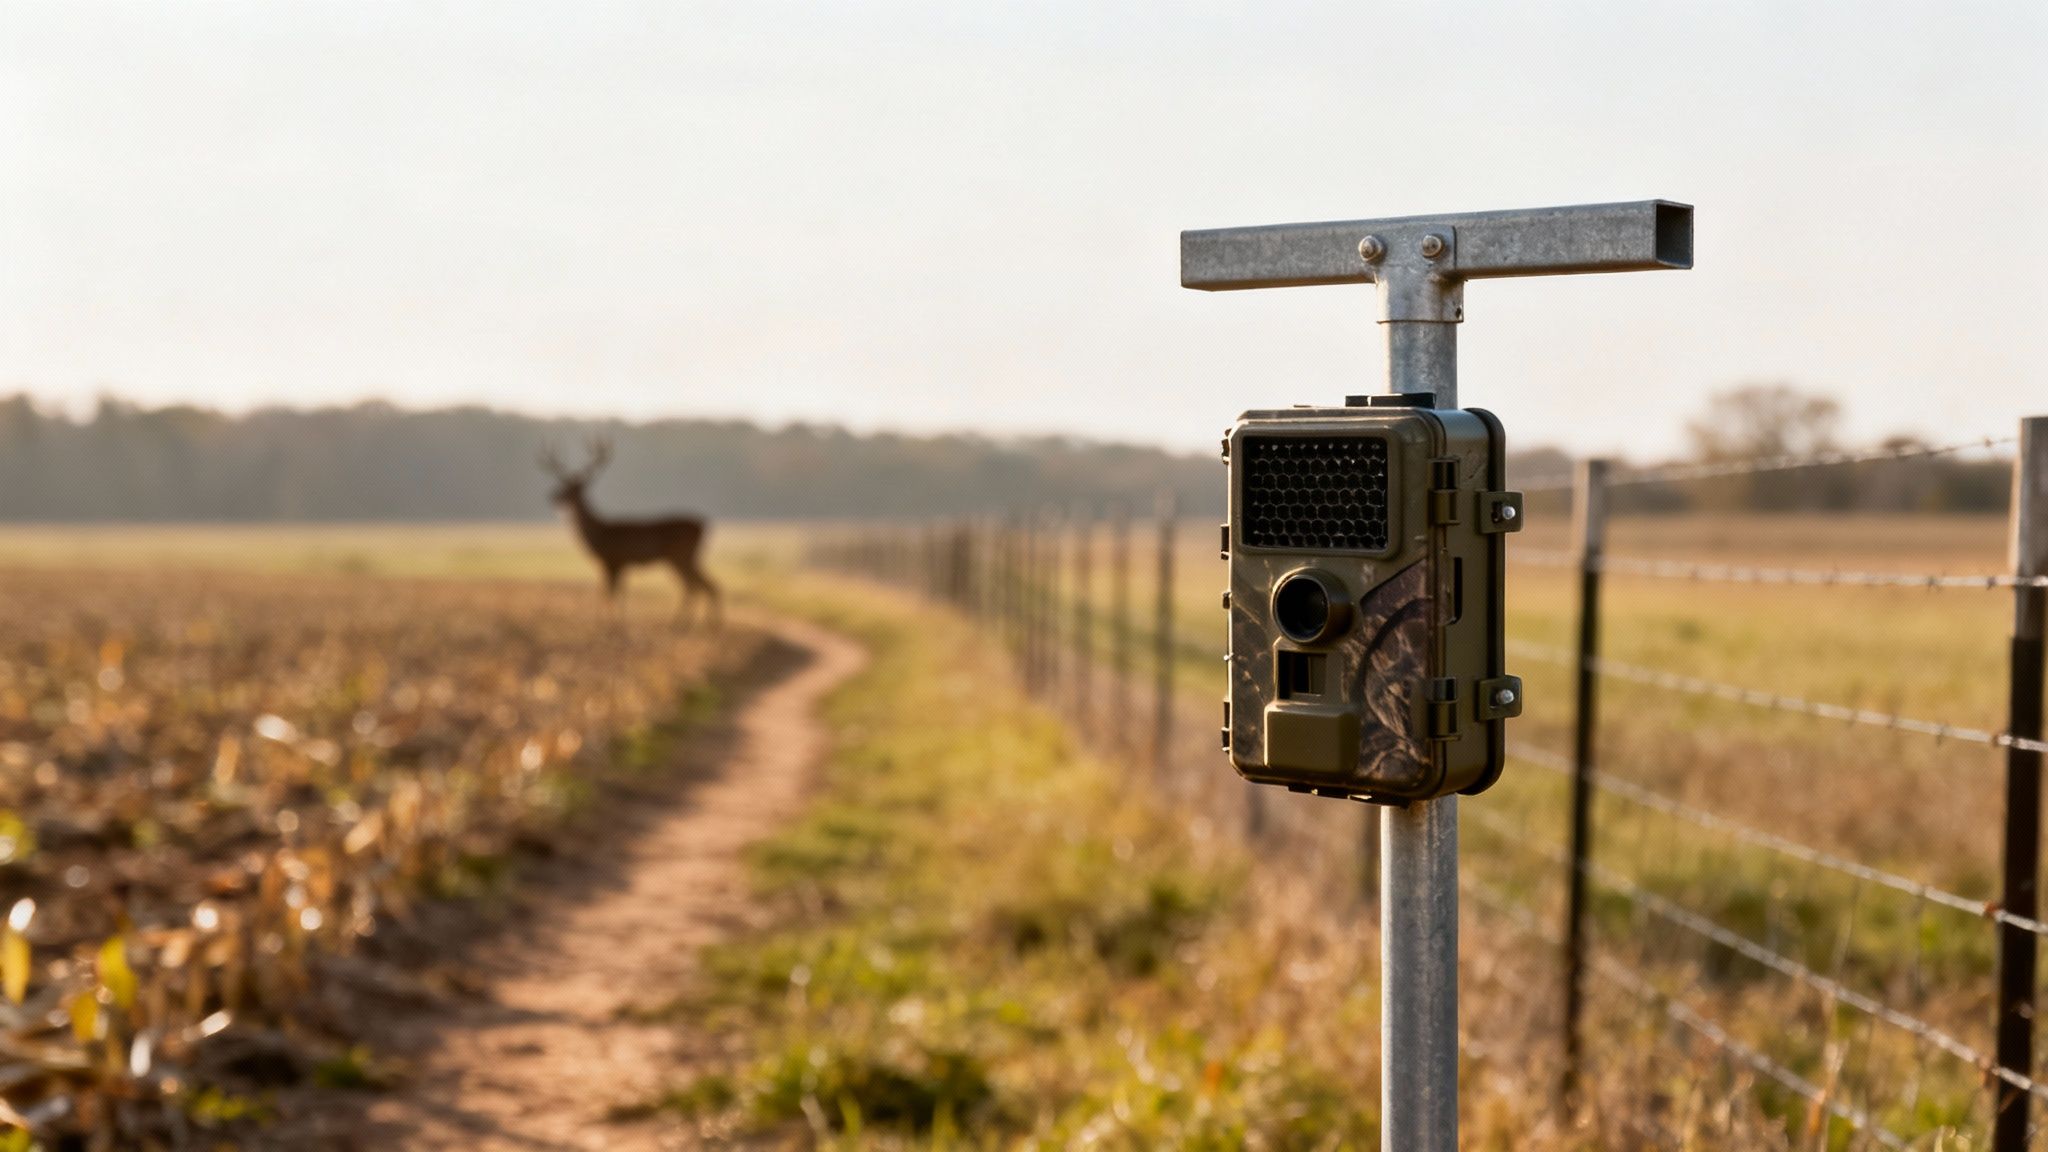
Shifting your cellular trail camera from a tree to a T-post isn't just a Plan B; it's a strategic move that puts you in complete control of your scouting. In so many of the best hunting spots—like the edge of a cornfield or a natural funnel along a fence—the perfect tree is rarely in the perfect spot. That's where a T-post setup becomes absolutely essential.
Instead of letting nature dictate where you can scout, you get to decide the exact location, height, and angle of your camera. This kind of precision lets you frame up a hot deer trail or a fresh scrape with an expert eye, guaranteeing your camera’s field of view is perfectly optimized.
Gaining Unmatched Stability and Control
One of the biggest advantages of using a steel T-post is its sheer rigidity. Unlike a flimsy tree branch that sways in the wind and floods your phone with false alerts, a properly installed T-post is rock-solid. This stability means fewer pictures of moving leaves and more high-quality images of actual wildlife. Your battery life will thank you, and your photo gallery will be much cleaner.
This method delivers a few key benefits:
- Total Placement Freedom: Put your camera anywhere you can drive a post. This opens up entirely new scouting possibilities in wide-open country.
- Reduced False Triggers: The immovable nature of a steel post drastically cuts down on motion alerts caused by wind, which saves both battery and data.
- Consistent Monitoring: You can create repeatable camera locations year after year. This is invaluable for reliable, long-term herd monitoring and patterning.
The real power of a T-post mount is its repeatability. When you find a productive spot, you can mark it and return your camera to the exact same vantage point every season, building a priceless historical record of animal movement.
A T-post and a dedicated mount offer a level of precision that a simple strap around a tree trunk can't match. To give you a clearer picture, here’s how the two methods stack up.
T Post Mount vs Tree Strap A Quick Comparison
| Feature | T Post Camera Mount | Traditional Tree Strap |
|---|---|---|
| Placement Options | Virtually unlimited; perfect for fields, fence lines, and open areas. | Limited to areas with suitable trees of the right size and location. |
| Stability | Excellent. A driven T-post is extremely rigid, minimizing wind-related false triggers. | Variable. Can be stable on a large trunk but prone to movement on smaller trees or limbs. |
| Adjustability | High. Offers precise control over height, angle, and orientation. | Limited. Adjustments depend entirely on the tree's shape and available branches. |
| Security | Good. Bolting the camera to a mount and post is a strong deterrent to theft. | Poor. Nylon straps are easily cut with a simple knife. |
| Ease of Installation | Requires driving a post, which can be tough in rocky soil. | Fast and easy, assuming a suitable tree is available. |
| Repeatability | Perfect. The post serves as a permanent marker for consistent camera placement year after year. | Difficult to replicate the exact height and angle season after season. |
While a tree strap is quick and easy, the control and stability offered by a T-post mount make it the superior choice for serious, long-term scouting.
A Smart Investment in Security and Longevity
Beyond performance, a t post camera mount gives you some built-in security advantages. A camera bolted to a solid steel post is a much harder target for thieves than one held on by a nylon strap that can be cut in seconds. This added security protects your valuable equipment, like the EagleCam 5, giving you peace of mind when you can't be on the property.
The explosive growth in trail camera usage highlights just how important reliable mounting solutions have become. The global market, valued at USD 125.7 million in 2025, is projected to hit USD 211.3 million by 2033, and a lot of that is driven by the strong hunting culture right here in North America. As more hunters depend on these devices for their pre-season homework, the demand for secure and effective setups will only grow. You can dive deeper into this trend by checking out the research from Grand View Research.
This growth shows just how crucial cameras are for understanding animal behavior, making a dependable mount a key piece of your overall strategy. To get better at identifying what you're seeing, check out our guide on finding bucks on trail cams.
Getting Your Field Kit Ready
A solid camera setup starts long before you ever step foot in the woods. Getting your tools and gear sorted out beforehand is the difference between a quick, clean install and a frustrating day that ends with a second trip home for a wrench you forgot.
The single most important tool you'll bring is a weighted T-post driver. Sure, you can whack a post in with a sledgehammer, but a proper driver is safer, faster, and the only way to guarantee the post goes in straight. If you're dealing with rocky or hard-packed dirt, a heavy-duty driver with good handles is non-negotiable—it gives you the force to punch through without bending your post.
The Right Hardware for the Job
Once your post is standing tall, it's all about securing the mount. Don't even think about just hand-tightening the bolts. That's a surefire way to end up with a camera that's spinning in the wind or sagging after a week.
You absolutely need a compact socket set or a couple of adjustable wrenches to properly lock down your t post camera mount.
Your hardware kit should have:
- A Socket Set: A small, portable one with common sizes like 7/16” or 1/2” will handle almost any mount out there.
- Adjustable Wrenches: Two small or medium-sized wrenches will tackle just about any nut and bolt combo you run into.
- A Level: A little magnetic torpedo level is perfect for making sure your post is perfectly plumb and your camera has a level horizon.
Pro Tip: Do a dry run at home first. Assemble the camera onto the mount before you head out. It’s a quick sanity check to make sure you have all the right screws and that everything fits, saving you from any nasty surprises in the field.
Choosing the Mount and Other Essentials
Not all T-post mounts are built the same. Some are just simple L-brackets, which can work. But the more advanced models, especially those with dual ball heads, offer way more flexibility.
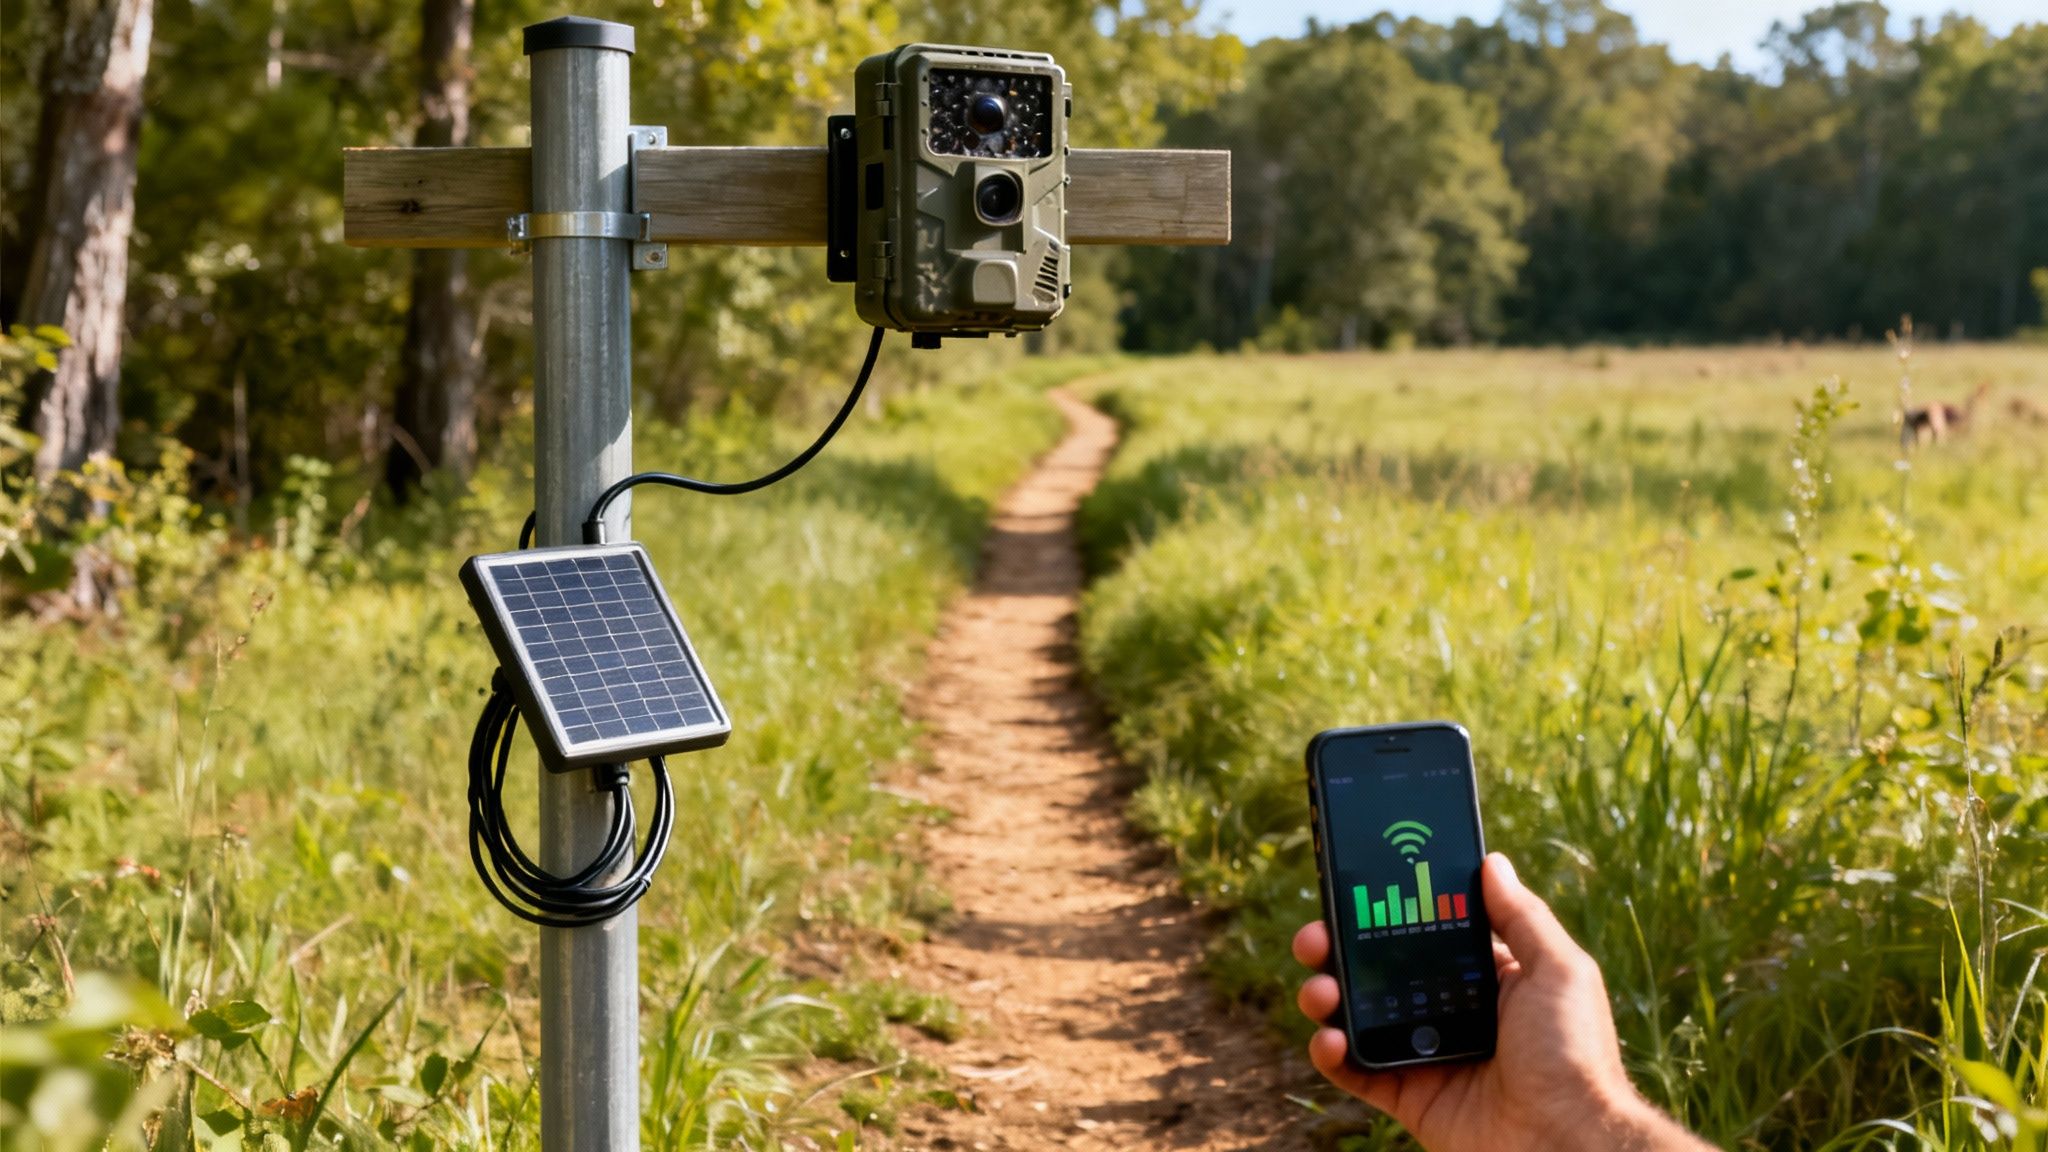
These let you aim the camera and a solar panel independently—a huge advantage. With a camera like the EagleCam 5, you can point the lens right at the trail while tilting the solar panel due south to soak up every bit of sunlight.
Finally, don't forget the finishing touches. A steel security lockbox is a great deterrent, and a python cable lock will secure the whole rig to the post. I always throw in a handful of extra zip ties, too. They’re perfect for managing the solar panel cable, keeping it tucked neatly against the post where it won't get snagged or chewed on by critters. A little prep goes a long way to making sure your camera is stable, secure, and ready to go from day one.
How to Install Your T Post and Mount for Rock-Solid Stability
Alright, with your gear in hand, it’s time to get dirty. This is where we build the foundation for your entire remote scouting setup, and trust me, a little extra effort now pays off big time with clear, stable footage all season long.
A solid installation really comes down to two things: picking the perfect spot and driving that post like you mean it.
First things first, let's talk location. This is easily the most important decision you'll make. Don't just look for a spot that covers the game trail or food plot; you have to think about the sun's path. Pointing a camera due east or west is a rookie mistake that leads to lens flare during sunrise and sunset, completely washing out your images. A north or south-facing camera is almost always the better play for consistent lighting.
This workflow breaks down the core components of the installation process into a simple, repeatable system.
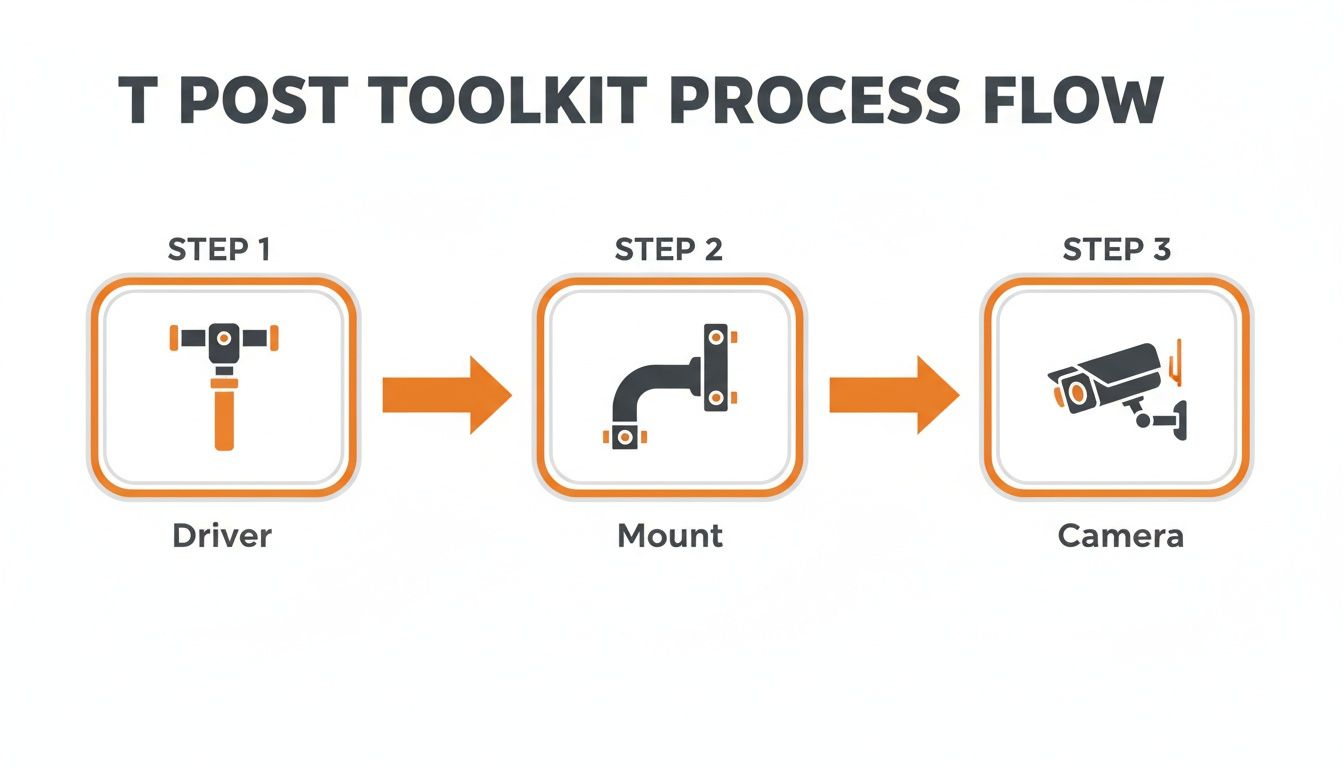
As you can see, it’s all about bringing three key elements—the driver, the mount, and the camera—together for a successful field setup.
Driving the Post for Maximum Rigidity
Once you’ve scouted the perfect spot, it's time to drive the post. Don't just eyeball it. Grab a small torpedo level and make sure the post is perfectly vertical as you pound it in. A slanted post won't just throw off your camera's angle; it's also far less stable against high winds and curious wildlife.
Use a weighted T-post driver for this job. It’s safer than a sledgehammer and gives you controlled, powerful impacts that sink the post straight down. You'll want to drive the post at least 18 to 24 inches into the ground. If you're working in soft or sandy soil, you might need to go even deeper to get that immovable base we're after.
A great field test for stability is what I call the "shake test." Grab the post firmly with both hands and try to wiggle it. If you feel any significant give or movement, it needs to go deeper. Period.
Attaching and Aiming Your Camera
With the post secure, grab your t post camera mount. Loosely bolt the mount to the post at your desired height—for deer, this is typically three to four feet off the ground. Before you crank everything down, attach your camera, like the Magic Eagle EagleCam 5, to the mount.
Now for the fun part. Pull up your camera’s live view feature on its companion app. This is hands-down the best way to fine-tune your field of view in real time.
- Check Your Aim: Pan and tilt the camera until it perfectly frames the scrape, trail, or mineral lick you're targeting.
- Level the Horizon: Make sure the image isn't crooked. A tilted view is just plain disorienting to look at.
- Confirm Detection Zone: Verify that the primary motion detection zone is covering the exact spot you want to monitor.
Once the view is absolutely perfect, tighten all the bolts securely with your socket wrench. Hand-tightening is never enough; you need a solid, mechanical connection that won't loosen after a month of wind and rain. For those dealing with really tough soil or wanting ultimate stability, you can even look into advanced techniques like anchoring posts to concrete.
Finally, if you're using a solar panel, attach it and angle it for maximum sun exposure, being careful not to create shadows in your camera’s view. For more setup ideas, check out our detailed guide on trail camera stands. A little planning here ensures your setup is not just stable but also smart.
Strategic Placement for Superior Detection and Signal
A rock-solid mount is a great start, but smart placement is what really separates an empty SD card from one filled with incredible wildlife photos. I’ve seen it a hundred times—the difference often comes down to just a few feet and a slight change in angle. Getting it right ensures your camera not only sees the action but also stays connected to send you those crucial updates.
One of the most common mistakes I see is pointing the camera straight down a trail. This almost guarantees blurry images or completely missed shots as animals zip through the frame. The fix is simple: angle your camera at roughly 45 degrees to the trail. This gives the camera’s sensor way more time to detect motion and snap a crisp, clear photo as the animal moves across the detection zone.
Finding the Cellular Sweet Spot
For a cellular trail camera, placement is a two-part puzzle. You need a good view, sure, but you also need a strong signal. Before you even think about driving your post into the ground, your first move should be a signal check. Just walk the area with your smartphone and keep an eye on the bars.
A single bar might be enough to send a text, but it's rarely reliable enough for transmitting high-res photos and videos. I always look for a spot with at least two or three consistent bars of service.
Pro Tip: Before you commit to a spot, use your camera’s own signal strength indicator. Power on the camera and let it search for a network. This gives you the most accurate reading of the signal the camera will actually use, which can sometimes be different from your phone’s.
Setting the Right Height and Angle
The height of your camera is just as critical as its angle. Different animals call for different perspectives, and the beauty of a t post camera mount is the freedom it gives you to adjust for your specific target.
Here are a few field-tested guidelines I stick to for camera height:
- Whitetail Deer: Set it at 3 to 4 feet. This gives you a perfect broadside view for identifying bucks and watching herd dynamics.
- Turkeys: For smaller game like turkeys, I drop the camera down to about 2 feet. This puts the lens right at their level for great body shots and strutting displays.
- Bears or Hogs: These critters often require a higher placement of 5 to 6 feet, angled down slightly. This helps keep the camera out of their reach and gives you a better top-down perspective.
The reliance on these cameras is exploding. North America now accounts for over 30% of global trail camera deployments, with nearly 62% of hunters in the region using them for scouting. This boom is pushing for smarter features, like the SignalSync technology in the EagleCam 5, which automatically hunts for the strongest network signal. You can dig deeper into the market data in reports from 360iResearch.
Advanced Security and Weatherproofing Strategies
Let's be honest—your trail camera is a serious investment in your scouting. Leaving it out in the middle of nowhere means you have to outsmart both two-legged thieves and mother nature. A solid, weatherproof setup is the only way to make sure your gear is still there and still running when you need it.
Physical security starts with brute force prevention. A heavy-duty steel lockbox designed for your specific camera model isn't just a good idea; it's non-negotiable. These things are built to take a beating. When you pair one with a quality python cable, you can lock the camera, box, and mount directly to the T-post. That alone is enough to make most casual thieves move on to an easier target.
Fortifying Your Setup Against Theft
Going beyond the basics, the quality of your hardware really matters. When you're locking up the camera housing, it's worth understanding what makes a good lock. Believe it or not, guides on choosing the best padlocks for storage units are a great resource, since the same principles of shackle strength and pick resistance apply here.
But a strong lock is only half the battle if your camera sticks out like a sore thumb. Camouflage is your next critical layer.
- Use Natural Cover: Whenever you can, pound that T-post in near a small bush or a clump of tall grass. Anything to break up that hard, straight silhouette.
- Wrap It Up: Grab some adhesive camo tape or a fabric wrap and go to town on the camera, the lockbox, and even the post itself. It’s a simple step that makes a huge difference.
- Bring in the Locals: Use a few zip ties to attach some small branches or leaves from the immediate area directly to the post. It sounds almost too simple, but this trick works wonders for making the whole setup just disappear into the background.
Here's where modern tech gives you an edge. A camera like the EagleCam 5 has geofence alerts built-in. You just draw a virtual boundary around your camera's location in the app. If that camera moves an inch outside that boundary, you get an instant notification on your phone, giving you a chance to react fast.
Weatherproofing for Uninterrupted Operation
Harsh weather can be just as destructive as a thief. Rain, snow, and brutal temperature swings will sideline your camera if you’re not prepared. Most decent trail cams are built to be weather-resistant, but a few extra tricks will keep them running flawlessly through the absolute worst of it.
First, lock down your connections. Any spot where a cable plugs into the camera—especially from a solar panel—is a potential entry point for moisture. A small dab of silicone sealant or a quick wrap of electrical tape around that connection point creates a waterproof seal. This tiny detail can prevent the kind of corrosion and short-circuiting that kills cameras over time.
You might also want to rig up a simple rain shield. You can fashion a small "roof" out of a piece of plastic or metal and attach it to the post just above your camera. It doesn't have to be pretty; it just has to deflect the worst of a downpour and keep water from pooling on the housing or running down the lens. These are the kinds of small, practical steps that keep your t post camera mount setup running reliably all season long.
For more ideas on locking down your gear, check out our guide on game camera lock cables. It’s packed with more pro tips.
Common T Post Mount Questions Answered
When you're out in the field messing with a trail camera, a few nagging questions always seem to come up. Getting good, practical answers can be the difference between a perfect setup and a day of frustration. We've pulled together the most common questions we hear about using a t post camera mount and laid out some straightforward, field-tested answers.
Think of this as your go-to guide for those little hiccups that can stop a great installation dead in its tracks. Let's get your gear running with confidence.
What Is the Best Height to Set My Trail Camera on a T Post for Deer?
For whitetail deer, the magic number is usually somewhere between 3 to 4 feet off the ground.
This height gives you a fantastic broadside view of the animal, which is exactly what you want for identification and judging antler size. Placing your camera at this level on a T post also keeps it just below a deer's natural line of sight, so they're far less likely to spot it.
Bonus—it's also a great height for keeping your lens out of reach of curious raccoons and other small critters that love to tamper with things. Before you walk away, always pop open your camera’s app and use the live view function to make sure your frame is perfect.
How Can I Stop My T Post Camera Mount from Spinning or Moving?
A camera mount that spins, sags, or droops is a classic problem, but thankfully, it’s an easy fix. First thing's first: tighten every single bolt with a wrench. Hand-tightening is never going to be enough to hold up against wind, rain, or a nosy cow bumping into the post.
Here's a great field trick for clamp-style mounts: wedge a small strip of rubber gasket material or some heavy-duty grip tape between the mount and the post itself before you crank it down. This adds a massive amount of friction and will stop that mount from rotating, even under some serious pressure.
Another simple but effective move is to position the mount so it rests right up against one of the T post's raised studs. Those little nubs act as a physical stop, preventing any downward spin over time.
Can I Use A Solar Panel with A T Post Camera Mount?
Absolutely. In fact, it's one of the biggest perks of using this kind of setup. A T post gives you a clean, unobstructed platform to mount a solar panel.
Many modern mounts, especially the dual ball-head models, even come with a dedicated bracket just for a solar panel. This lets you aim the panel and the camera completely independently of each other.
If your mount doesn't have a spot for one, no sweat. Just grab a small, separate clamp-on mount for the panel. To get the most juice, face the panel south (if you're in the Northern Hemisphere) with a clear shot of the sky. Then, use a few zip ties to run the cable neatly down the post, keeping it tight so wildlife can’t chew on it or get tangled up. Do this, and your camera will have continuous power for 24/7 scouting.
At Magic Eagle, we make gear for hunters who can't afford to have their equipment fail. The EagleCam 5 is built to perform in the roughest conditions, and pairing it with a solid T-post setup gives you unmatched scouting intelligence. See how our smart cellular trail cameras can change your hunt at https://magiceagle.com.